Work with Sessions
Learn how to create and manage Sessions: custom presets of Properties, filters, sorting options, and appearance options that you can recall in the application. Also, you will learn how to share a Session with other Users of the same application.
Abstract
- What are the Sessions? Learn about the what are the Sessions in eLegere.
- How to Save your Customizations as a Session Learn how to save your Properties, filtering, sorting, and appearance options as a Session.
- The Sessions Page Learn about the main page to manage all your Sessions.
- Update the Session with new customizations Learn how to modify a Session's customizations.
- Create a new Session from an existing one Learn how to create a new Session starting from an existing one.
- Load a Session when launching an application automatically Learn how to make a Session the Default Session and load it automatically at each access.
- Export the Session's Data Learn how to export the rows' data from a Session.
- Share a Session Learn how to share a Session with other users having access to the application.
What are the Sessions?
Learn about the what are the Sessions in eLegere.
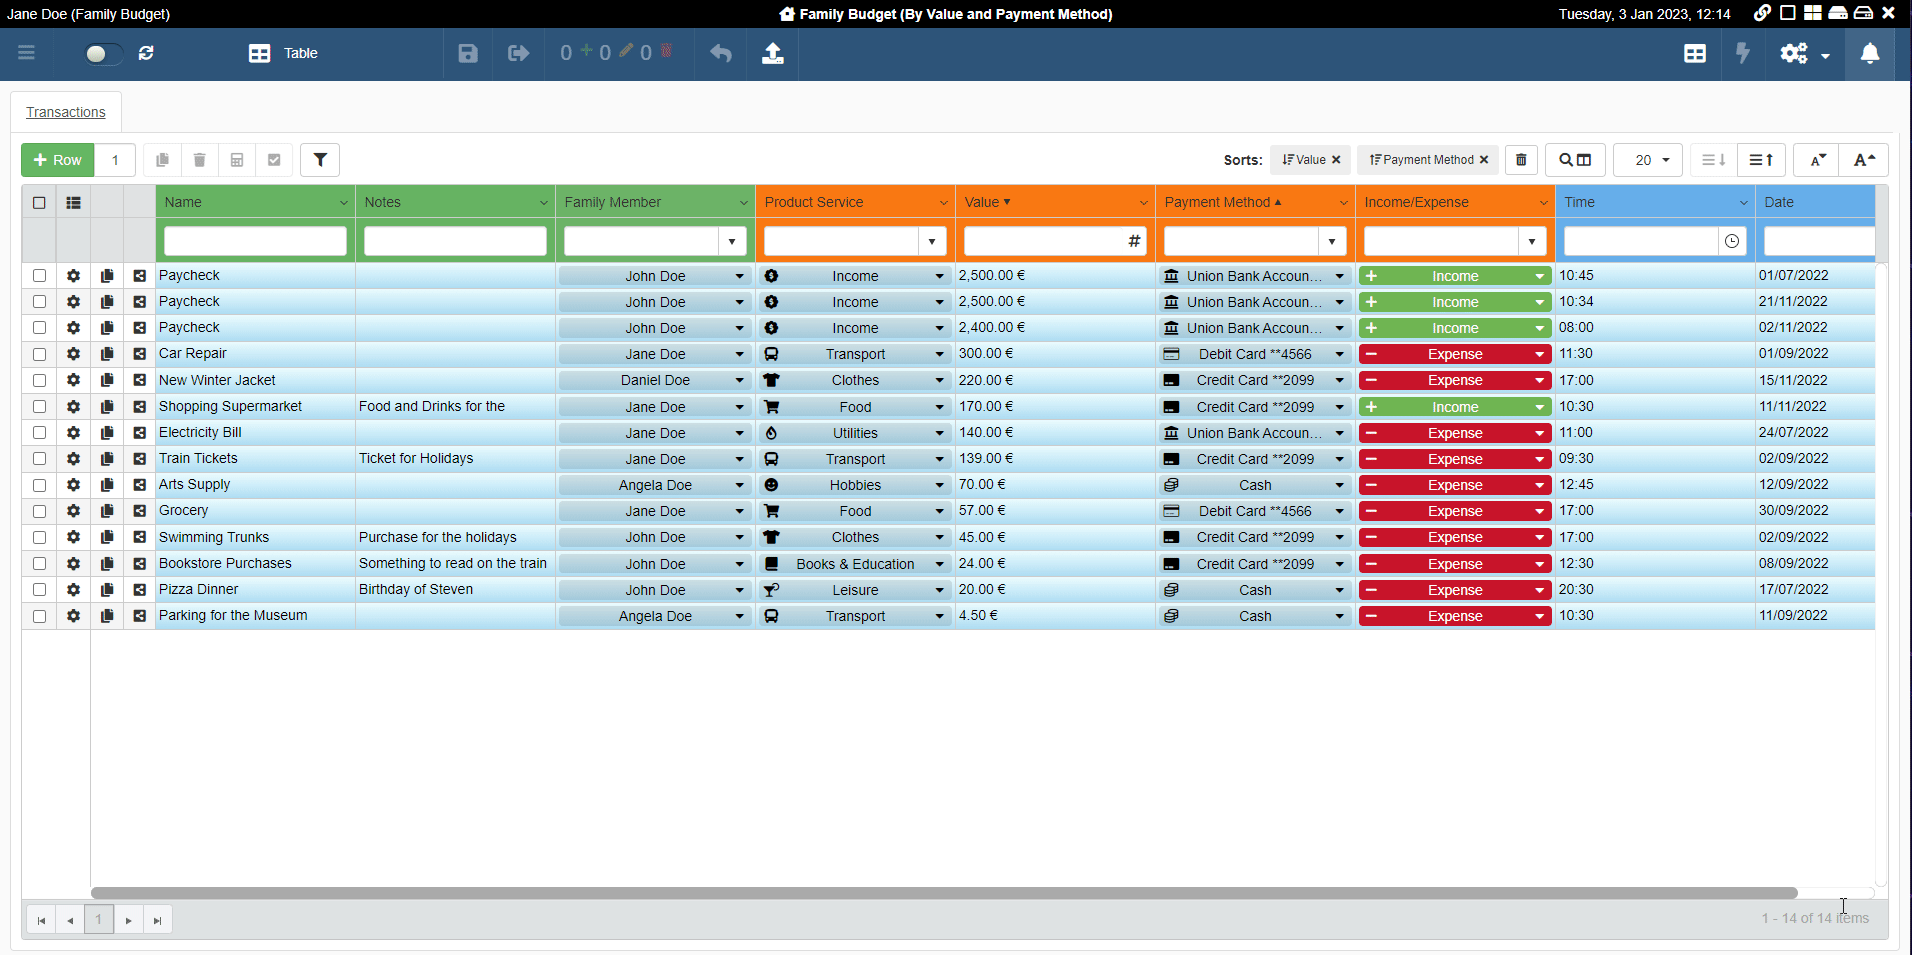
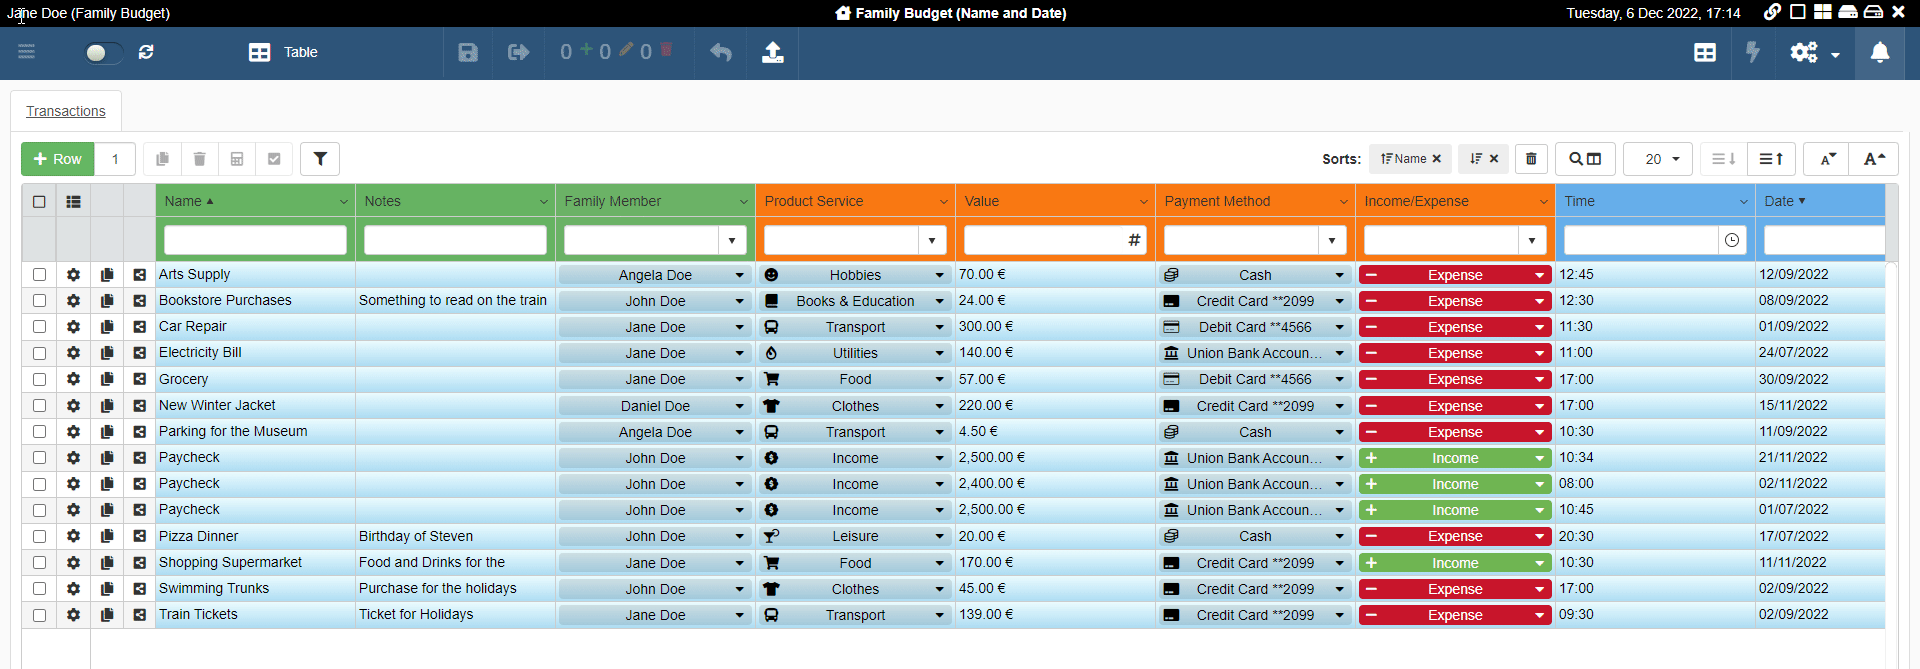
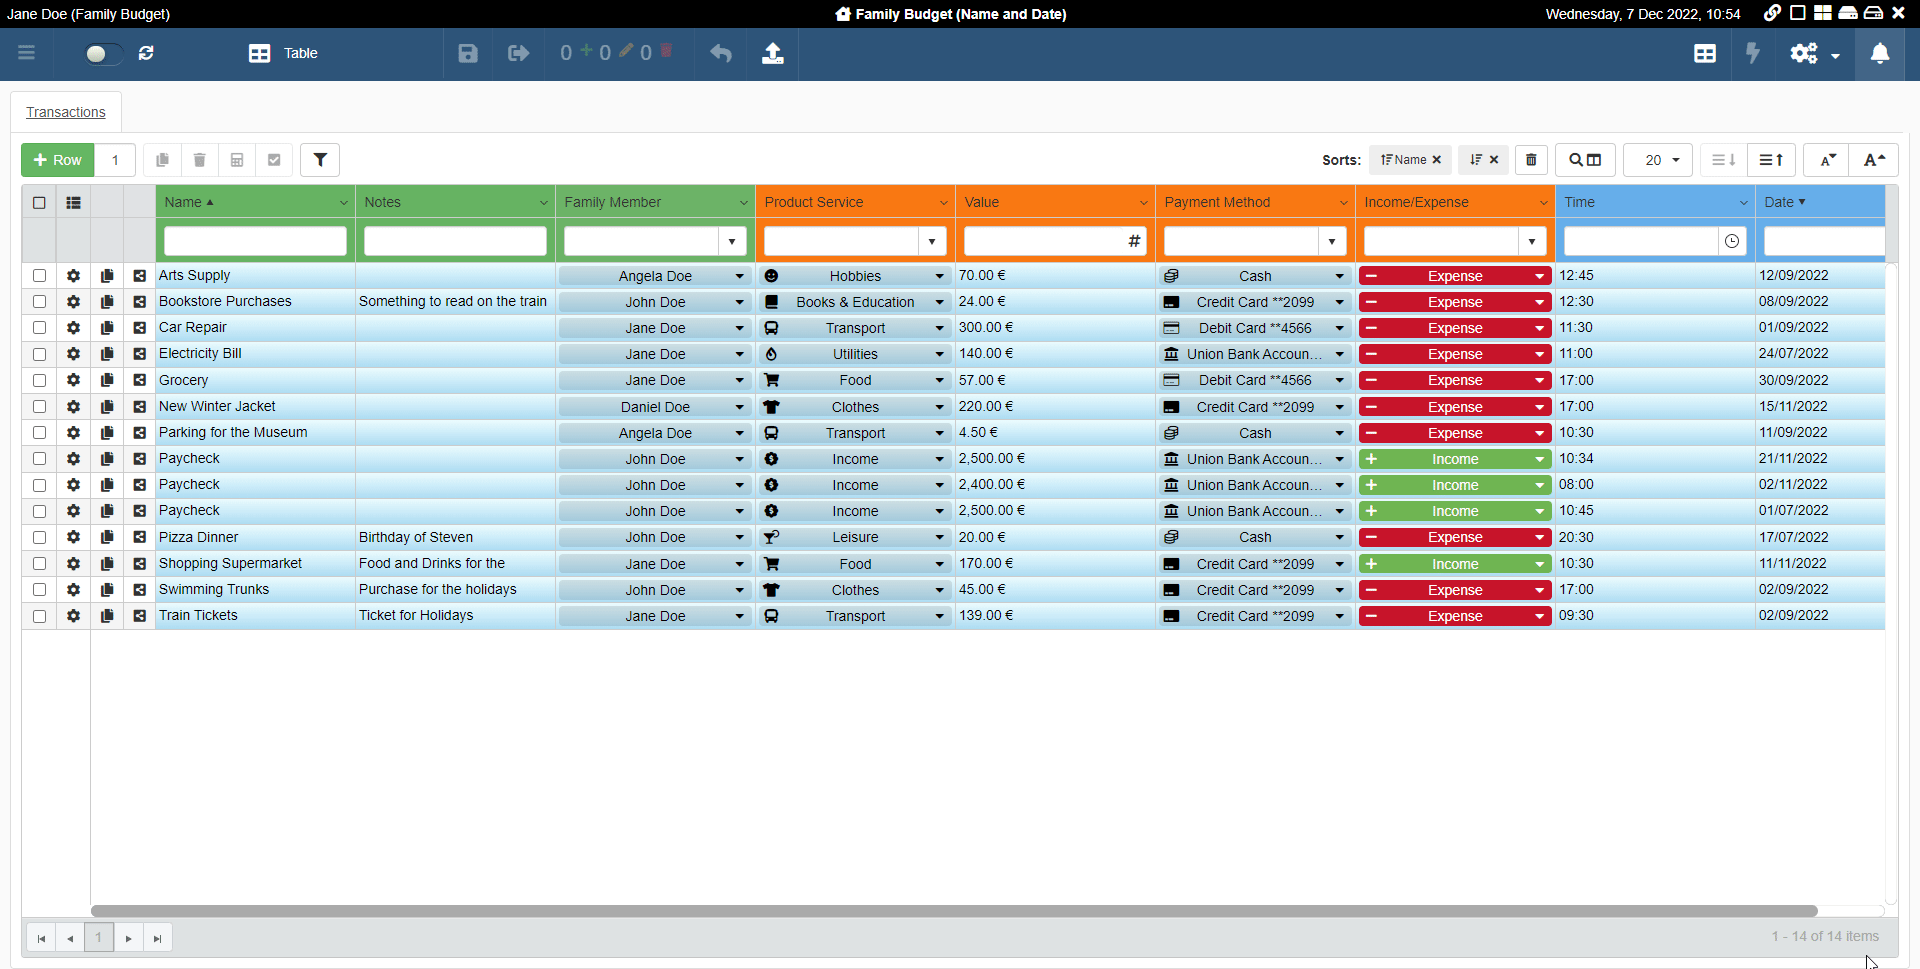
Sessions are presets of Properties, filters, sorting, and appearance options that you save, modify, and load for the current application.
Sessions avoids you the effort to set up at every access the same Properties, filters, sorting, and appearance options manually. One click and the application will load all the settings without any action from your part.
- Users can create as many Sessions as they want for an application.
- Users can customize and modify a Session they have created at any time.
Info
Every time you access an application, you are in an new empty Session for that application. An empty Session is a Session with no enabled customizations.
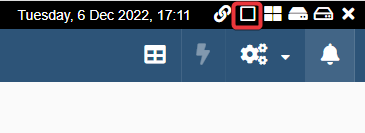
Users can find all the commands related to Sessions in the upper-right corner of any application.
If there are no saved Sessions: there will be only the Save Session As button () in the upper-right corner. It means that you are currently in a new empty Session. (See Create a Session for more information about empty Sessions.)

If there are one or more saved Sessions: the upper-right corner displays the following buttons.

From the left to the right:
- Reopen the current Application, using an empty session () Relaunch the application without any personalization. Appears if a Session is active.
- Sessions () Opens the drop-down list of saved Sessions.
- Save Session As () Save the actual settings as a new Session.
- Save Session () Overwrites the Session with the current settings.
Note
The other two buttons on the upper-right corner are not related to Sessions. The Copy application's link button () yields a link to share the application with other eLegere users having proper permissions. The Close button () closes the application.
How to Save your Customizations as a Session
Learn how to save your Properties, filtering, sorting, and appearance options as a Session.
In particular, you will learn how to create Sessions and switch among them
Create a Session
You will learn how to save as a preset your customizations within an application.
Every time you access an application, eLegere creates a new empty Session for that application. An empty Session has no customizations.
During your Session, you can add Properties, filters, columns' sorts, and customize the table appearance (e.g. hiding a column). You can save your actual Session to recall it any time. The action avoids you to set up all the options in a new empty Session at each access.
Follow the following steps to create a Session:
-
In the upper-right corner of the application's top strip bar, click on the Save Session As button ().
The action will open the Save Session window.
-
In the Save Session window, insert the following information to identify your Session. (The
optionaltag points the optional information not essential to save the Session.)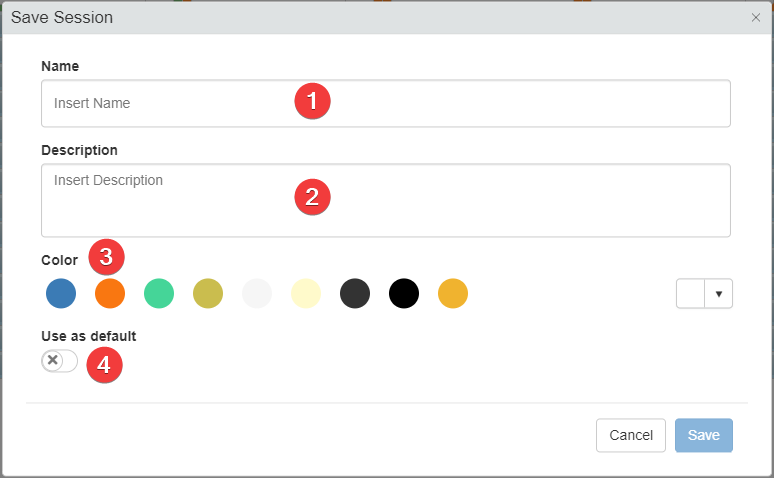
- (1) Name Insert a name to identify the Session.
- (2) Description Insert a Description explaining what settings the Session saves.
optional - (3) Color Choose a color to identify the Session or leave the default color.
optional - (4) Use as default The toggle switch sets up the Session as default: at every access, the application will load this Session. (See Load a Session when launching an application automatically for more information.)
optional
-
Click on the Save button to save the Session. Click on the Cancel button to abort the creation.
A notification will confirm the success in saving the Session.
Also, the Session's name will appear next to the application's name.

Switch between Sessions
Learn how to switch between Sessions you have created.
If you have one or more saved Sessions, you can either switch between Sessions or open an empty Session.
Inside an application, clicking on the Sessions () button opens the Sessions List with all the Sessions available for the current user..
You can load a Session at any time by following the steps below.
-
Click on the Sessions () button on the application's top strip bar in the upper-right corner. The action opens the Sessions List.

-
The Session List below the search bar lists all the saved Sessions available. Select the Session you want to load. The name and color identify each saved Session.
The application will load the selected Session.
Note
If you have set up a Session as the Default: the application will load the default Session automatically at the access. (See Create a Session and Load a Session when launching an application automatically for more information about saving a Default Session.)
If you have saved multiple Sessions, you can search the list of Sessions through the search bar.
-
In the Sessions List search bar, click on the textbox and type the name of the Session you are looking for.
-
Click on the Session you want to load from the results.
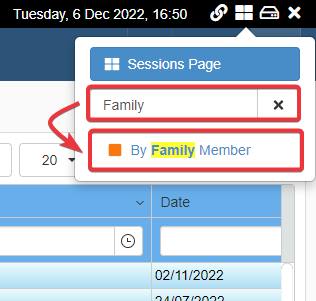
The action will load the preferred Session from the results.
You can also decide to exit the Session. In such case, the application will open a new empty Session.
If a Session is loaded in the application, the Reopen the current Application, using an empty session () button will appear in the top-right corner of the application's top strip bar.
You can exit the current Session by clicking on the Reopen the current Application, using an empty session () button.
The action leads back to the application with an empty Session.
The Sessions Page
Learn about the main page to manage all your Sessions.
In Switch between Sessions, you have learnt how to switch between Sessions or open an empty Session with no customizations.
The Sessions Page is the panel that manages all the Sessions. It offers more tool than the Session List. If you have to perform actions more complex than saving and recalling a Session, the Sessions Page offers more features to manage all your Sessions.
You will first learn how to enter the Sessions Page and the basics of its panel. An explanation of how to manage the Sessions will follow.
- Entering the Sessions Page
- The Sessions Page Panel
- Organize Your Sessions
- Customize Session Appearance
- Delete a Session
Entering the Sessions Page
You can access the Sessions Page in two ways:
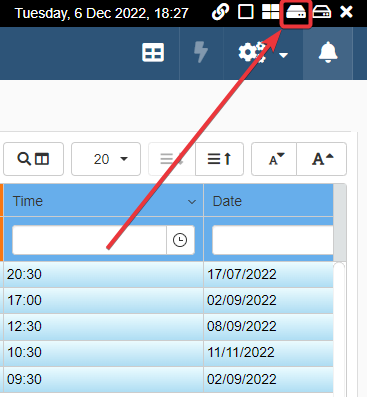
From the Home Panel
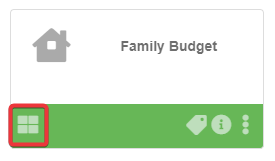
You can access to an application's Session Page from the Home. Click on the icon on the application's tile to open its Session Page.
Note
The icon appears if the application has at least one saved Session.
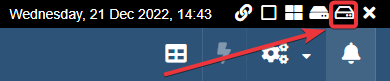
From within the Application
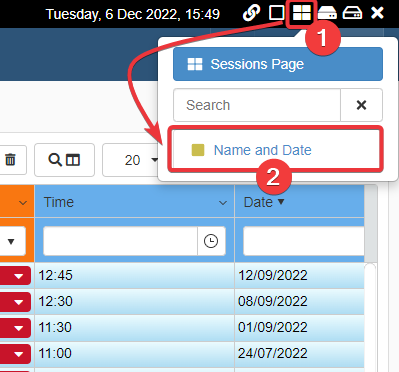
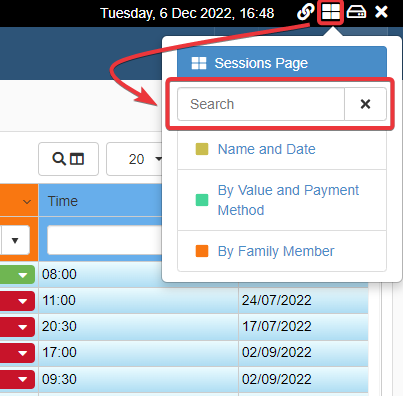
You can access the Sessions Page by clicking on the Sessions () button on the application's top strip bar in the upper-right corner.
-
Click on the Sessions () button. The action opens the Sessions List.
-
Click on the Sessions Page button. The action leads to Sessions Page.

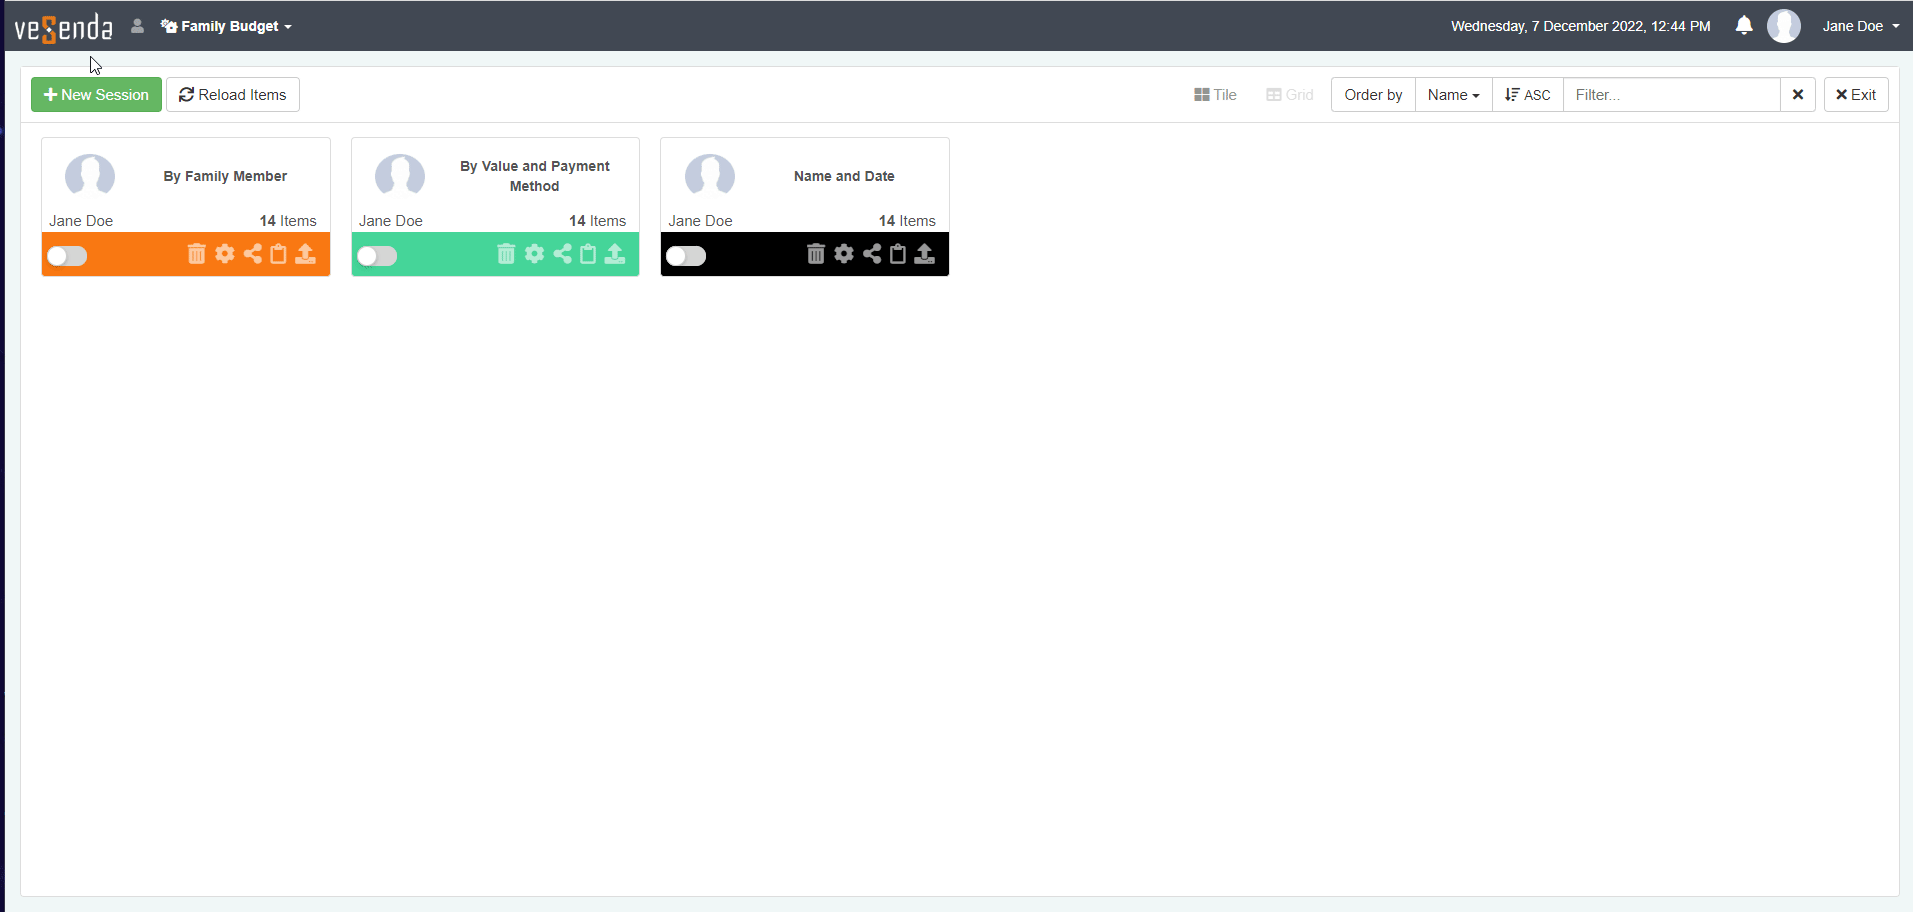
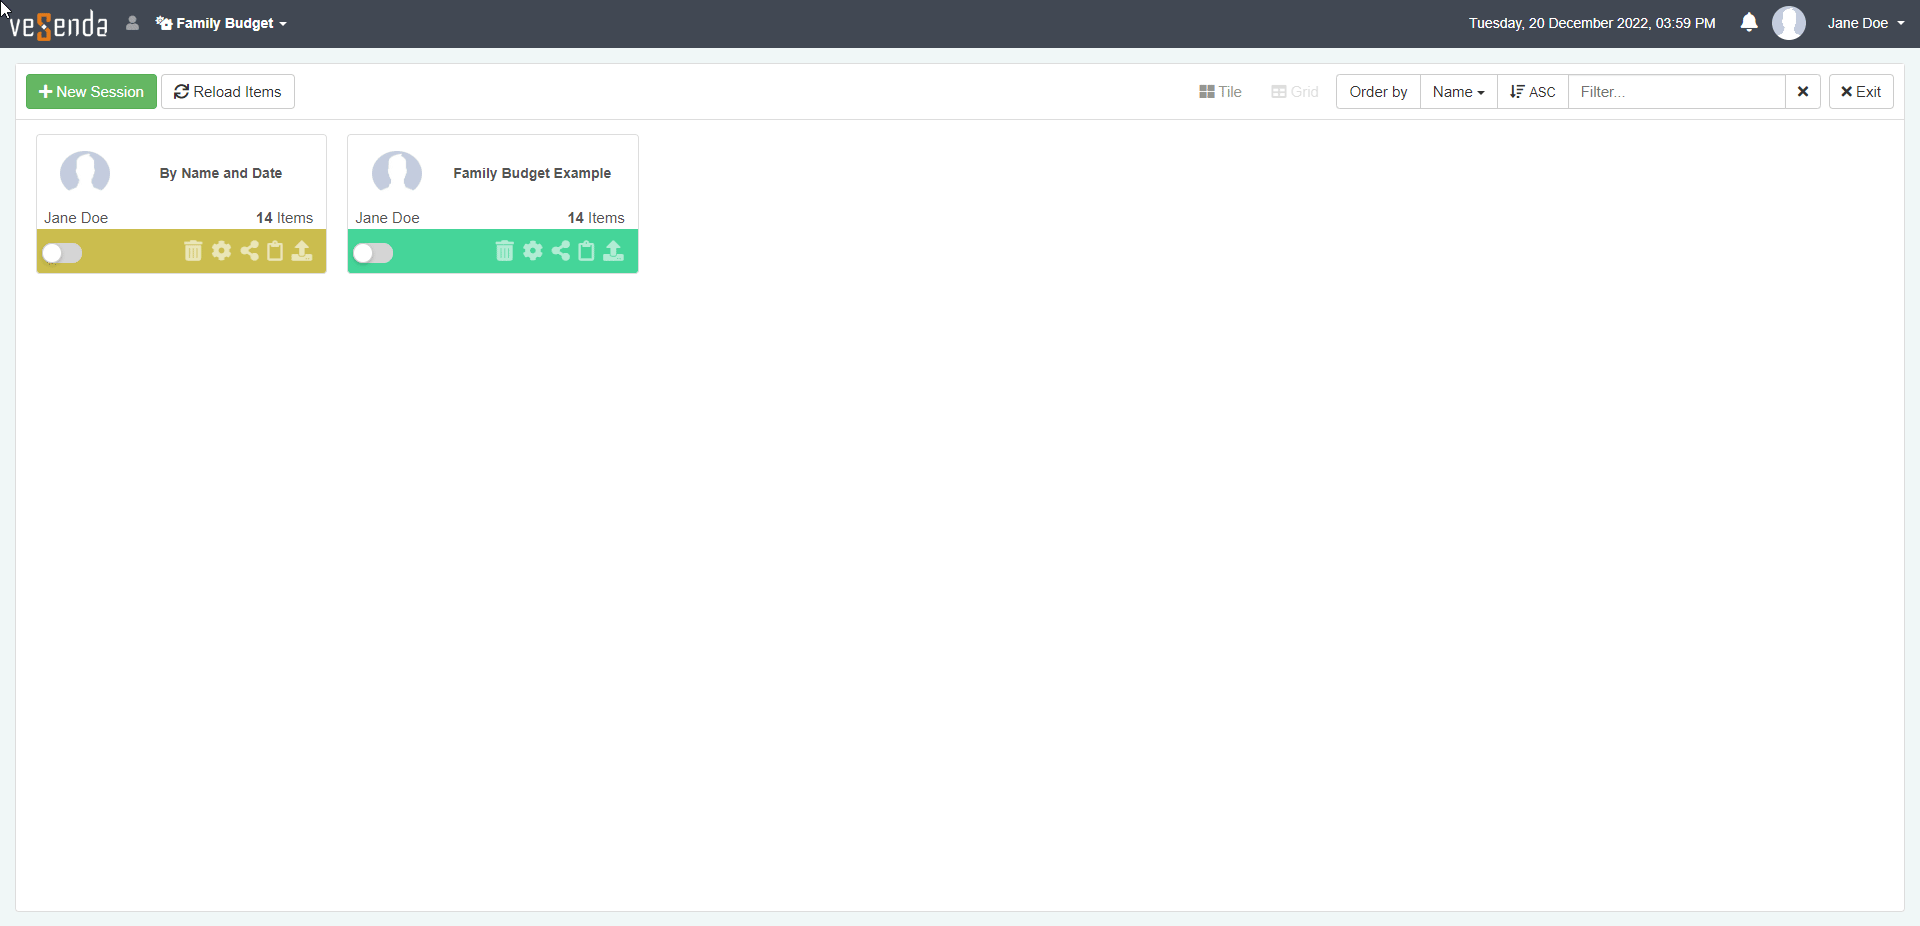
The Sessions Page's Panel
Learn about the Sessions Page's organization.
The Sessions Page offers two view modes: the Tile view and the Grid view. From both the views you can open and manage your Sessions.
The Tile view is the default view when entering.
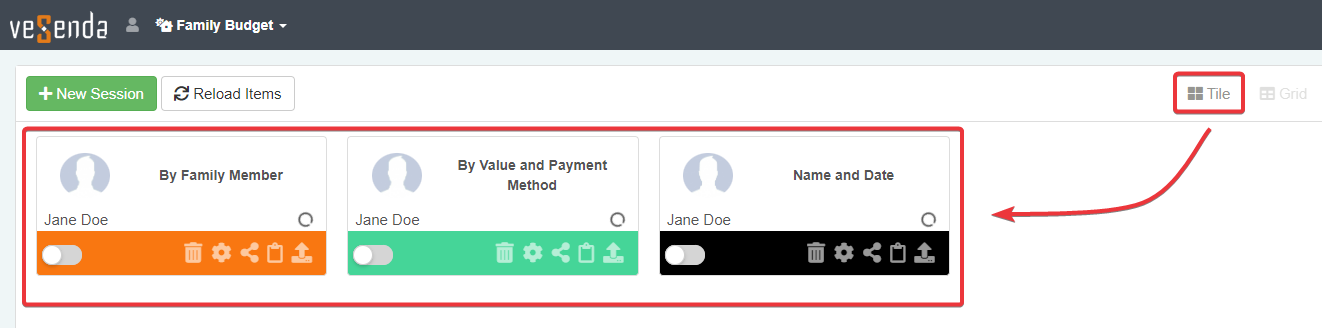
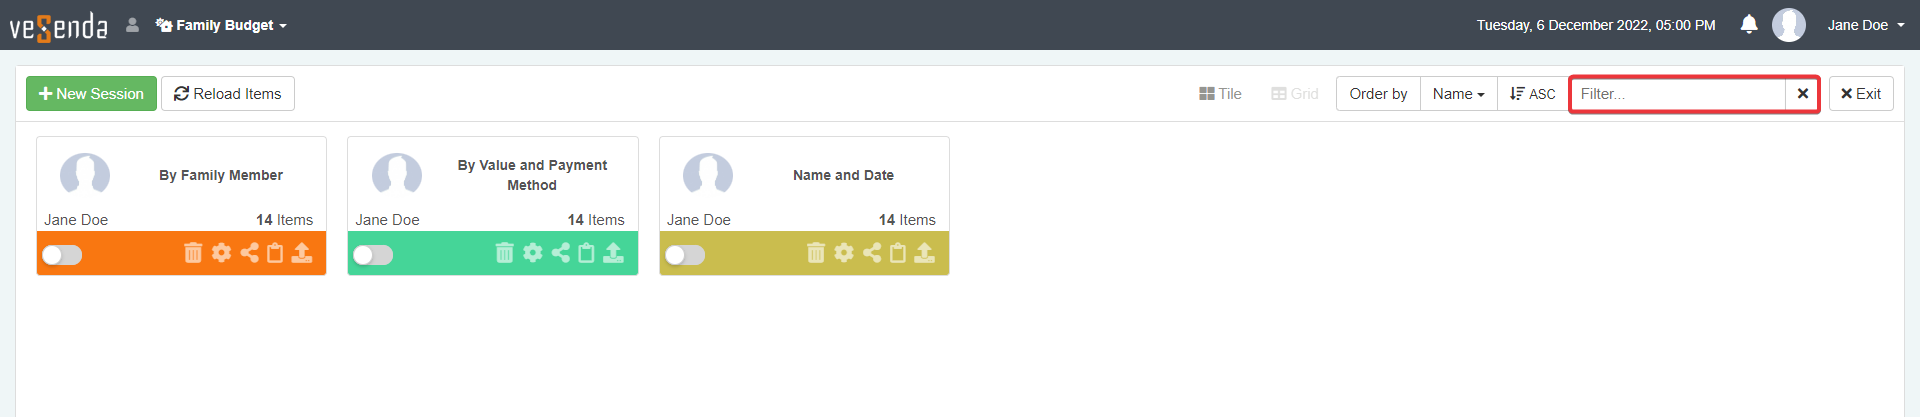
Tile View
A brief explanation of the Sessions Page's Tile view.
When landing on the Sessions Page, the default view for the panel is the Tile view.
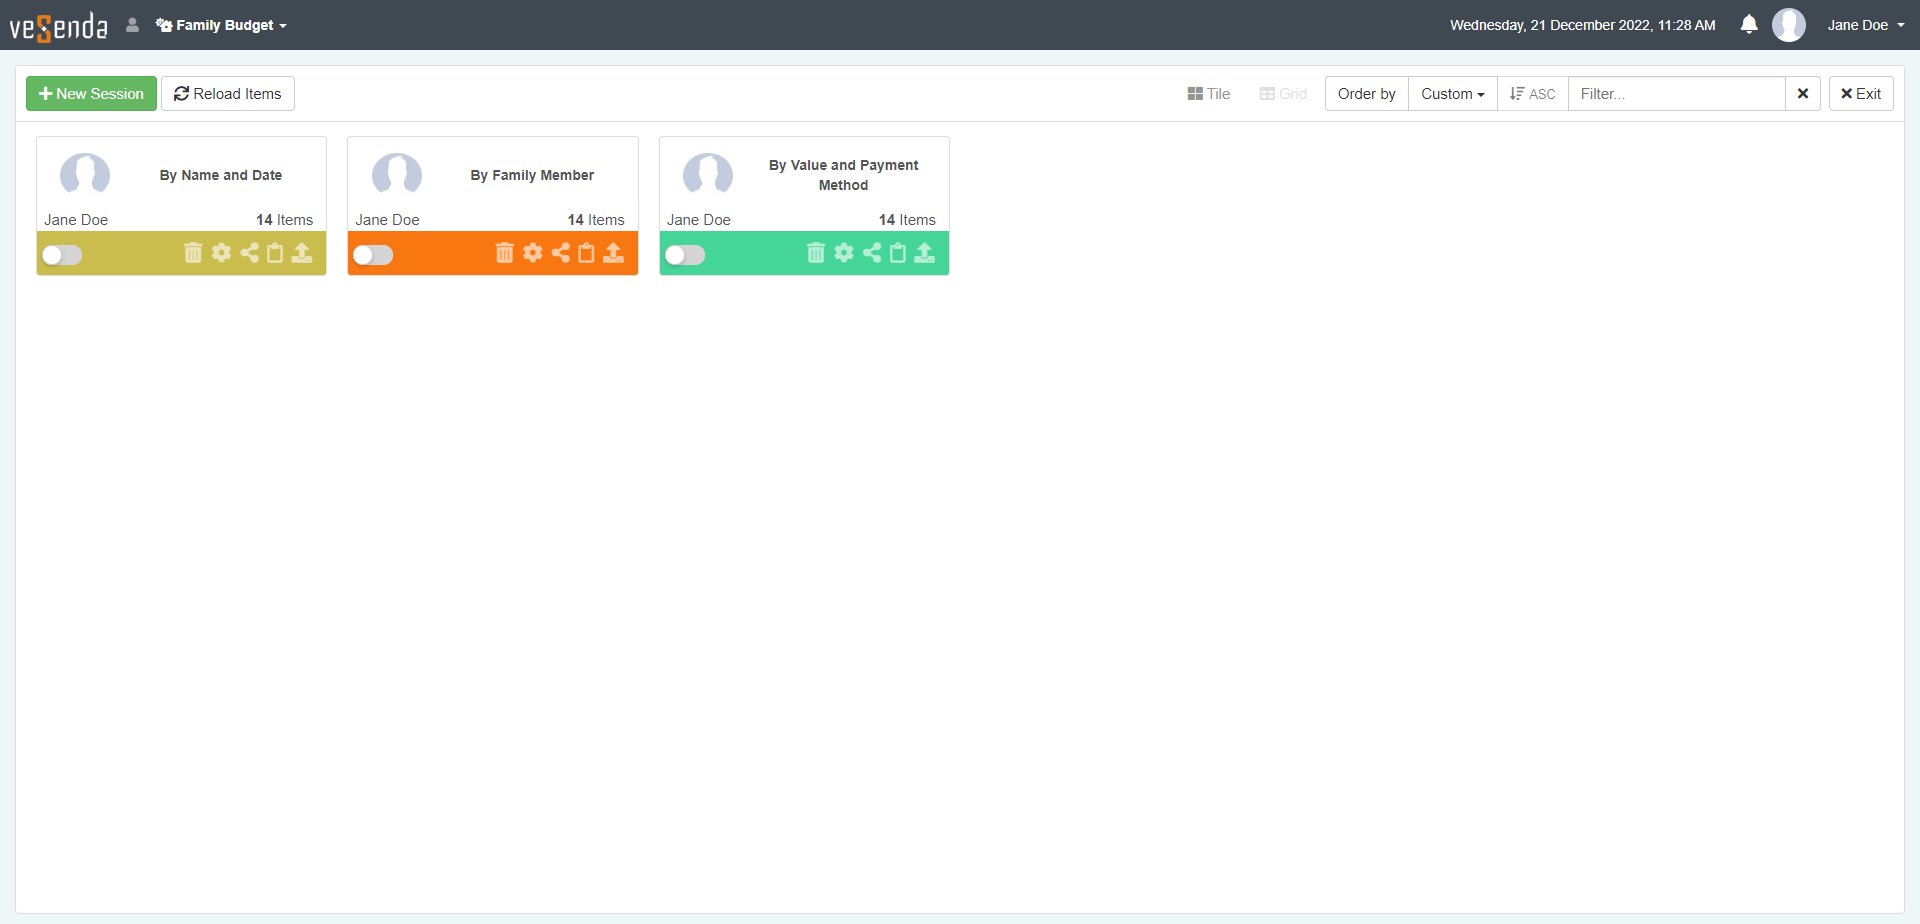
The Sessions Page has the following arrangement.
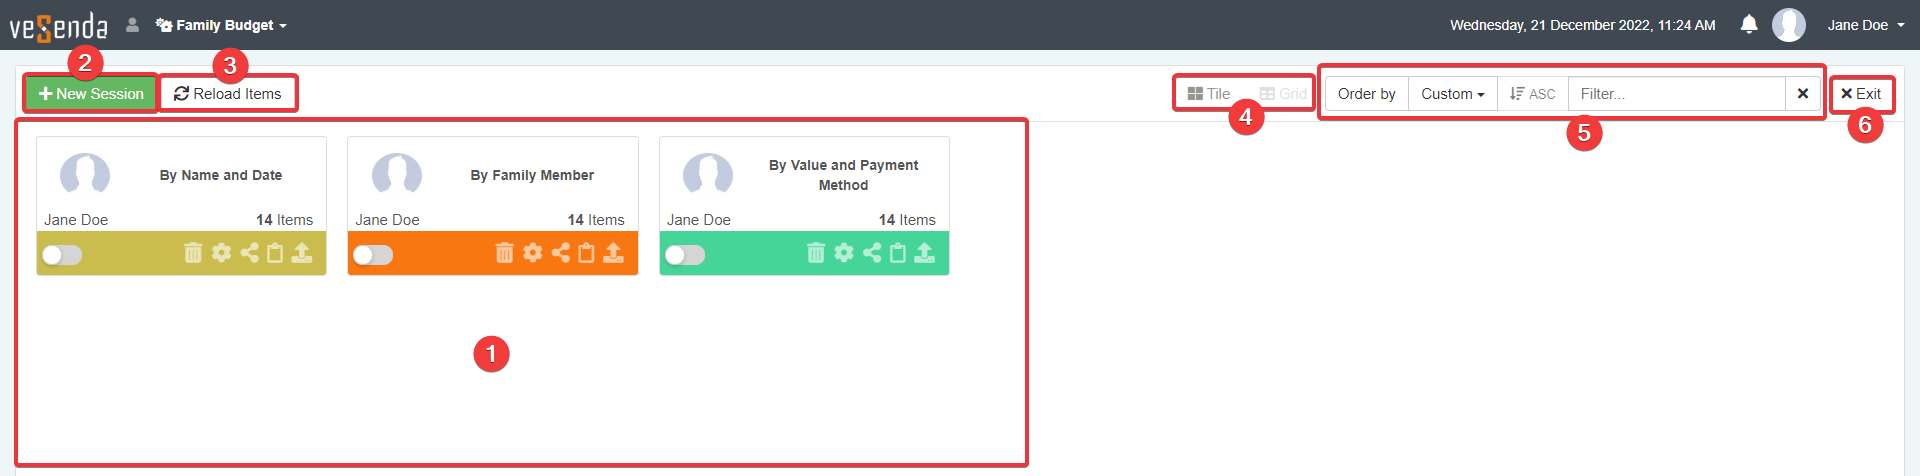
-
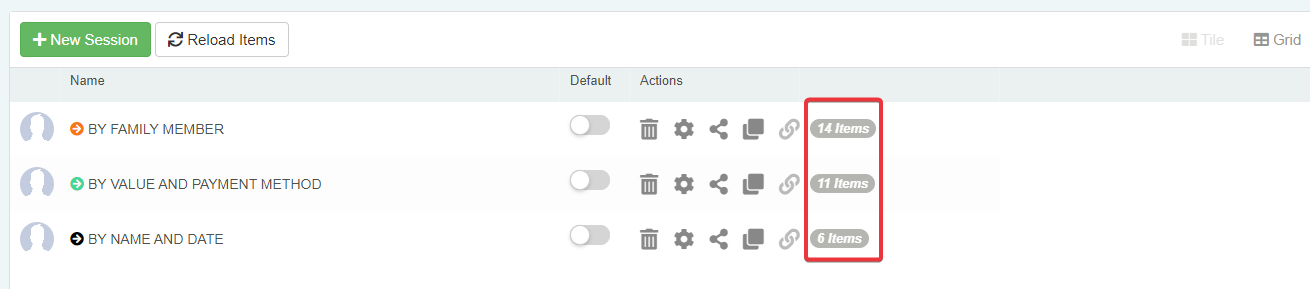
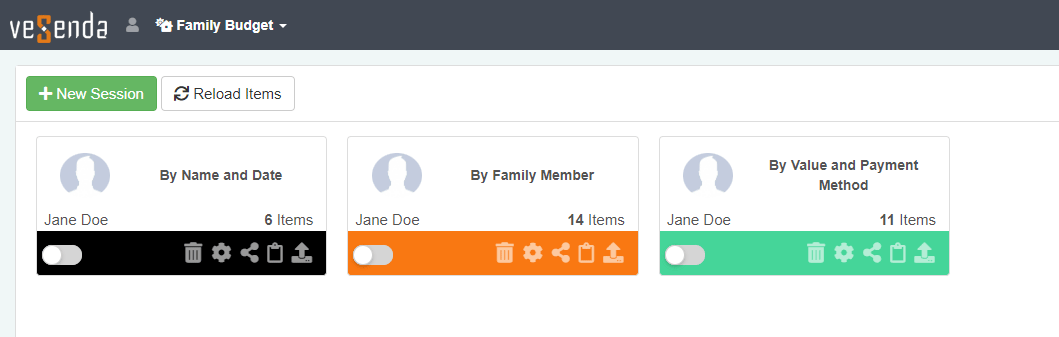
Tiles Each tile represents a saved Session.
-
New Session Opens a new empty Session for the application.
-
Reload Items Updates the Sessions counter. The counter highlights the number of items satisfying both Properties and filters.
-
The buttons enable to choose either the Tile view or the Grid view.
-
Tool bar to sort and search your Sessions.
-
Exit button to return to the Domain's Home.
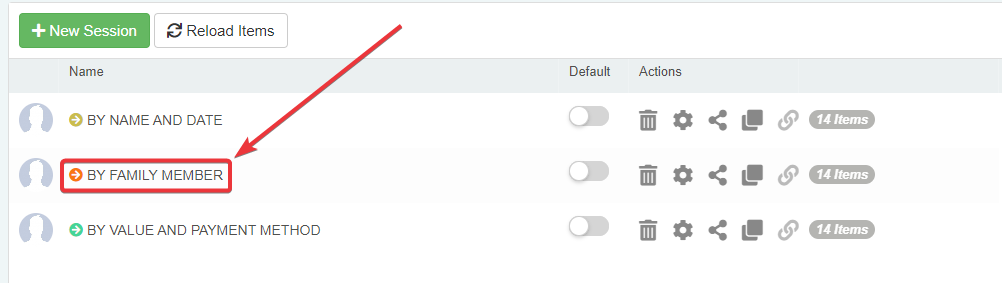
Grid View
A brief explanation of the Sessions Page's Grid view. The Grid view enables to view the Sessions set as a list instead of a tile-based view.
You can switch to the Grid view from the Tile view by clicking on the Grid button. You find the button in the upper-right corner of the Sessions Page.
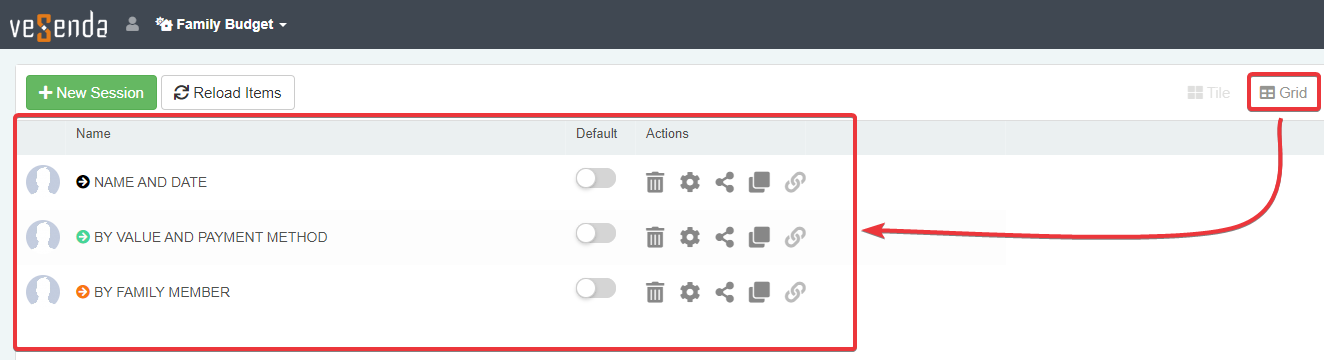
The Session Page will change as follows.
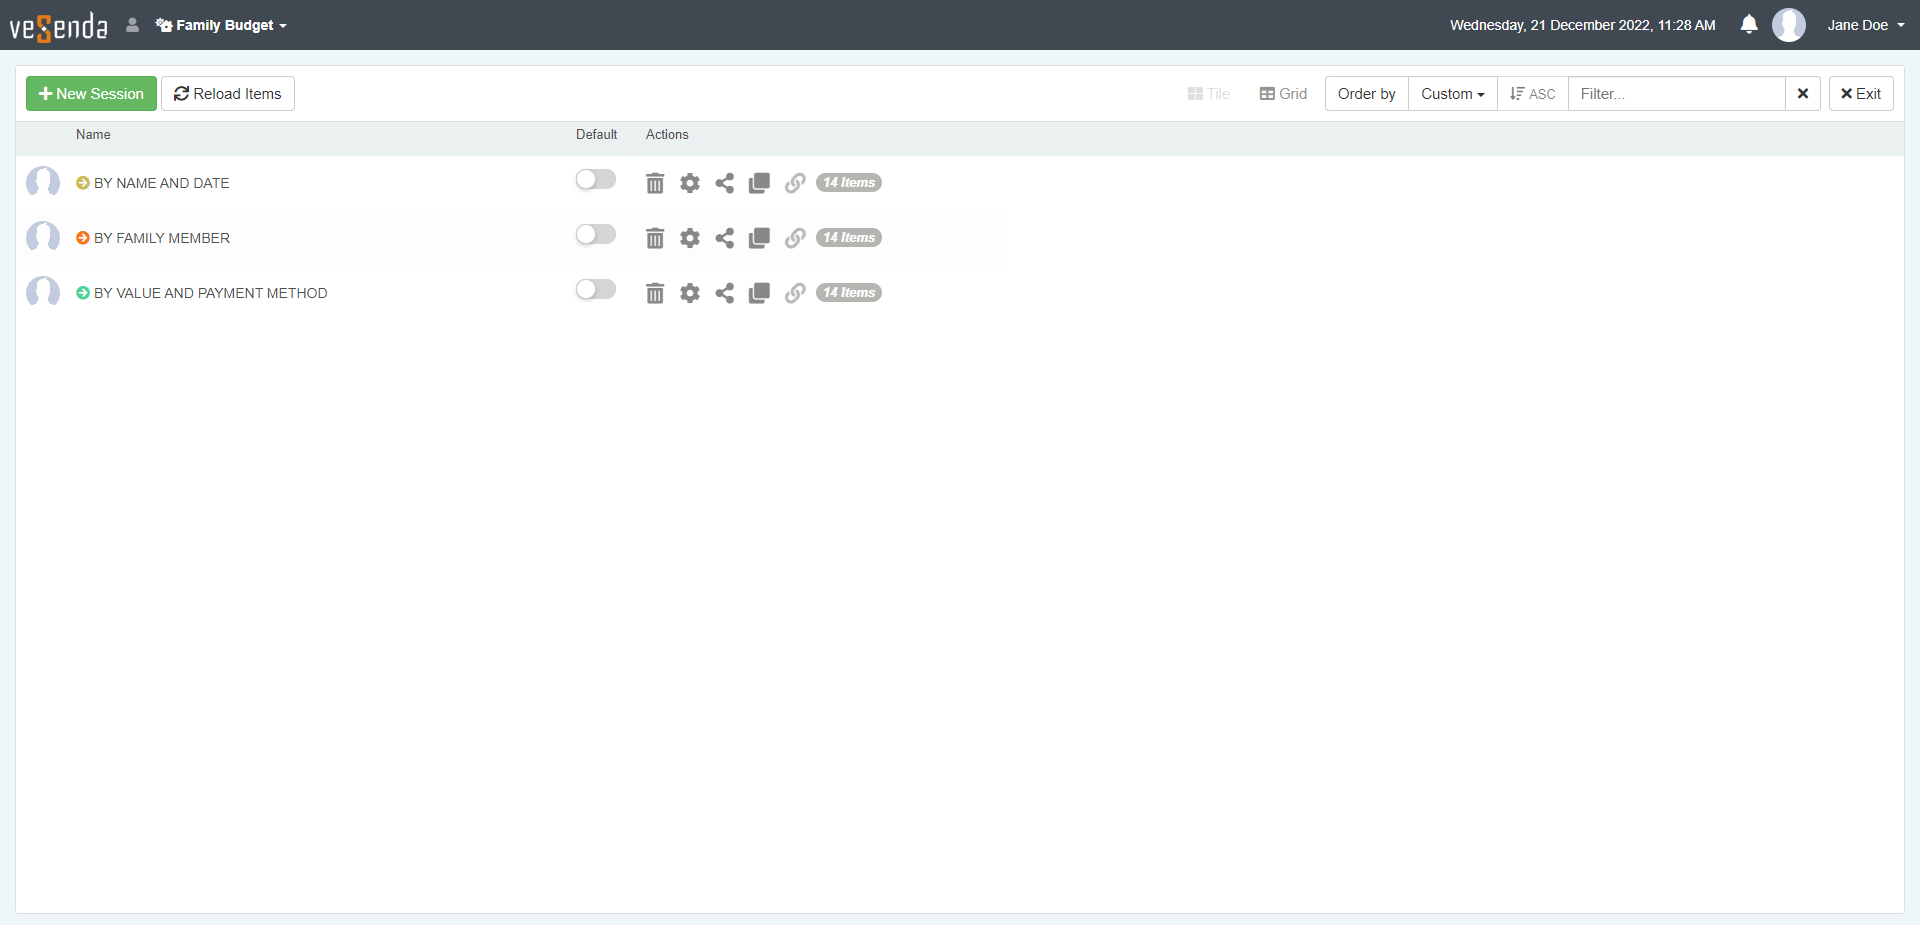
The interface is similar to the Tile view, exception made for the organization of Sessions as a rows list.

-
Row Each row represents a saved Session.
-
Default column. Clicking on the toggle switch enables the Session as the default one. (See Load a Session when launching an application automatically for more information about the Default sessions.)
-
Actions column. The column displays buttons to execute operations explained later in the chapter. The Actions column includes the counter of items satisfying the Sessions's Properties and filters.
-
New Session Opens a new empty Session for the application.
-
Reload Items Updates the Sessions counter. The counter highlights the number of items satisfying both Properties and filters.
-
The buttons enable to choose either the Tile view or the Grid view.
-
Tool bar to sort and search your Sessions.
-
Exit button to return to the Domain's Home.
Click on the Tile view button to return to the Tile view from the Grid View.
Opening a Session within the Sessions Page
In the Tile view, click on the Session's tile to open it.

In the Grid view, click on the Session's name at the corresponding row to open it.
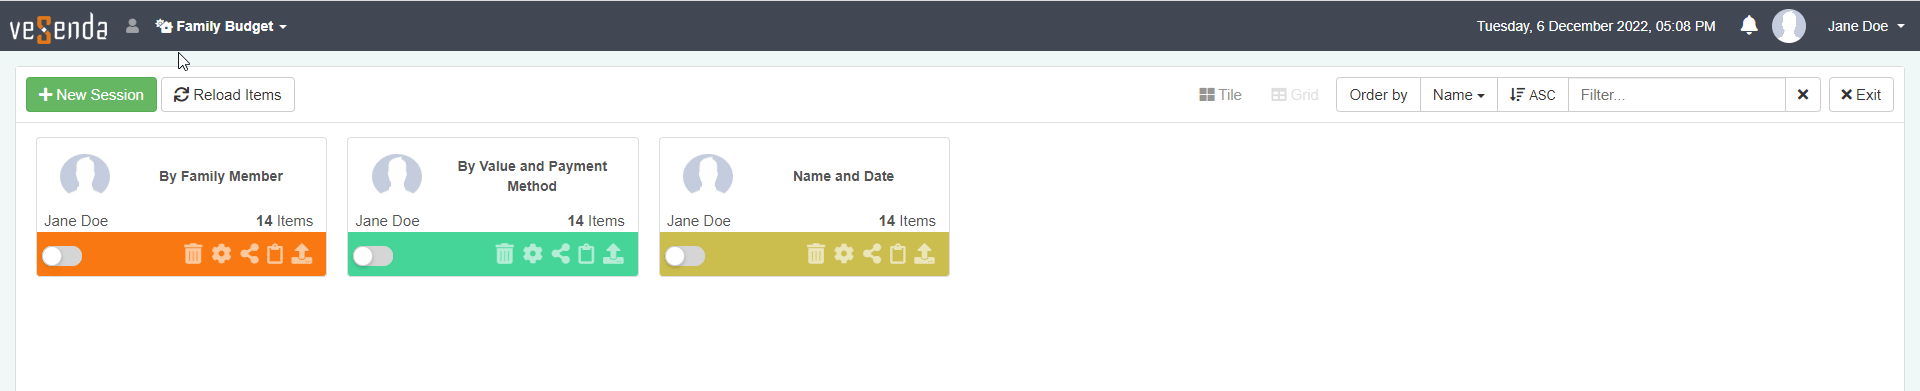
You can search any Session in the Sessions Page.
-
In the Sessions Page, type the name of the Session you are looking for in the search bar. You will find the search bar in the top-right corner of the Sessions Page.
-
Click on one of the corresponding Sessions from the search.

The application will load the Session selected from the Sessions Page.
Organize Your Sessions
Learn how to arrange and sort your Sessions inside the Sessions Page.
In Tile view, can arrange your Sessions as you prefer by drag & drop the tiles.

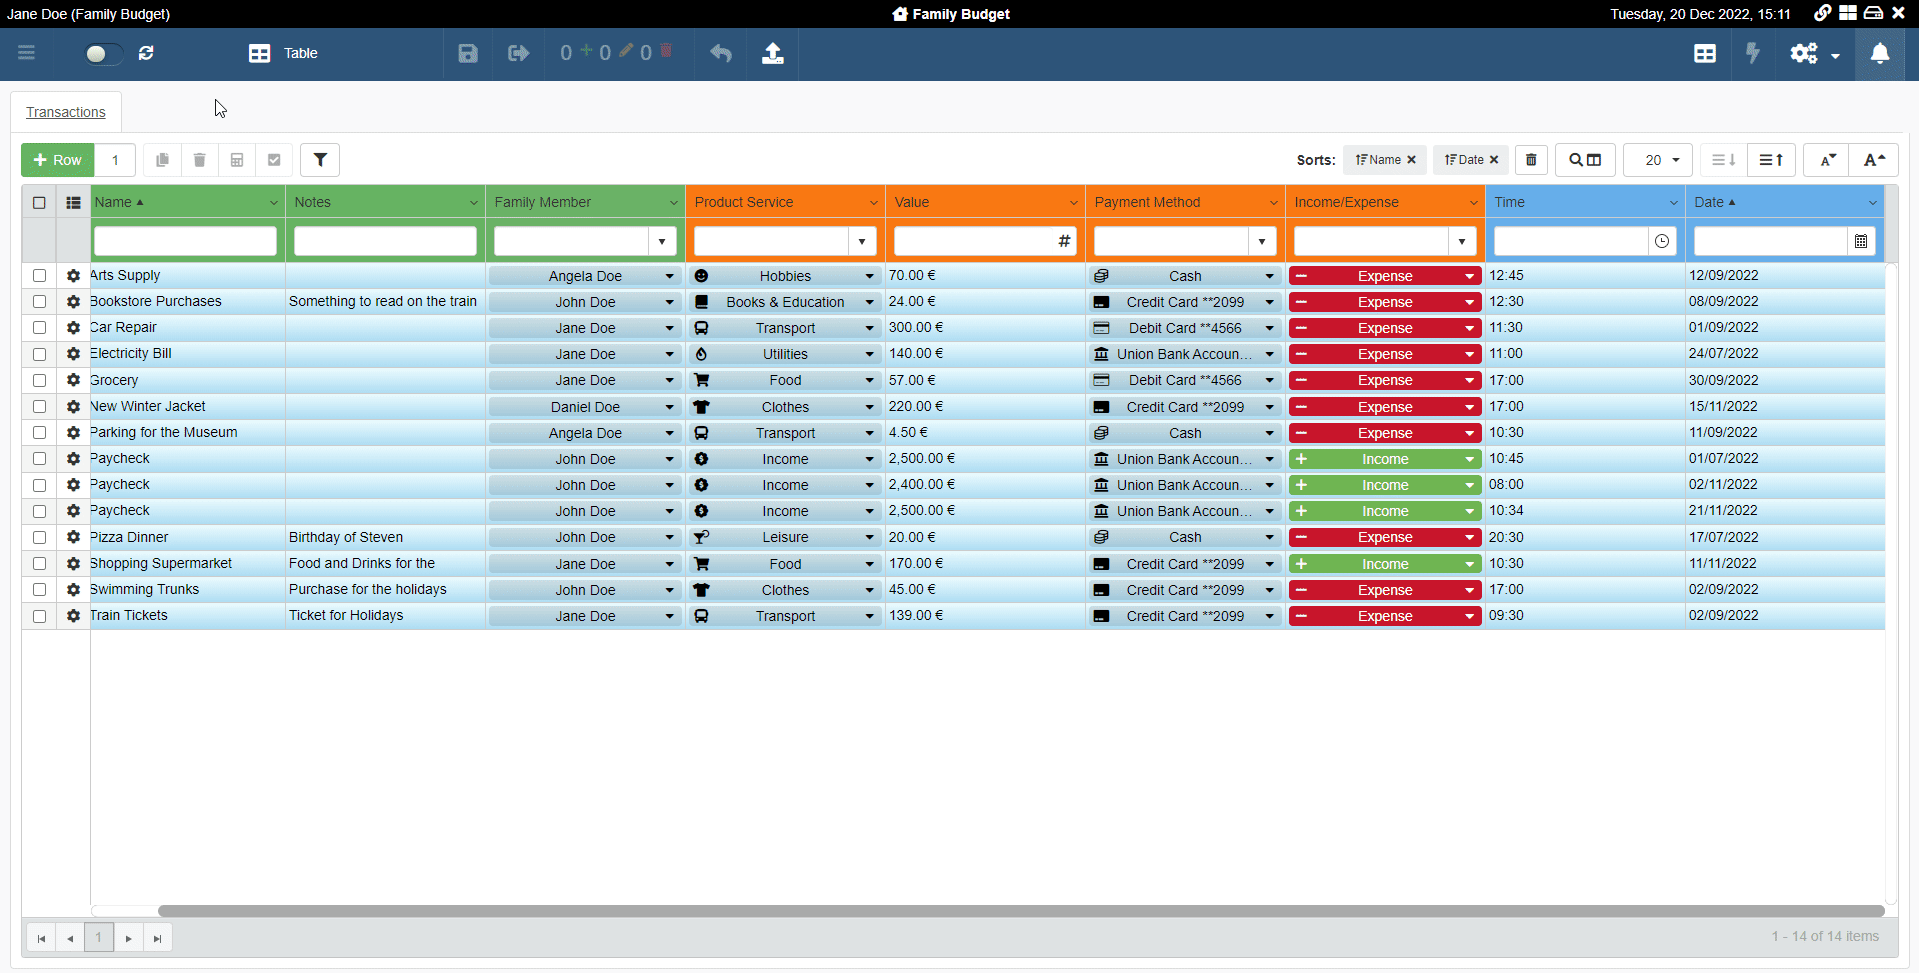
In both Tile and Grid view, you can choose the sorting option to arrange your Sessions.
You can find the sorting options in the upper-right corner of the Sessions Page. The position is the same for both Tile or Grid view.

You can choose through two buttons the sorting criteria and the Ascending/Descending order.

-
Click on Order by button to open a drop-down list and choose the preferred sorting criterion. (By default, the sorting criterion is by Name.)
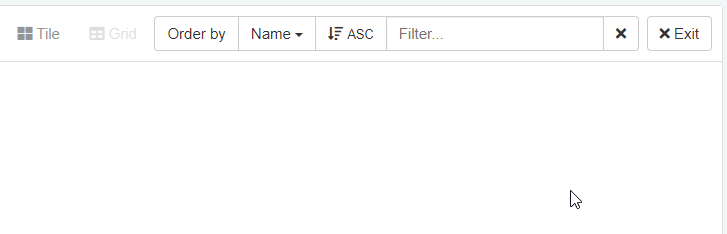
-
Click on the ASC/DESC button to setup either the Ascending or Descending order.

Set the sorting options you prefer for arranging your Sessions.

Customize Session Appearance
Users can configure appearance options of a Session. These settings are not the filtering, sorting, and appearance options. The Session settings are the Session's appearance in the Sessions List and Sessions Page.
You can change the Session's name, description, and color from the Sessions Page.
-
In the Sessions Page, choose the Session to be modified.
-
In Tile view, on the Session's tile, click on the Settings button () to access the Session settings.
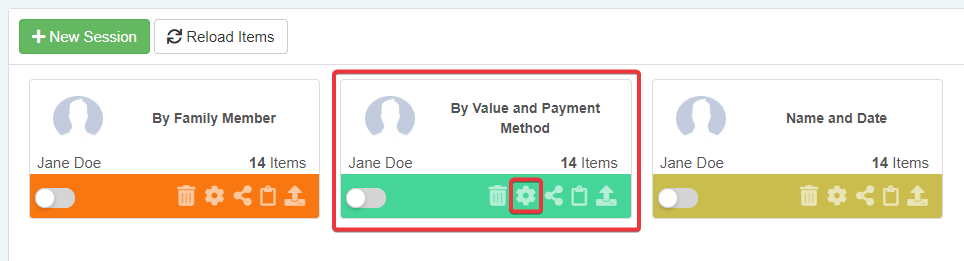
In Grid view, click the Settings button () on the Session's row.
-
Clicking on the Settings button opens again the Save Session window. (See Create a Session for more information about the Save Session window.) Change any setting or information you like.

-
Click on the Save button to confirm the changes to the Session's settings.
The action will save the new Sessions settings.

Delete a Session
Learn how to delete a Session.
You can delete any Session from the Sessions Page.
Warning
The action deletes the Session permanently. Be sure that you want to delete the selected Session
-
In the Sessions Page, choose the tile of the Session to be modified.
-
On the Session's tile, click on the Delete button ().
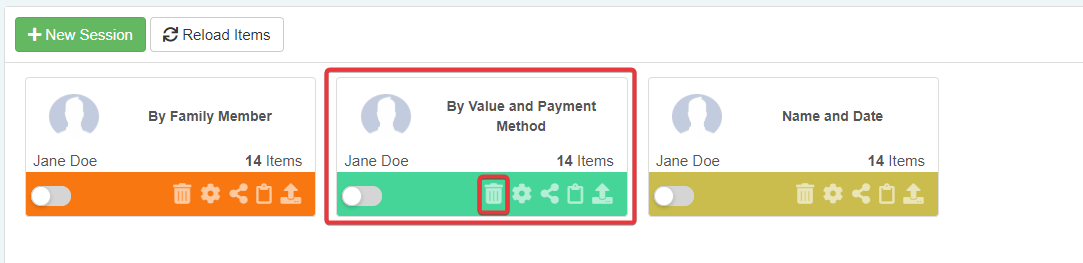
In Grid View, click on the Delete button () on the Session's row.
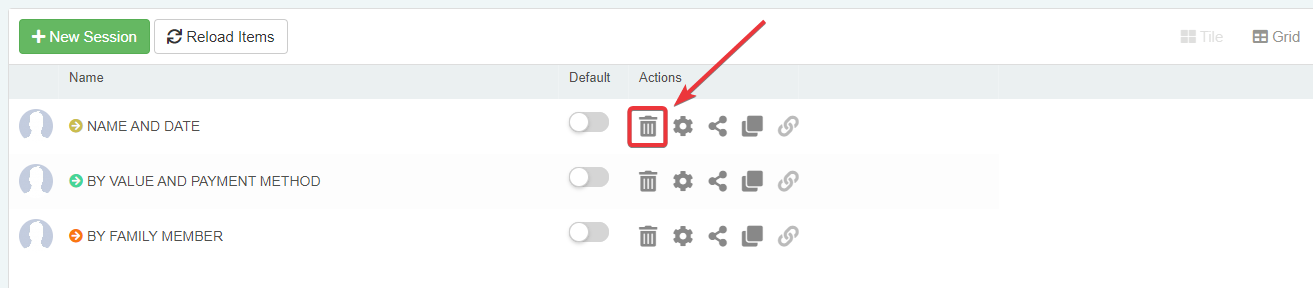
-
Clicking the Delete button on the Session's tile opens the Delete Session confirmation window. Click the Yes button to confirm the deletion. Click the Cancel button to abort the deletion.
You will have deleted the Session and it will disappear from both Session List and the Session Page.
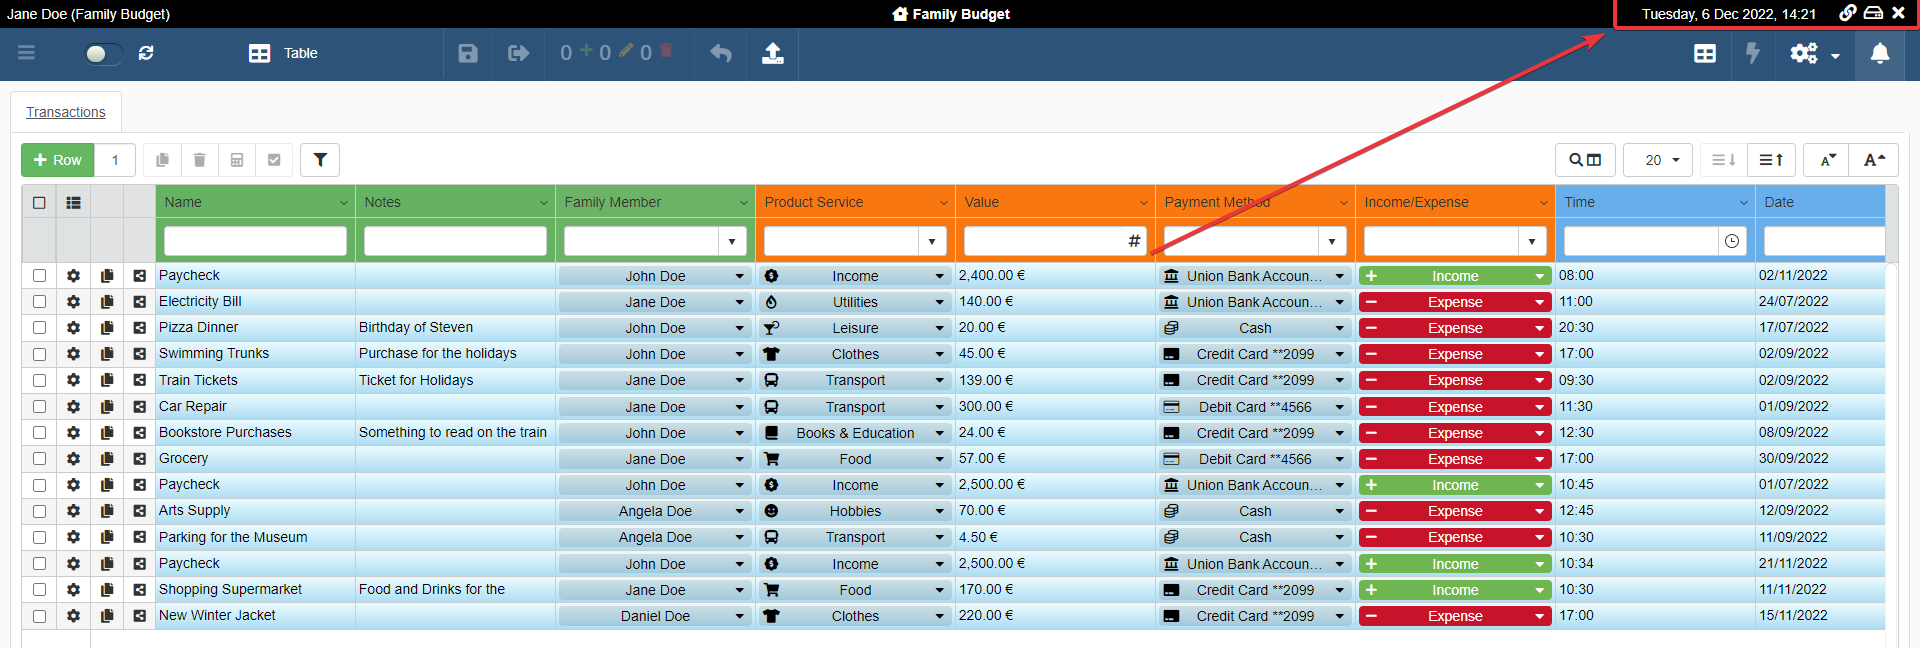
Update the Session with new customizations
Learn how to modify a Session's customizations.
The saved set of customizations (i.e Properties, filtering, sorting, and appearance options) defines a Session. At any time, you can modify and overwrite the Session's actual set of Properties, filtering, sorting, and appearance options.
Info
See the sections Table View Personalization and Filtering for more information about Properties, filters, sorts, and appearance customization.
While a Session is loaded in the application, you can change its Properties, filtering options, sorting options, and appearance options and save the changes.
Change any Property, filtering options, sorting options, and appearance options. Then click on the Save Session () button to save the changes to the current Session.
You can find the Save Session () button on the upper-right corner of the application.
The Save Session () button overwrites the Session with the current settings.
Create a new Session from an existing one
Learn how to create a new Session starting from an existing one.
If you prefer, you can save a modified Session (see Update the Session with new customizations) as a separated new Session. The action keeps saved the Session with the old customizations without overwriting it with the modified customizations.
While a Session is loaded in the application, you can change its Properties, filtering options, sorting options, and appearance options and save the changes. If you don't want to overwrite the Session, you can use the Save Session As () button.
Change any Property, filtering options, sorting options, and appearance options. Then click on the Save Session As () button to create the new Session.
You find the Save Session As () button in the upper-right corner of the application.
The action opens the Save Session window with the Name field filled with the previous Session's name. Change any settings you prefer and click on the Save button as if you are saving a new Session.
You will find the Session you have created starting from the previous modified Session in the Sessions List and in the Sessions Page.
Load a Session when launching an application automatically
Learn how to make a Session the Default Session and load it automatically at each access.
In the Session Page, you can make a Session the Default Session if you haven't made it during its creation. (See Create a Session for more information about setting up a Session as the Default during the creation.) The application will load the Default Session at every access.
In Tile view, click on the toggle switch on the Session's tile you want to make the Default Session.

In Grid View, click on the toggle switch under the Default.

Question
If there is a Default Session already selected, clicking on the toggle switch disables the Default option on the older Session.

Click again the toggle switch on the tile to disable the Default option for that Session.
Export the Session's Data
Learn how to export the rows' data from a Session.
You can export all the items satisfying the Properties and filters' criteria from a Session in the desired format. Also, you can reload the Session to update the number of items before exporting the data as a file.
Reload Session Items
Learn how to update the items' set and the Session's counter before exporting.
Session Items are the rows satisfying the chosen filters and Properties. (See the section Filtering for more information about filters and Properties.)
A Session reports on both Tile and Grid views the number of Session Items. The Export function in the Session Page exports only the data of the Session Items
In the Tile view:

In the Grid view:
You can update the counter of the Session Items by clicking on the Reload Items button.
The Reload Items is in the upper-left corner of the Sessions Page.
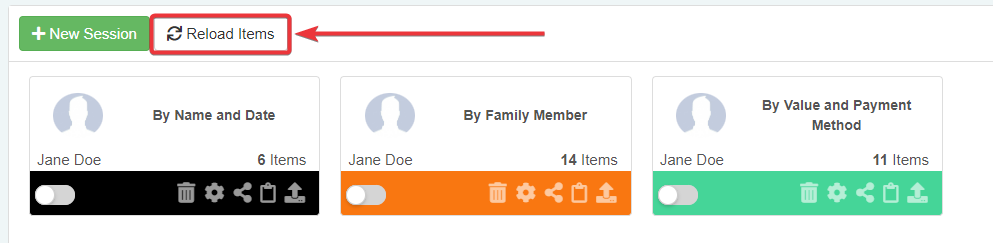
Click on the Reload Items to update the items' counter.
Export the Session Data
Learn how to export the Session Items' data from the Session.
If you want to export the Session Items' data instead of all the application's data, click on the Export button () of the Session.
You will find the the Export button () on the Session's tile in Tile View.
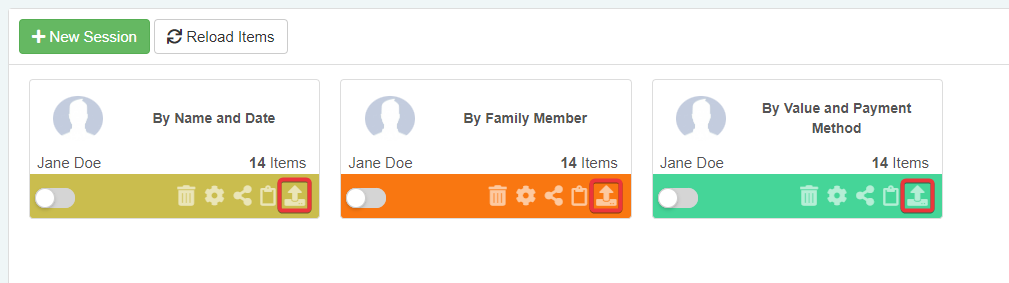
The action opens the Export window as if you are in the application.
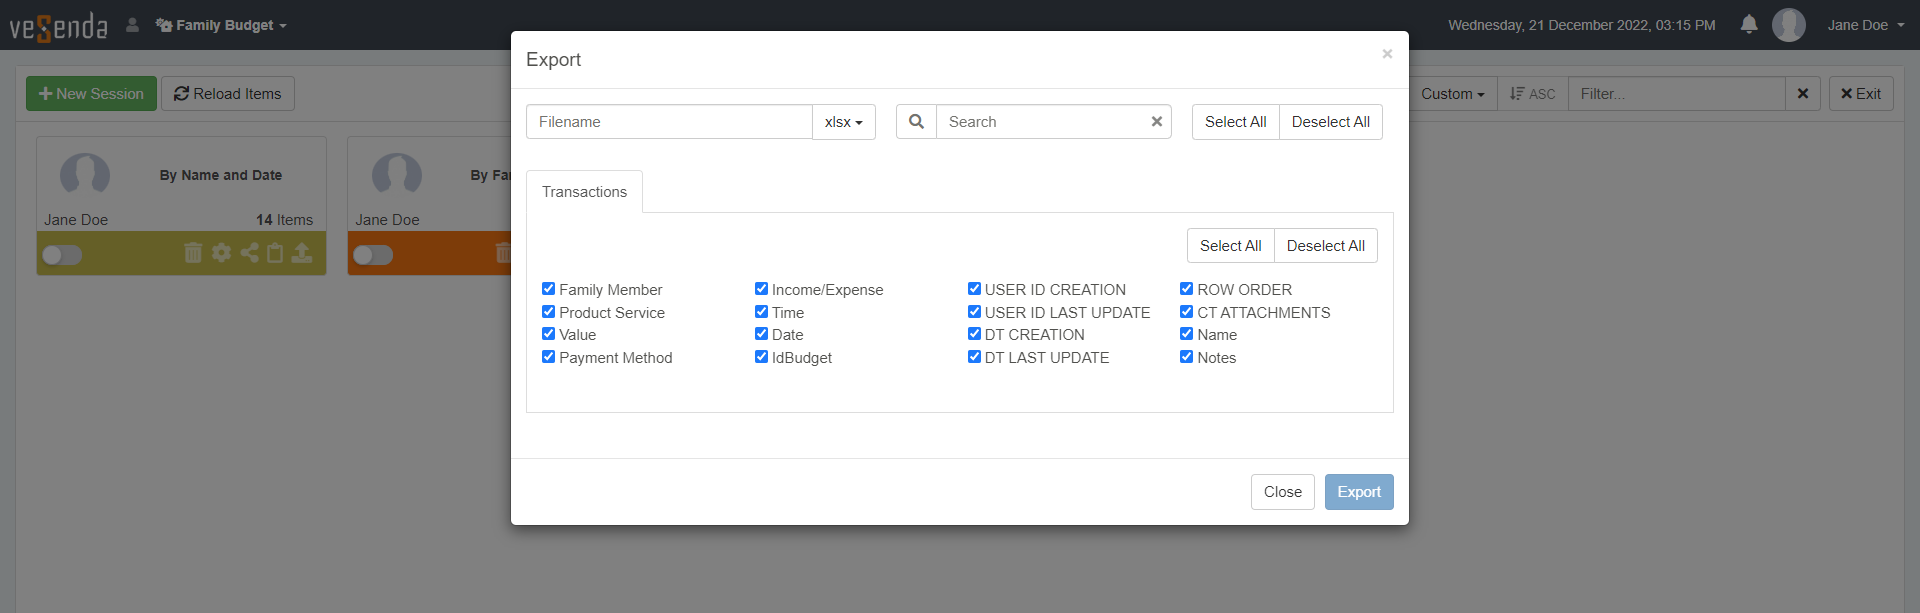
The procedure works exactly like what explained in the Export chapter. Select the name of the file and the columns for the export, then click on the Export button.
Share a Session
Learn how to share a Session with other users having access to the application.
eLegere offers two ways to share your Sessions: you can share a temporary link to your Session; you can copy your Session to another user's list who can access the application.
Share a link to your Session
Learn how to share a temporary link to your Session.
You can share a link to enable the access to the application with the chosen Session enabled. The loaded Session will be the actual session for the user that uses the link.
Attention
The shared link remains valid as long as the User who shared the Session makes no modifications to Properties, filters, sorting order or appearance options. If the user makes any change to their Session, they must share a new link.
You can share with other eLegere users of your installation any Session of the application. Only Users belonging to the same Domain and having the same permissions can view the shared Session.
-
In Tile view, click on the Share button on a Session tile to open the Share window.
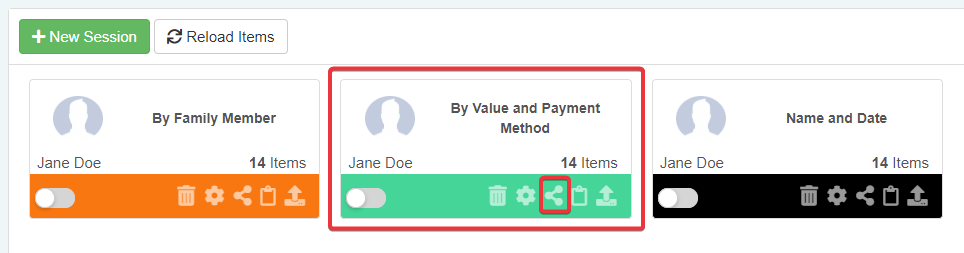
In Grid view, click on the Share button on the row corresponding to the Session.

-
The action in Step 1 opens the Share window.
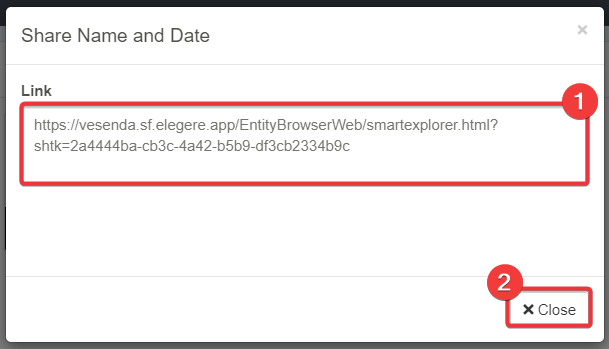
- (1) In the Share window, copy the link from the textbox. Share the link with any User having access to the Domain and having your same application's permissions.
- (2) Click on the Cancel button to close the Share window.
Clone a Session for other Users
Learn how to clone a Session for other users.
Cloning a Session creates a new Session identical to the selected Session for other Users or Groups who have access to the application.
Note
Take in account that:
- The cloned Sessions have no relation with their original Sessions. They are separated Sessions identical to the original.
- Users have no option to decline. The Users will find the cloned Session in their Sessions List directly.
- There are no notifications to the destined Users or Groups about the cloned Session's creation.
In the Session Page, you can clone a Session.
In Tile view, click on the Copy button () on the Session's tile to clone the Session.
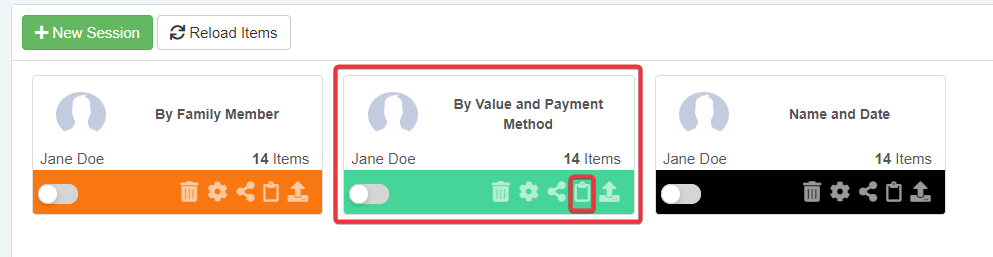
In Grid view, click on the Copy button () on the Session's row to clone the Session.
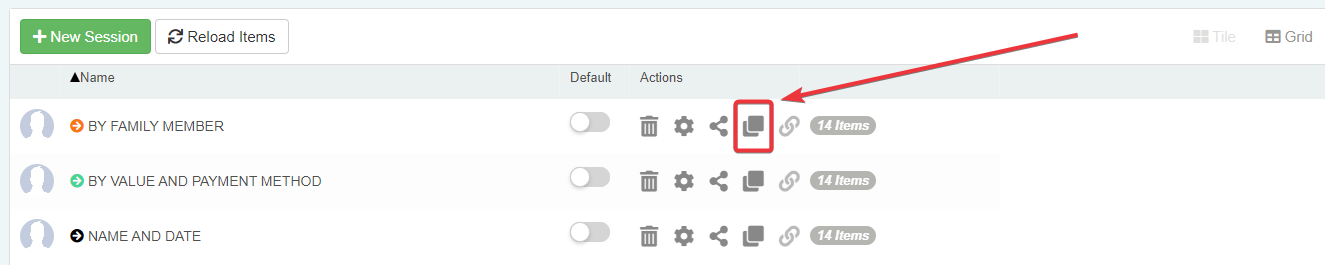
The action leads to the Clone window.
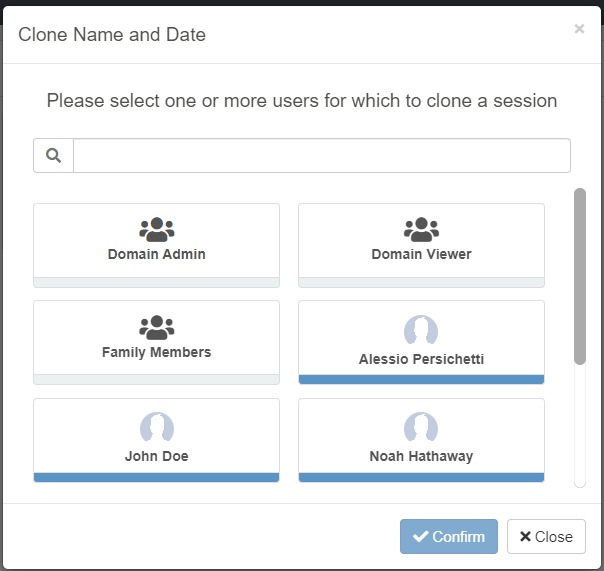
Choose the Group or the precise Users for which you want to clone the selected Session.
Click on the Confirm button to complete the action or the Cancel button if you want to abort the copy.
The action creates a copy of the same Session for the users in a Group or the selected Users who can access the application.