Create Storage
To build the App we need to create its Storage.
Storage
Storage is the data repository where the information will be physically collected.
In eLegere we can create Storages using different sources:
| Source | Description |
|---|---|
 |
Connection: synchronized (append/substitution) between CSV / XLS files uploaded or SQL DB table |
| Blank: by sketch | |
 |
Logical: useful to create a view on another Storage |
 |
Lookup Editor: useful to create drop-down menu field where select a value from a list |
In this guide we will use Blank Storage and Lookup Editor.
Use Case
- Blank Storage type will be used for Subsidiaries and Revenues information.
- Lookup Editor will be used for: STATUS, YEAR and CURRENCY.
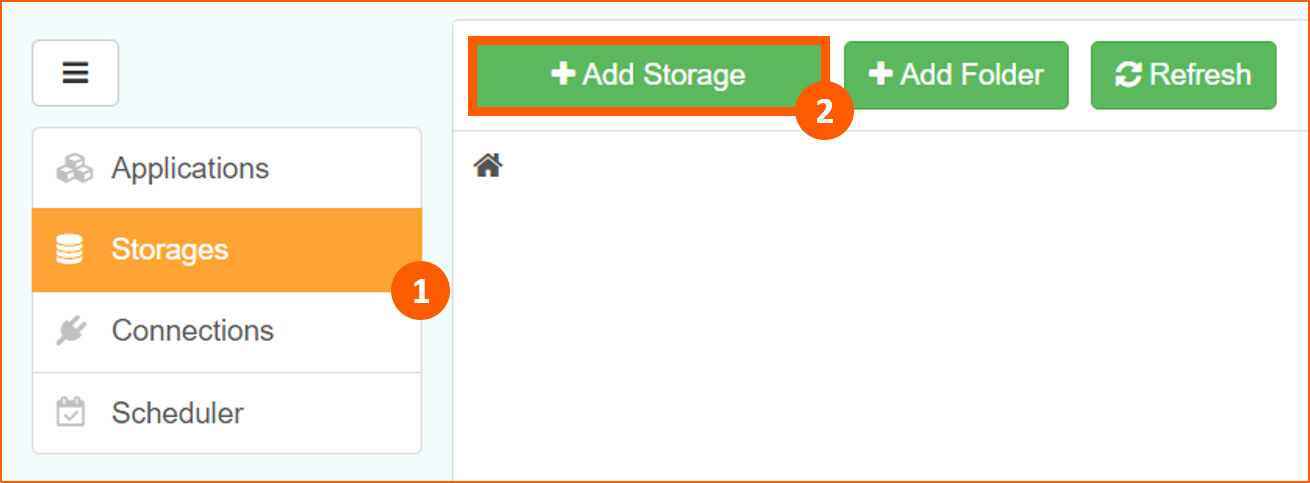
Add Storage
So let's create a Storage starting from menu Storages and select Add Storage:
In the popup window select Blank Storage type:
![]()
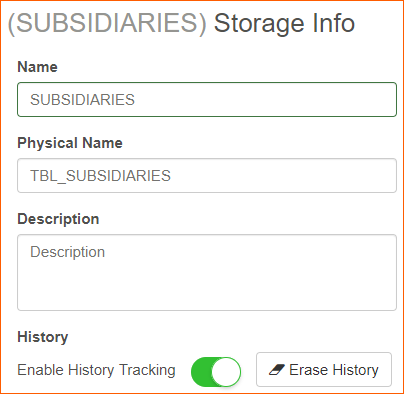
Storage Info
In the Storage Info choose:
-
a logical Name
-
a Physical Name (optional): by default eLegere will build an automatic name based on the following string:
Storage_yyyy_mm_dd_hh_mm_ss_ccc -
Enable History Tracking

Use Case
- The first Storage will be named SUBSIDIARIES and its Physical Name TBL_SUBSIDIARIES since it will contain all the subsidiaries' information (Company Name, Address, ...). Enable also the History Tracking:
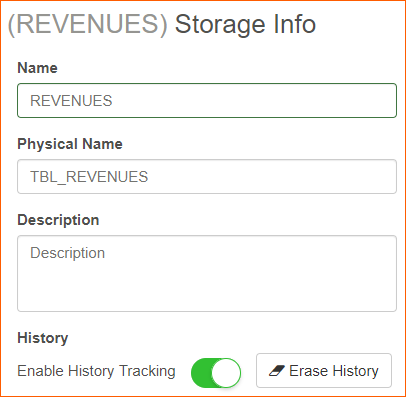
- The second Storage will be named REVENUES and its Physical Name TBL_REVENUES since it will contain subsidiary's revenues information (Year, Revenue amount, Currency, ...). Enable also the History Tracking:
Fields Mapping
Now it's time to define the fields of our storages.
Use Case
Fields match the columns of the Excel file of the Subsidiaries where we can find information about Subsidiaries and their Revenues.
Starting on Fields Mapping menu, drag a type of Fields and drop it on the right to create a new one:
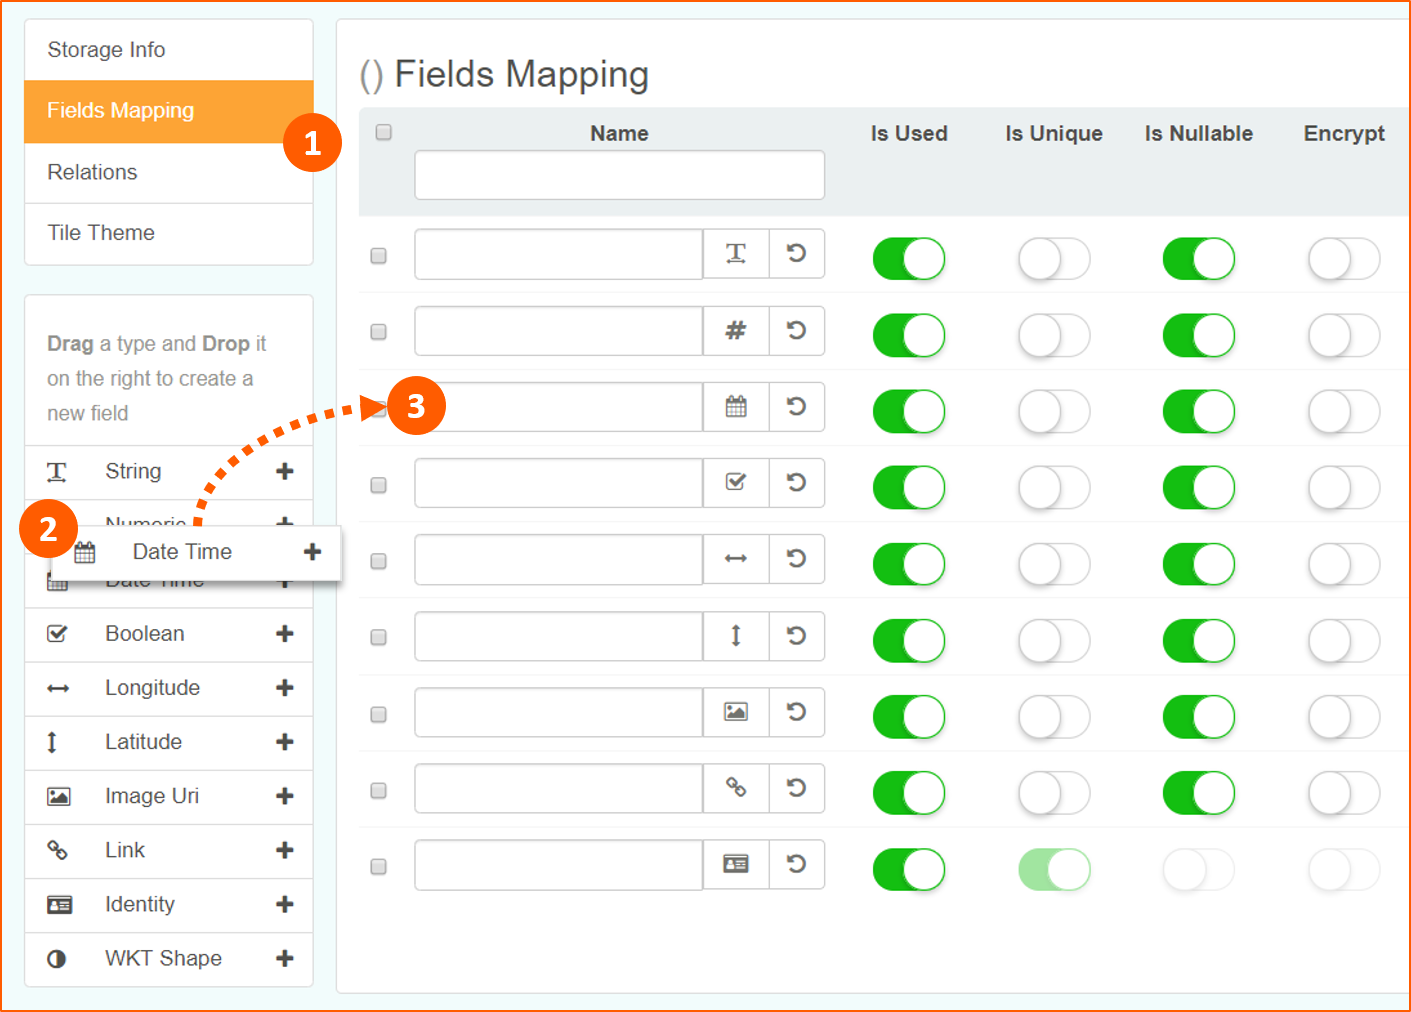
We will use only the following type of Fields:
| Icon | Type | Description |
|---|---|---|
 |
String | Text |
 |
Numeric | Numeric |
 |
Date Time | Date time format |
 |
Boolean | True or false |
 |
Longitude | Longitude +/- ##.#### format |
 |
Latitude | Latitude +/- ##.#### format |
 |
Identity | Progressive number, unique and not nullable |
Use Case
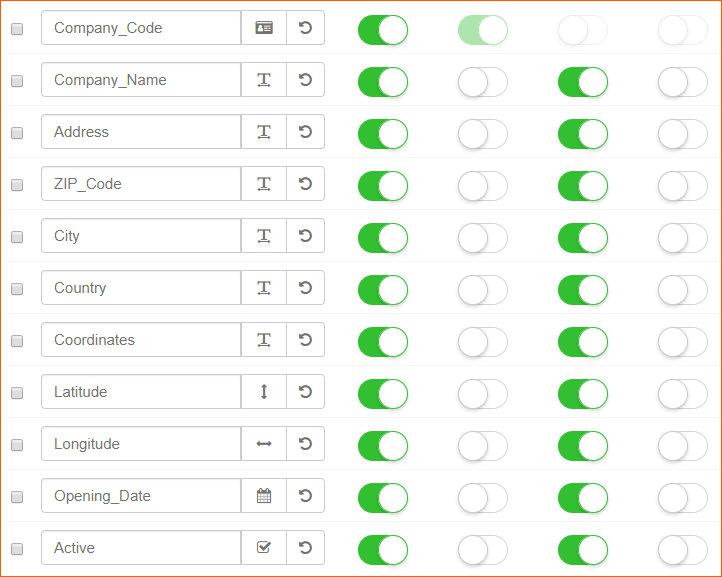
- SUBSIDIARIES fields:
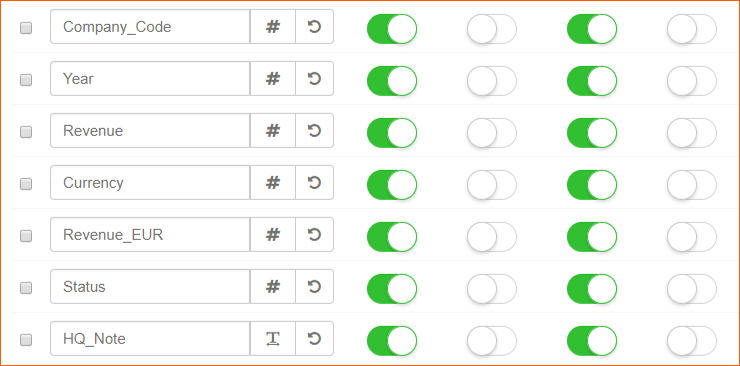
- REVENUES fields:
Company_Code
To create the Relation between SUBSIDIARIES Storage (master information) and REVENUES Storage (details information) we need to link REVENUES to the corresponding SUBSIDIARY. To do it we created a Numeric field called Company_Code in REVENUES Storage that will be connected to the corresponding Identity one into the SUBSIDIARIES Storage. See the Relations section to create this relation.
Year, Currency, Entry_Status
We choose to make these three fields as Numeric since we want to connect them to a Lookup table based on a Numeric and Text description field. See the Lookup section for more details.
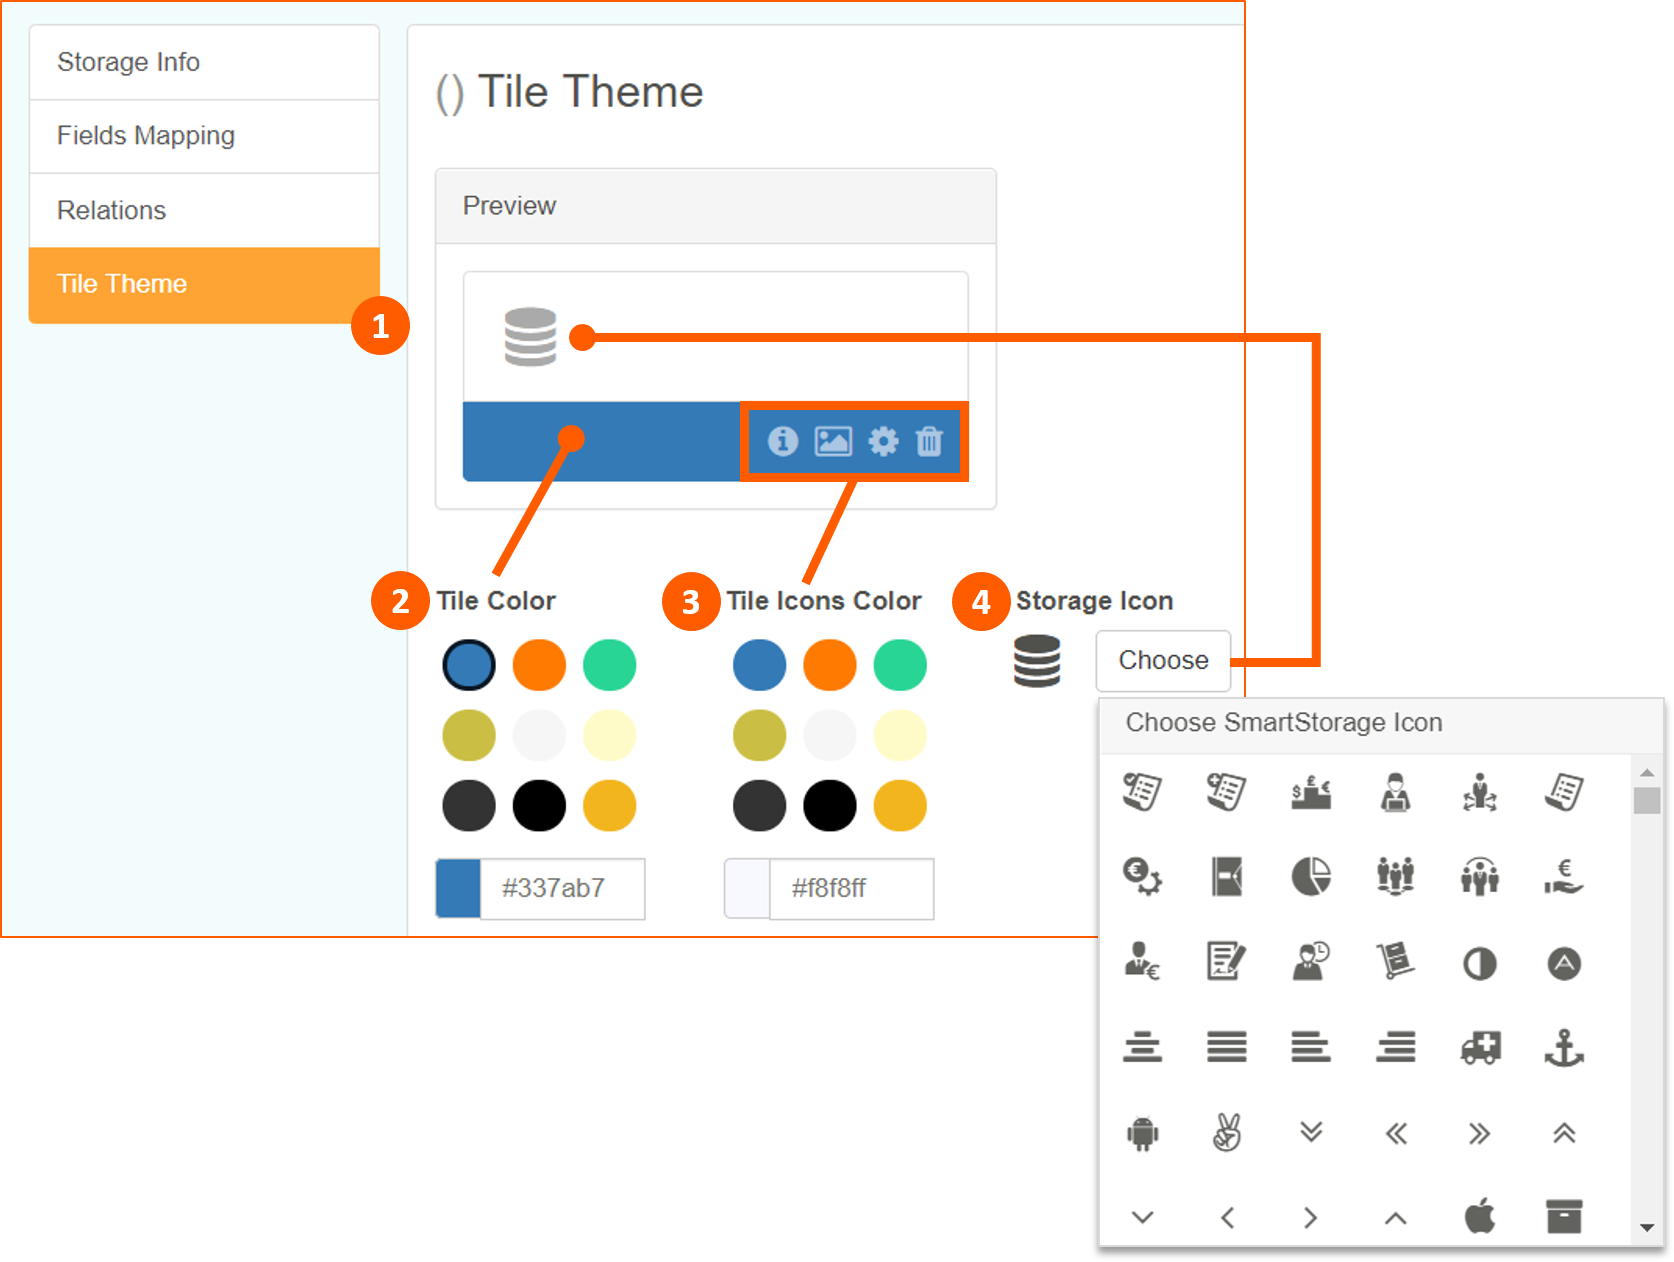
Tile Theme
Before completing the creation of the storages, we can customize the Tile Theme, personalizing the Tile Color, the Tile Icons Color and the Storage Icon.
Finally click Save and Exit button:

Lookup
Lookup
Lookup is a simple Storage useful to create a field with drop-down menu where the user can select a value from a pre-defined list. In a Lookup Storage there are only two fields available:
- Code (renemeable)
- Label (renemeable)
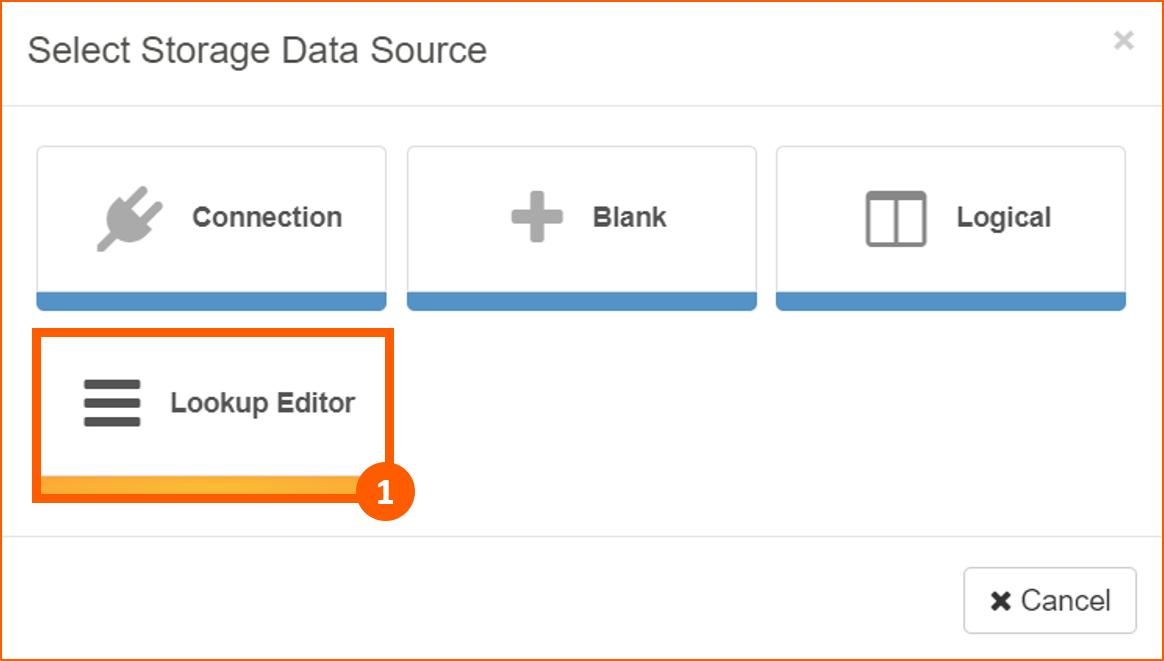
To create it go again on Storages and Add Storage. In the popup windows select Lookup Editor Storage:
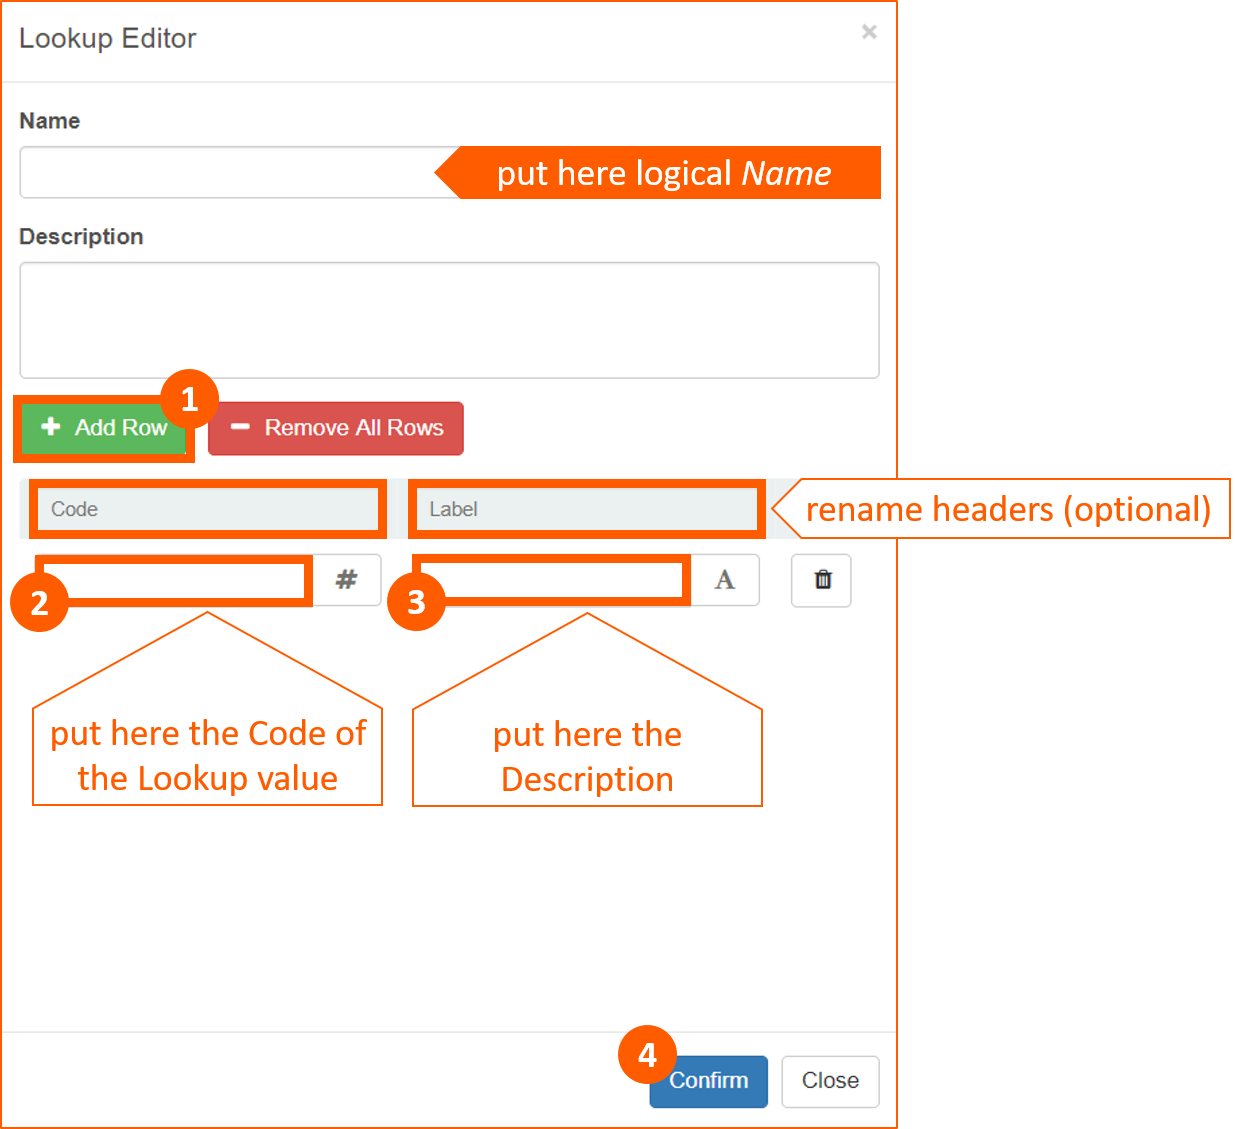
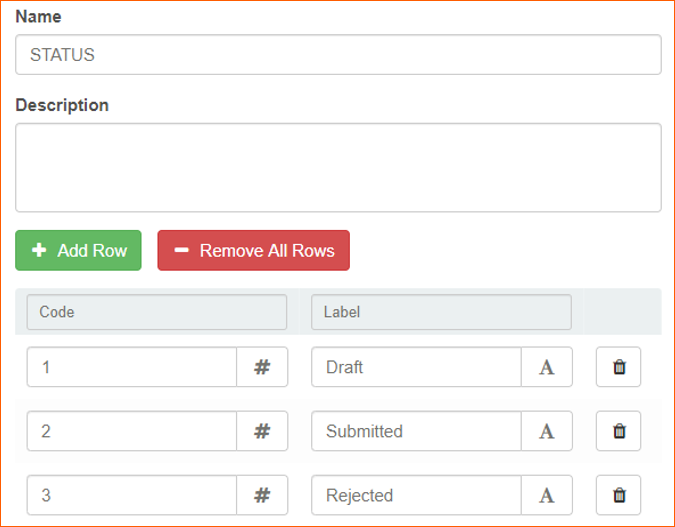
In the popup window, assign a Name to this storage, use Add Row to insert one or more values (code and description), eventually rename the headers (Code & Label by default) and finally Confirm to save it.
Lookup
The Lookup store is the easiest way to let the user select a value from a list. By the way a Blank storage can be used too. Please visit Lookup on Work on eLegere page for more details.
Use Case
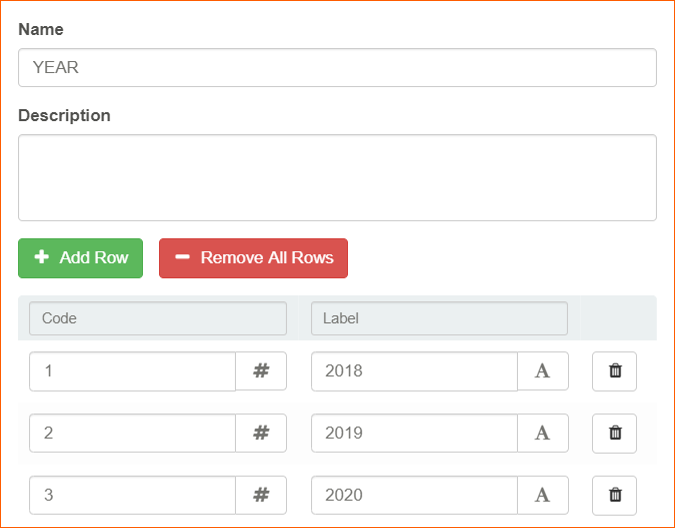
- The Lookup for YEAR is:
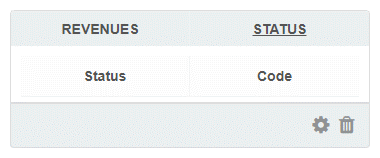
- The Lookup for STATUS is:
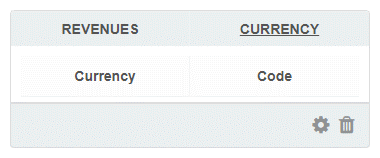
- The Lookup for CURRENCY is:

Add Folder (optional)
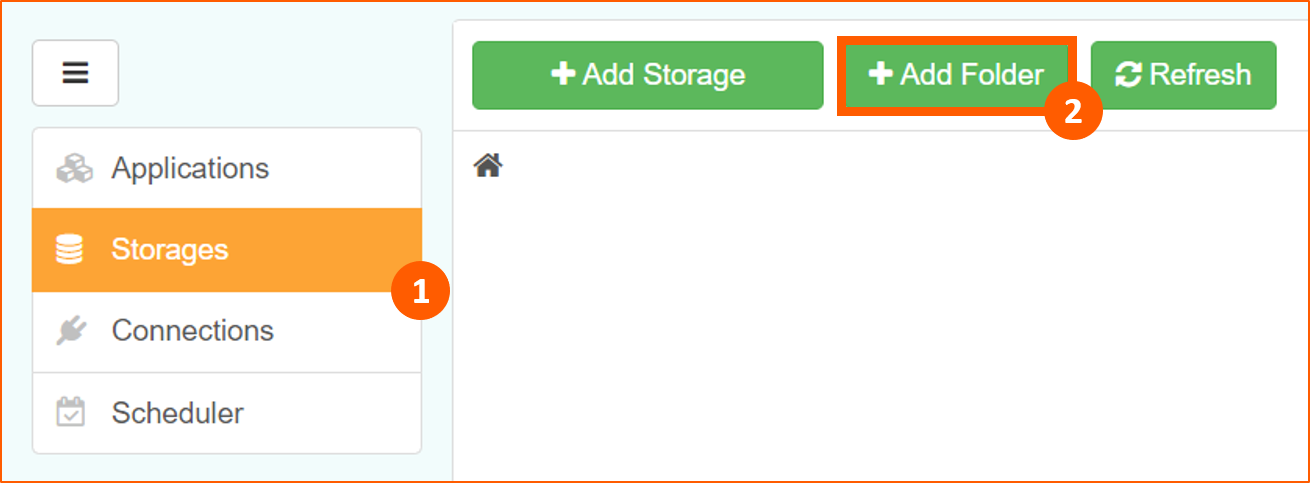
To organize storages we have the possibility to create Folders. Start from Storages menu and then Add Folder button:
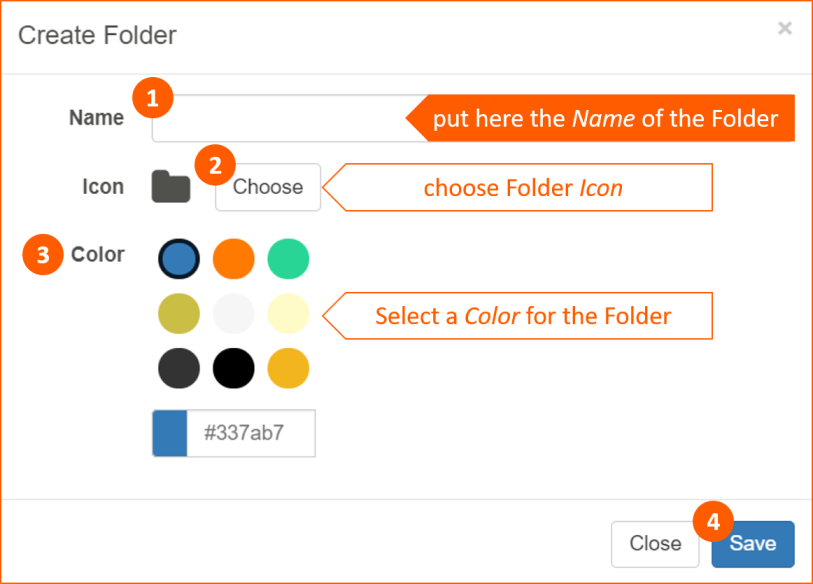
In the popup window, insert the Name of the Folder, choose an Icon, a Color and then click on Save.
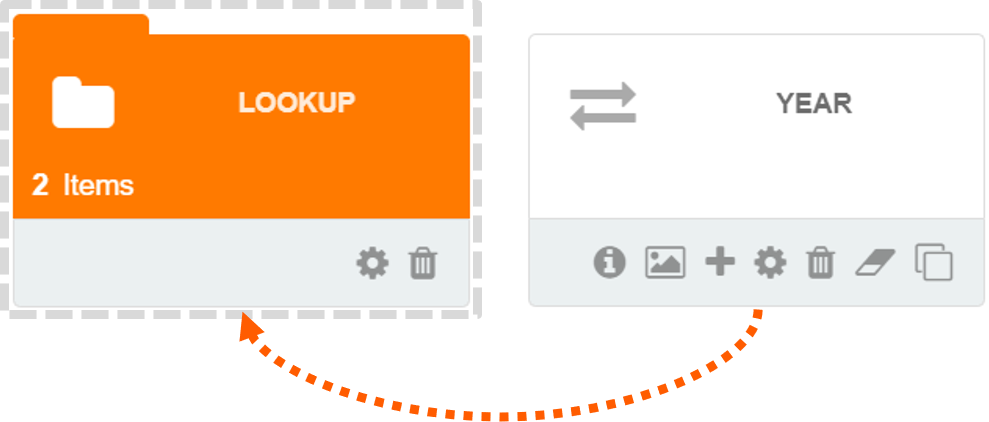
Drag and drop Storage into the just created Folder:
Use Case
In our Use Case we created a folder called LOOKUP to collect all the Lookup Storages: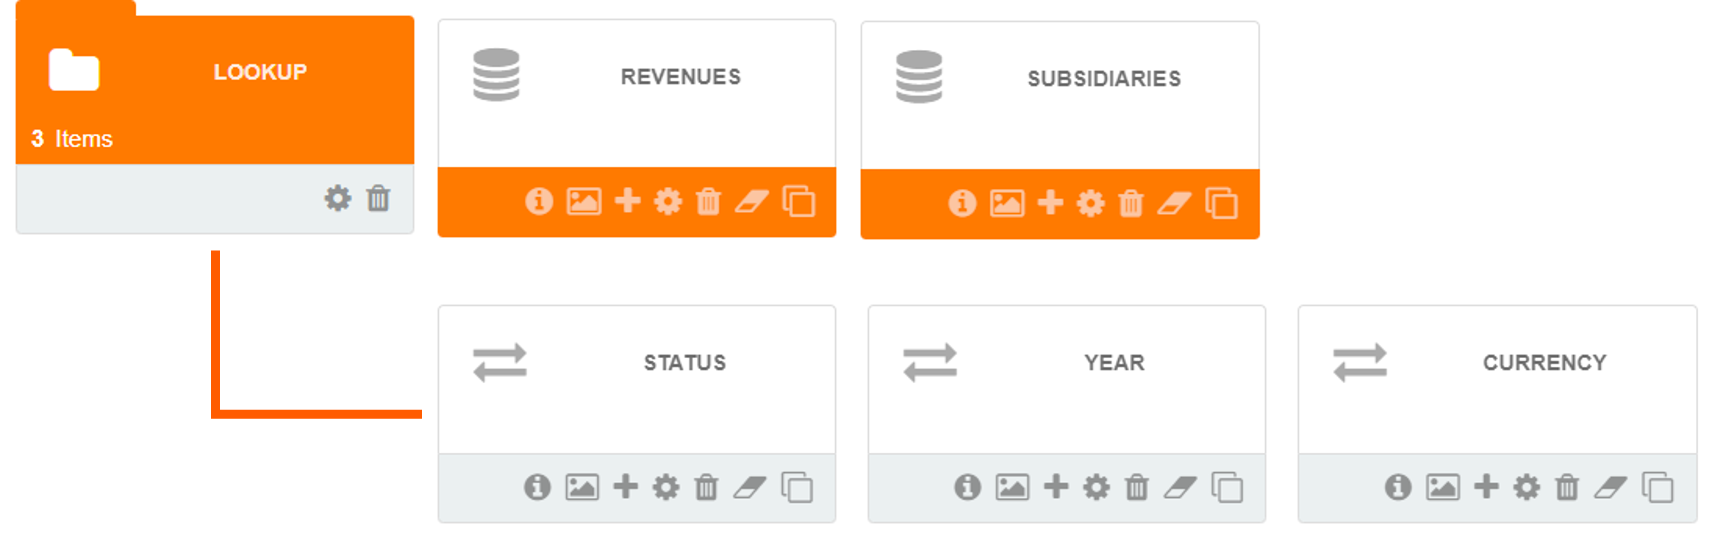
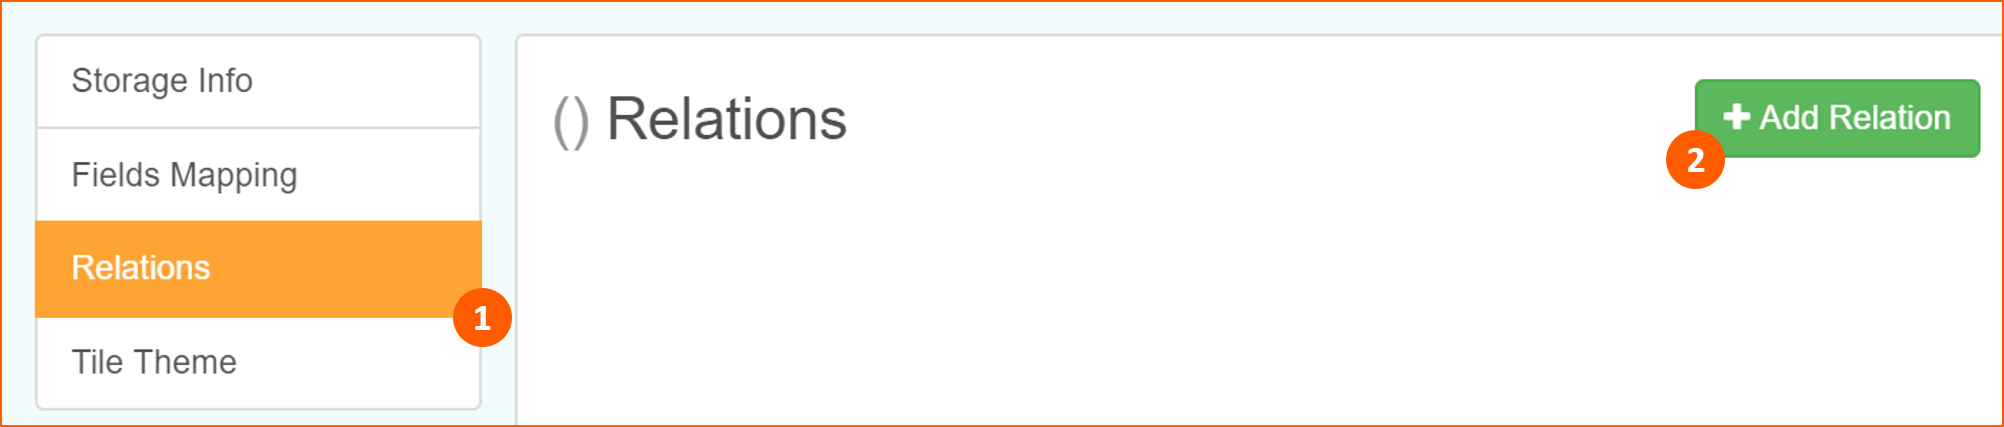
Relations
The final step is to create the Relations between storages.
Relations
A Storages Relation, is a physical link between two fields of two storages. The Relation has to be declared into the storage that contains the field used to select a value from a pre-defined list (related storage).
To create it, start from Relations menu and then Add Relation:
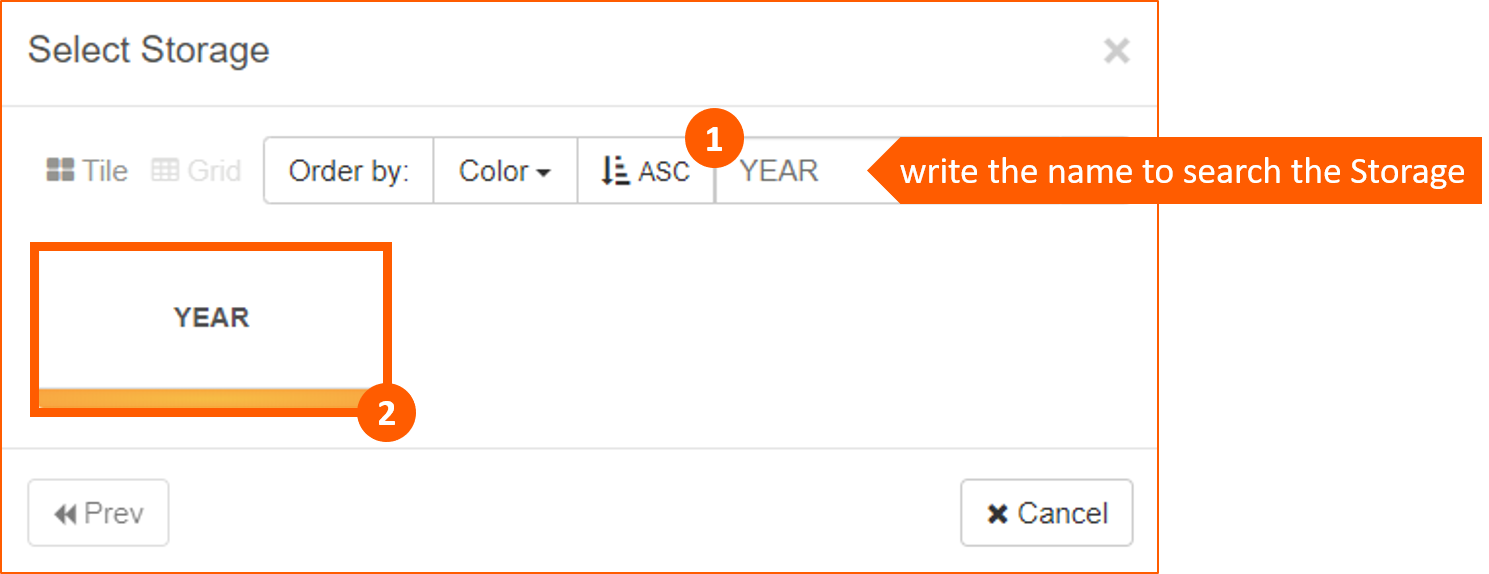
In the popup window select the Storage that you want to link:
Then choose the field (1), (2) to the related key (3), (4) to link the storages. Finally select Confirm (5):
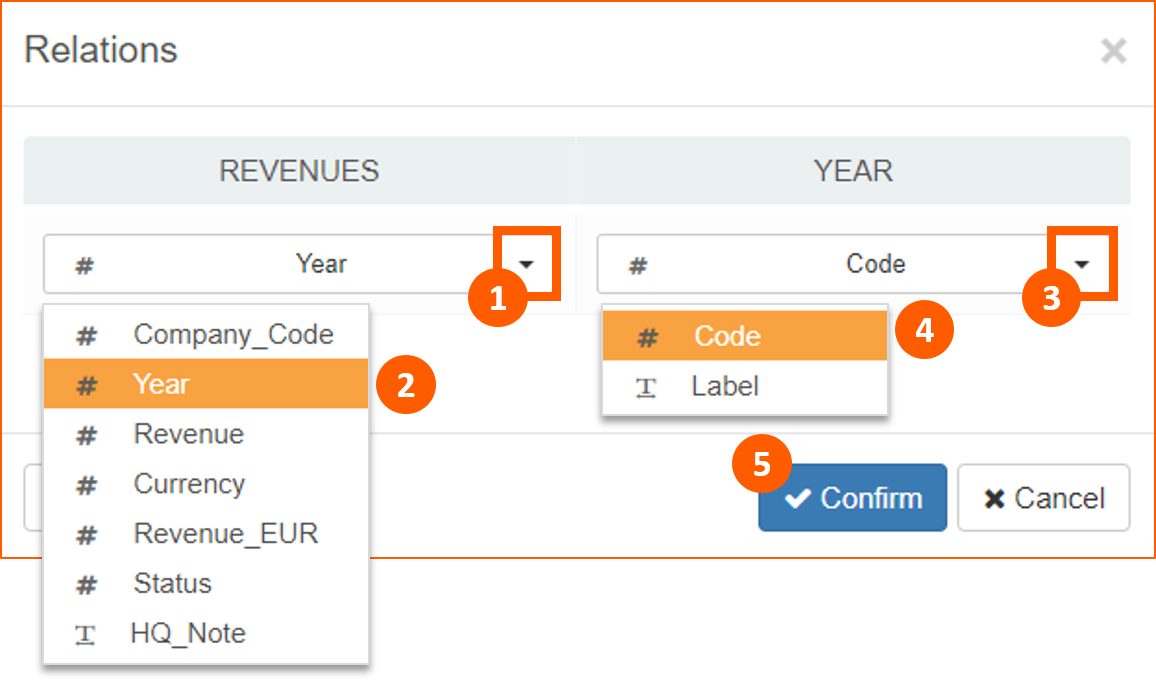
Great! You have just created your first Relation!

Finally click Save and Exit button:
Use Case
- Relations in REVENUES Storage:

- Relations in SUBSIDIARIES Storage:
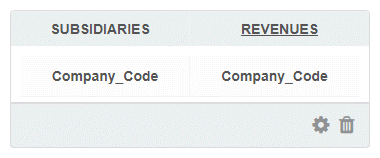
Note: this relation is useful to create the link between SUBSIDIARIES Storage (master information) and REVENUES Storage (details information). In this case we have to select first the key of the master and then the field of the details.