Formulas Use Cases
Info
You can find the syntax and the role of each function and variable in the Functions and Variables Reference. See the reference to learn the use of each function and variable.
The Formulas Use Cases document collects the most common use cases of formulas encountered in every day eLegere use. You can:
- Copy & Paste the formulas and adapt them to your case.
- Use the cases as a blueprint to write your own formulas.
- Combine the cases for more complex uses.
Index
- Appearance
- Calculations
- Notifications
- Restriction
- Disable Changes When the a Project Status is Completed
- Make Mandatory a Motivation Field If the Supervisor Rejects a Request
- Employees Can Only Add New Rows While Managers Can Update or Delete Entries
- The Users Should View Only the Rows They Have Created
- Employees Should View Only Their Rows and the Managers All the Rows
- Restrict Products from a Drop-Down List according to the Selected Category
- Allow Choosing Certain Project Statuses according to the Current Status
- Centralize Who Can Edit or View Data through a Dedicated Application
Info
Each use case has the following format:
Use Case Title
The title of the use case scenario.
Scenario
This paragraph explains the scenario and which necessity the formula must satisfy.
Where to Insert?
This paragraph explains where to insert the related formula.
Formula
This paragraph contains the formula and where to use it.
Each Formula section at the bottom has a summary of the functions and system variables employed in the case.
Commentary
This paragraph discusses how to employ the formula in similar use cases or any exception.
Appearance
This section collects use cases where an application's appearance changes according to certain conditions.
Cell Changes Color When You Record an Expense or Earnings
Scenario
You have a personal budgeting application recording all your expenses and earnings.
The application colors the cell "Value €" of green if the entry is an earning or red if the entry is an expense.
Where to Insert?
If you want to configure a table field's cell to change colors given certain conditions:
-
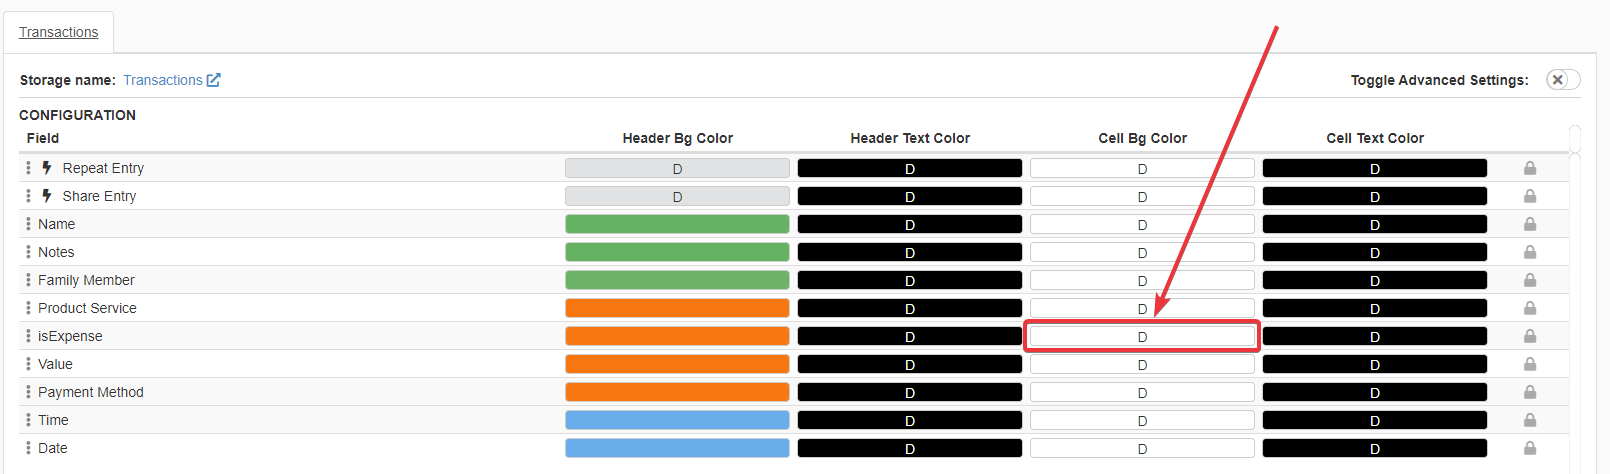
In Design Mode, navigate to Layout.
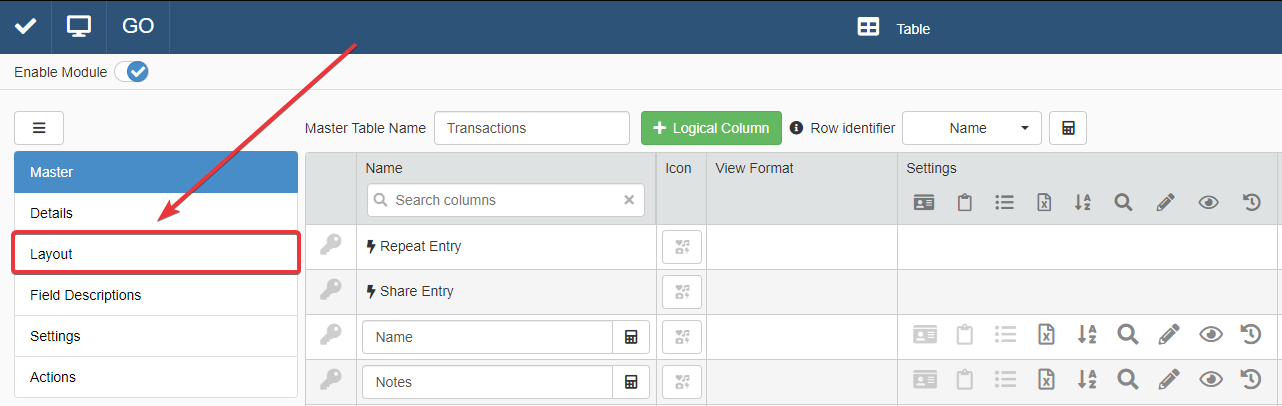
-
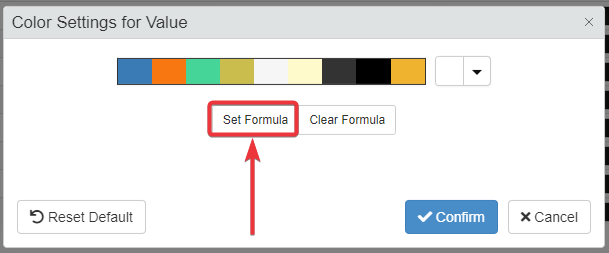
Click on the Cell Background Color button for the cell you want to configure. The action opens the Color Settings window.
-
In the Color Settings window, click on the Set Formula button to open the Formula Editor.
Formula
The following formula checks if the value is positive or negative.
- If positive, the value is an earning and the cell becomes green.
- If negative, the value is an expense and the cell becomes red.
Besides earning and expenses, there could be the case where the inserted value is 0. In case the value is 0, the cell color should be gray.
1 2 3 4 5 6 7 8 9 10 11 12 13 14 15 16 17 18 19 | |
Question
How do you specify a particular color in a formula? You must insert between quotation marks ("") a code specifying the color. eLegere supports any standard HTML color format.
Employed Functions and System Variables
Commentary
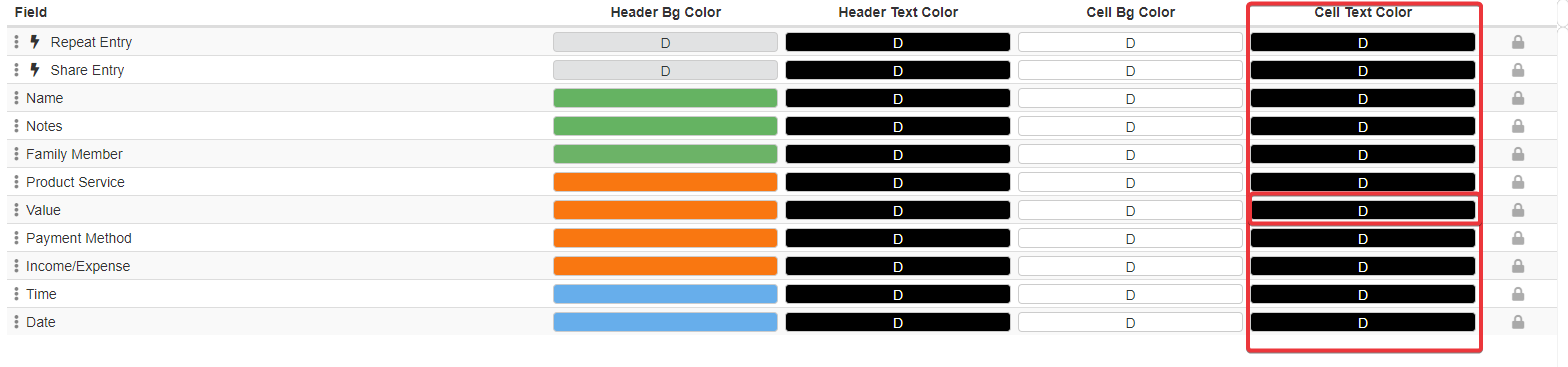
You can employ the same formula pattern also for other Layout components in Design Mode.

For example, if you want to change the cell's text color according to its value, insert the formula by clicking on the Cell Text Color button.
You can use as many Comparison formulas as you want to add conditions and the related colors. In case you want to add more conditions to be satisfied, add an =AND() or =OR() as first parameter of the =IF(). Then add more Comparison functions (e.g. =GT(), =LT(), =GTE(), =LTE(), =EQ()).
Use more than two nested =IF() functions inside one each other to add more conditions to the condition's tree.
Example
An example of nested conditions in a formula.
1 2 3 4 5 6 7 8 9 10 11 12 13 14 15 16 | |
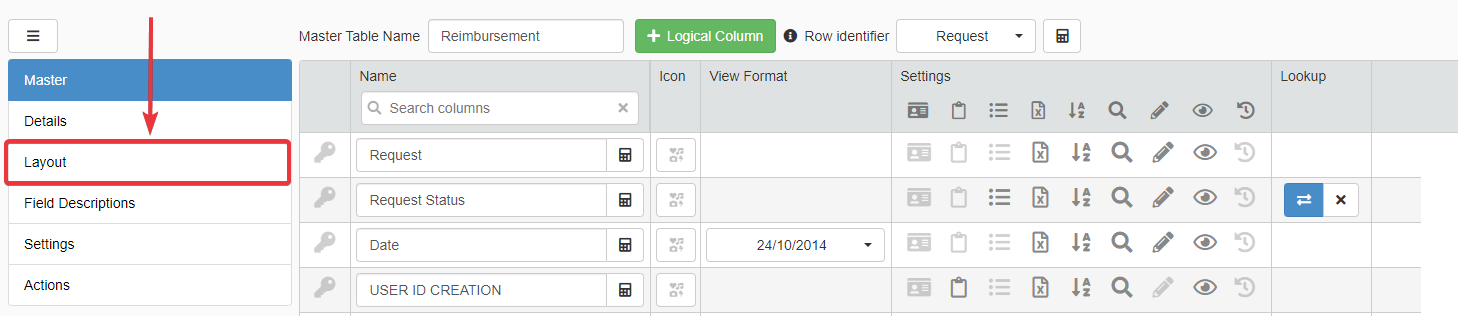
Change Row Color When the Status Changes
Scenario
You have an application that manages the reimbursements.
A Lookup drop-down list records the status of the request (e.g. Draft, Submitted, Approved, Rejected, Revised).
The application must highlight with a different color the entry according to the Status. For example:
- Draft is yellow.
- Revised and Submitted are white.
- Approved is green.
- Rejected is red.
Where to Insert?
If you want to configure a row to change colors given certain criteria:
-
In Design Mode, navigate to Layout.
-
Turn on the Toggle Advanced Settings toggle switch. This action opens the Advanced Settings.

-
Click on the Background button (D) below the Row Colors. The action opens the Row background color window.

-
In the Color Settings window, click on the Set Formula button to open the Formula Editor.
Formula
The formula checks the recorded option in the Lookup drop-down list field Status. Each recorded option has an Id from 1 to 5.
Depending on the value of Status, the formula specifies a color for that status. The application displays then the row using that color.
1 2 3 4 5 6 7 8 9 10 11 12 13 14 15 16 17 18 19 20 21 22 23 24 25 | |
Question
How do you specify a particular color in a formula? You must insert between quotation marks ("") a code specifying the color. eLegere supports any standard HTML color format.
Employed Functions and System Variables
Commentary
You can employ the same formula pattern also for other Layout components in Design Mode.
For example, if you want to change the cell's text color according to the value: insert the Formula by clicking on the Cell Text Color button.
If you need a specific color in case the value doesn't satisfy any of the =CASE() conditions: add =DEFAULT() as last parameter of the =SWITCH() function. =DEFAULT() has only one parameter specifying the default value if no =CASE() conditions are satisfied.
Example
1 2 3 4 5 6 | |
Calculation
This section collects use cases where cell fields calculate their values automatically.
Display the Number of Completed Task in a Daily Task Manager
Scenario
The application is a Task Management application where:
- Each row is a day.
- The Detail contains a row for each task of the day.
For each day, the application must display the number of completed task out of the total number of tasks for that day.
Where to Insert?
If the Designer wants a field that updates in real time, you need to insert the formula in a Logical Column. Logical Columns are not fields existing on the Storage but entities that calculate in real time the required data.
-
In Design Mode, click on the Add Logical Column button on the Master panel.

-
Choose Calculation type for the Logical Column and where to insert the Logical Column in the table.
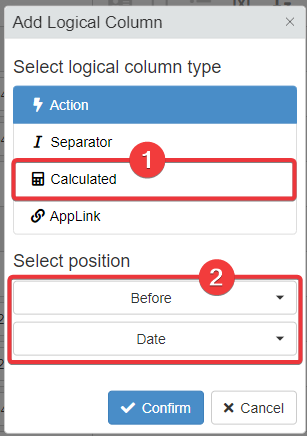
-
The actions in steps 1-2 move the user to the Logical sub-panel. Add a name to the new Logical Column (e.g. Tasks Progressions).

-
Move to the Master table's Formula panel. Click on the icon of the Logical Column to open the Formula Editor.

Formula
The Task Management application has a Detail containing a series of tasks for each day. The Detail is called dailyTasks. Each row in dailyTask has a flag to sign each task as Completed (i.e. the Completed field).
Each Master row should show Logical Column with the total number of tasks and the number of completed task.
Insert the formula in a Logical Column's Formula Editor.
Question
In this case, the value must be a text (String) instead of a number (Numeric). This because Numeric field values don't allow inserting alphanumeric characters or strings like \, @, task, and so on.
1 2 3 4 5 6 7 8 9 10 11 12 13 14 15 16 17 18 19 20 21 22 23 24 25 26 27 28 29 30 31 32 | |
Employed Functions and System Variables
Commentary
If you want to calculate data on the fly that you don't need to record, use a Calculated Logical Column. Calculated Logical Columns calculates any formula and displays their result in real time.
If you have to create a text using a mix of field cells' values and fixed text, use the =CONCAT() function. =CONCAT() supports as many String type parameters as the Designer wants.
Example
You could use the =CONCAT() to create a unique code starting from other fields. You use functions like =RIGHT(), =LEFT(), and =SUBSTRING() to take strings and compose them through =CONCAT().
The =AGGREGATEDETAILS() function has multiple employments; counting the number of rows in a Detail is one of them. You can use =AGGREGATEDETAILS() to sum, find the highest or lowest value or obtain the numeric average value of a field on the Detail.
Calculating an Item Price including the VAT (%)
Scenario
The application should calculate the final cost of the item taxes (VAT) included.
The user chooses a country from a Lookup drop-down list. The item's final price should change according to the country's local VAT.
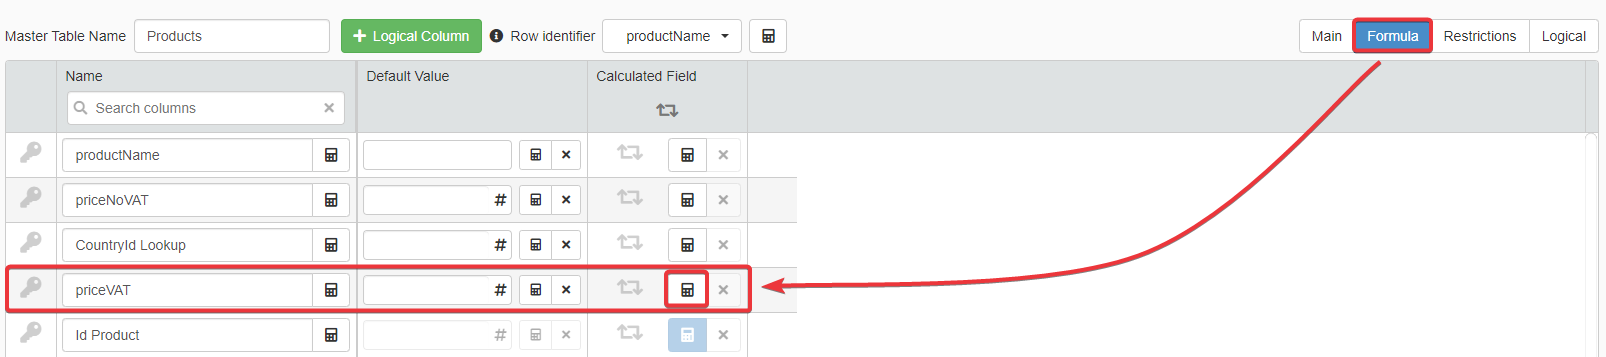
Where to Insert?
In the Formula sub-panel, insert the formula under the Calculated Field column in correspondence to the field's row.
-
In the Design Mode, go to the table containing the price with VAT's Calculated field.
-
Click on the Formula sub-panel.

-
Click on the icon under the Calculated Field column corresponding to the price with VAT field.
Formula
The formula makes two arithmetic calculations by picking up the VAT from the countries' Storage (called in the example sCountriesInfo).
Note
Applications can represent a percentage as a integer number (es. 100%, 50%). In Storages, Numeric type fields records the percentages (%) as decimal numbers. E.g. 22 % = 0.22, 7% = 0.07
The field CountryId_Lookup records the Countries' reference (Id) from #sCountriesInfo. #sCountriesInfo contains the country's name and its VAT (%).
Insert the formula in the field that will record the final price VAT included.
1 2 3 4 5 6 7 8 9 10 11 12 13 14 15 16 17 18 19 20 21 22 23 24 25 26 27 | |
Note
#sCountriesInfo.VAT stores the VAT (%) as decimal number; so, multiplying the price without VAT (i.e. priceNoVAT) for the #sCountriesInfo.VAT's value is enough to calculate the Valued-added tax.
Employed Functions and System Variables
Commentary
You can use the same formula pattern for each case where you must retrieve a value from another Storage and use it for calculations.
Use the =LOOKUP() function and the third parameter to identify the value you are looking for.
Example
You can use the same use case for differentiated VAT percentages according to a product or service category. (E.g. 4% for food, 15% for books, 10% electricity and gas.)
Record the Current Date When You Add a New Entry
Scenario
In an application, creating a new row should fill a Date o Date-Time field with the current date automatically.
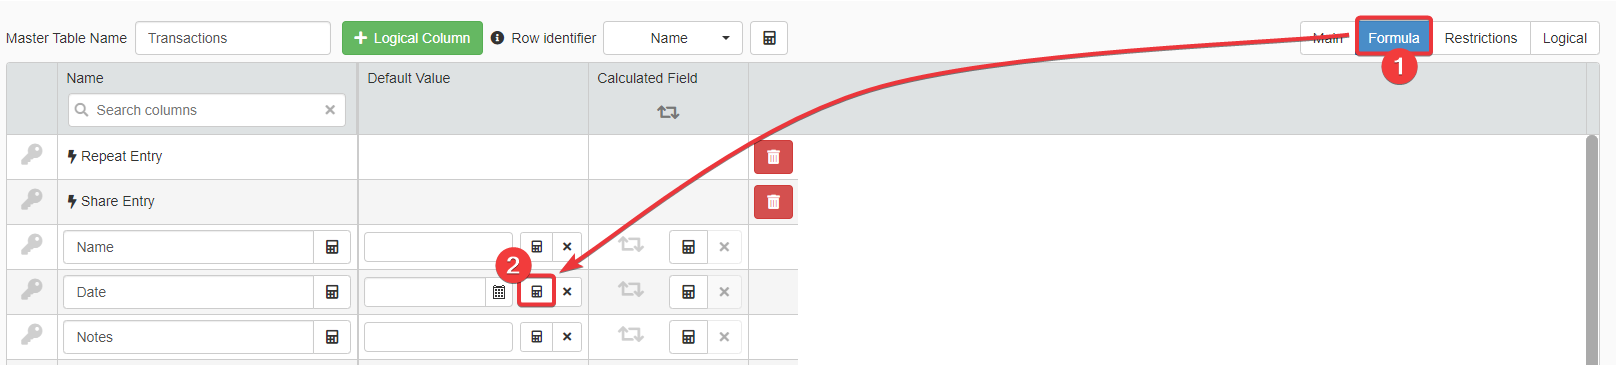
Where to Insert?
The current date should be a Default Value: every time the user inserts a new row in the application, the field must have that particular value. In this case, the value of the current Date or Date and Time (if the field is Date-Time).
-
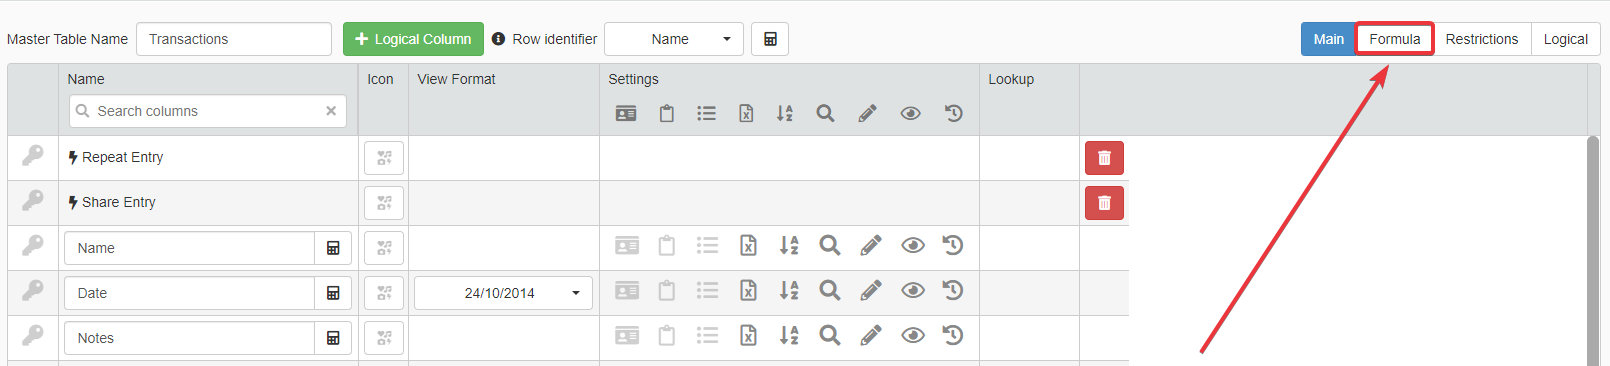
In the Design Mode, go to the table containing the Date or Date-Time field.
-
Click on the Formula tab.
-
Next to the desired Date or Date-Time field, click on the icon in the Default Value column.
Formula
The formula is just a variable pointing to the current Date or Date-Time (depending on the field's type).
1 2 3 | |
Employed Functions and System Variables
Commentary
You can use the $CURRENTDATE system variable within String type fields to point to the current date.
Use =CONCAT() functions if you want to add a Date to a text.
Example
The formula below creates a sentence starting from a String type field (i.e. Username) and the $CURRENTDATE variable.
1 | |
=FORMATDATE() inside the =CONCAT() function. $CURRENTDATE represents the current Date in the eLegere proprietary format. You need =FORMATDATE() to format the Date in a readable format; e.g. dd/mm/yyyy or mm-dd-yyyy.
You can find here a list of format options for the =FORMATDATE()'s third parameter here.
Notifications
This section collects use cases where you configure notifications' content and behavior through formulas.
Sending a Notification When a Request is Submitted
Scenario
An application enables the employees to request holidays and time-off.
The application must warn through an email the Supervisors of any submitted request waiting approval or rejection.
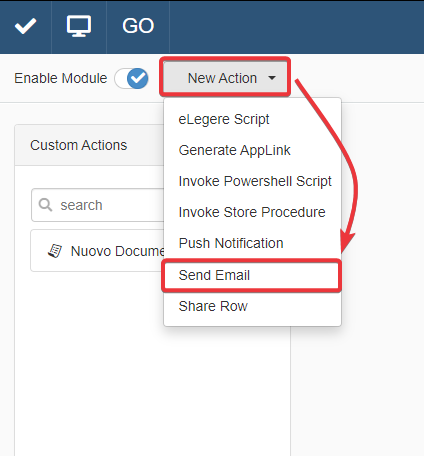
In eLegere, Designers can configure applications to send email notification automatically. The Designers to do so must create a Send Email type Custom Action. Designers can define receivers and content dynamically using formulas.
Where to Insert?
You must create a Send Email Custom Action first. Use the formulas to define the notification's receivers, Subject, and Body dynamically.
Follow the steps below to create the Send Email Custom Action:
-
In the Design Mode, click on the icon on the top-right corner of the interface.

-
Click on the New Action drop-down list and choose Send Email as option.
-
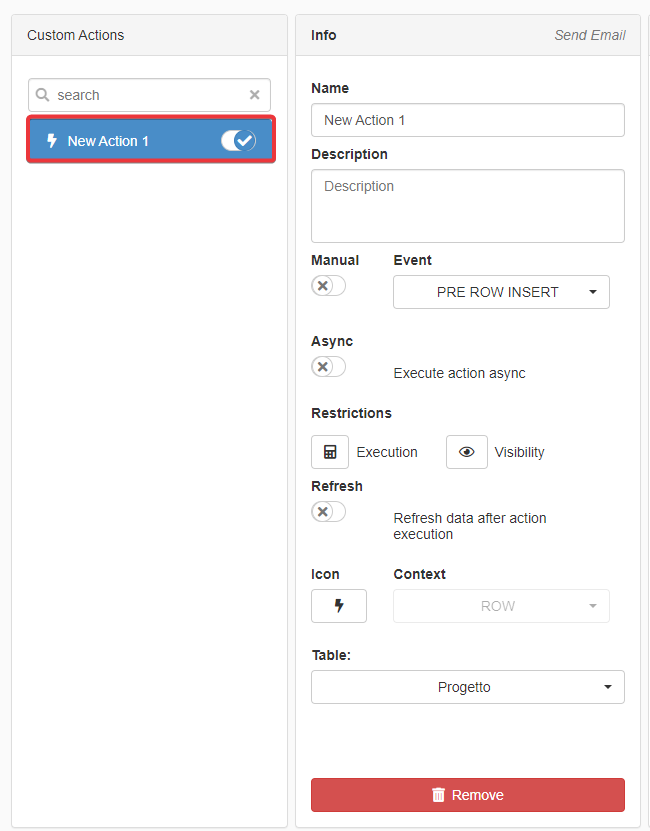
In the left side-bar with the Custom Actions' list, click on the action you have created.
-
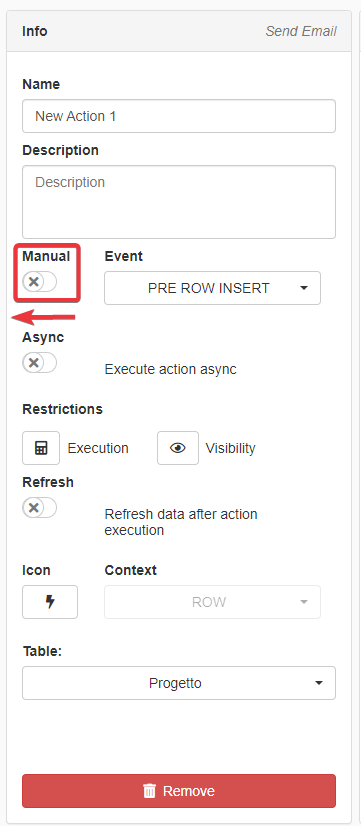
Disable the Manual toggle switch. The action runs when an event triggers the activation.
-
Choose POST ROW INSERT as option from the Event drop-down list. This option triggers the action at each new entry on the table.
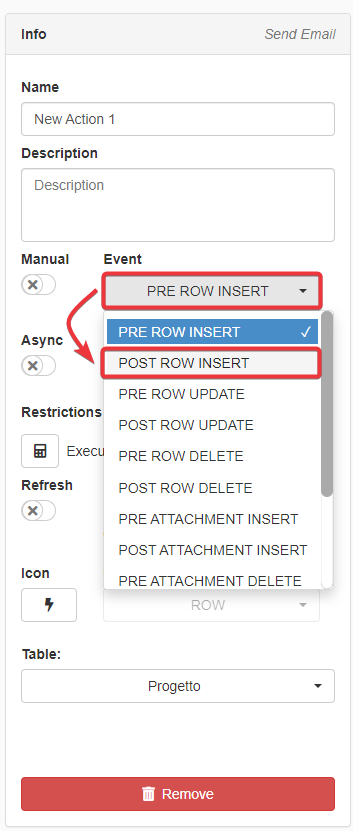
Designers can insert formulas:
- In the To: field through the icon.
- In the Subject.
- In the Body.
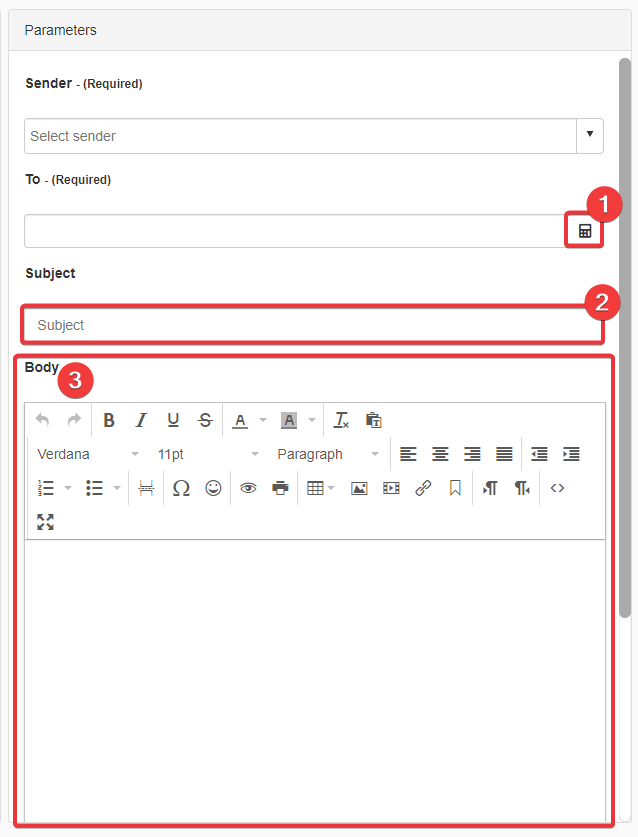
Note
Inserting formulas either in the Subject or the Body requires enclosing the formula between two squared brackets []. Inside Subject and Body in Send Email Custom Actions, applications interpret formulas outside squared brackets [] as standard text and won't run them.
Formula
The Custom Action Send Email employs three separated formulas in the three sections To:, Subject, and the Body.
You must insert the formulas in these sections of the Send Email Custom Action sub-panel.
- For the To:, you need a formula to retrieve the supervisors' list.
- For the Subject, you need a formula to record the request's Date and Time.
- For the Body, you need a link to the request to speed up the approval o rejection. It is optional but useful.

Employed Functions and System Variables
To: Field
For the To:, you need a formula to retrieve the supervisors' list.
Click on the icon next to the To: field.
Note
In this case, you don't need enclosing the formula between two squared brackets []. You are inserting the formula in the Formula Editor.
The function =GROUPUSERSEMAILS() specifies in the To: to take all the email addresses of the "Supervisors" User Group's members.
The Custom Action will send the email to everyone belonging to the "Supervisors" User Group.
1 | |
Subject
For the Subject, you need a formula to record the request's Date and Time.
Note
The formula goes into a Subject field. It requires the squared brackets to be interpreted as formula ([]).
Type a standard template text for the email's Subject. For example:
1 | |
Add the formula to insert the Date at the end of the standard template text.
The formula's task is taking the current Date ($CURRENTDATE) and displaying it (=FORMATDATE) according to the format "day-month-year hour:minutes" ("dd-mm-yy hh:mm").
$CURRENTDATE retrieves the current Date and Time.
The function =FORMATDATE() formats the current Date and Time according to the following format: "dd-mm-yy hh:mm".
1 | |
Body
For the Body, you could insert a link to the request to speed up the approval o rejection. It is optional but useful.
Note
The formula goes into the Body text. It requires the squared brackets to be interpreted as formula ([]).
Write a template text for the Body. For example:
1 | |
The formula goes into a Body's text.
Creates a link (=GENERATEROWLINK) to the specified row in the application's Storage (#sHolidayRequests).
The formula yields a link redirecting to the application and the new entry. It points to the application and Storage #sHolidayRequests that contain the requests.
1 | |
Commentary
You can use the same formulas even for notification about rows' changes, deletion or attachments (upload, download or deletion). Choose a different trigger from the Event drop-down list from the Info panel.
Example
- POST ROW UPDATE Choose from the Event drop-down list if you want to warn the User Group after any edits.
- POST ROW DELETE Choose from the Event drop-down list if you want to warn the User Group after any deletion.
- POST ATTACHMENTS INSERT Choose from the Event drop-down list if you want to warn the User Group after any attachments' uploads.
- POST ATTACHMENTS DELETE Choose from the Event drop-down list if you want to warn the User Group after any attachments' deletion.
You can find all the supported Date/Time formats for the third parameter of =FORMATDATE() function here.
If you want to insert a link to a different application using =GENERATEROWLINK():
- Insert as first parameter the Storage name of the other application.
- Insert as second parameter the field to consider from the Storage.
- Insert as third parameter the field designated as Primary Key in the application.
- The Id of the external application between quotation marks (
"").
Example
An example of use to link a row to an application different from the current one.
1 | |
Restriction
This section collects use cases where you can restrict the displayed application's content or operations (e.g. adding, editing, or deleting rows).
Disable Changes When the Project Status is Completed
Scenario
A Project Management application must block any change to a project's row when its status is Completed.
Only members of the "Chief Directors" User Group can modify any project at any stage, included Completed.
Where to Insert?
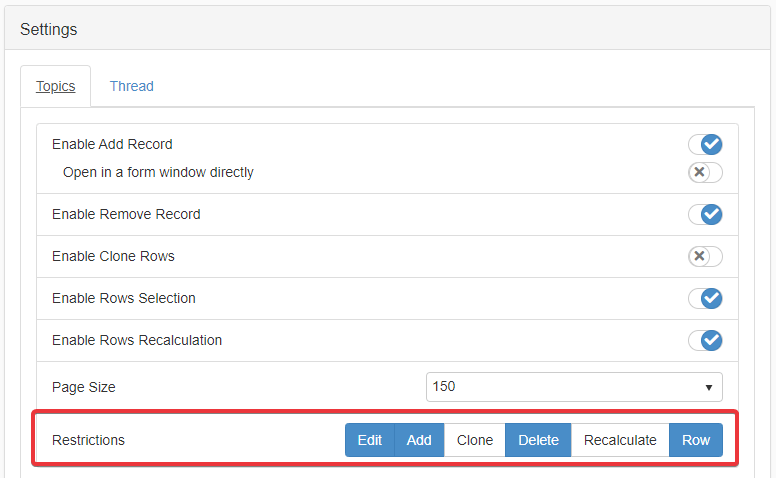
If you want to add any restriction to a table regarding adding, editing, cloning or deleting rows:
-
In Design Mode, navigate to the Settings sub-panel.
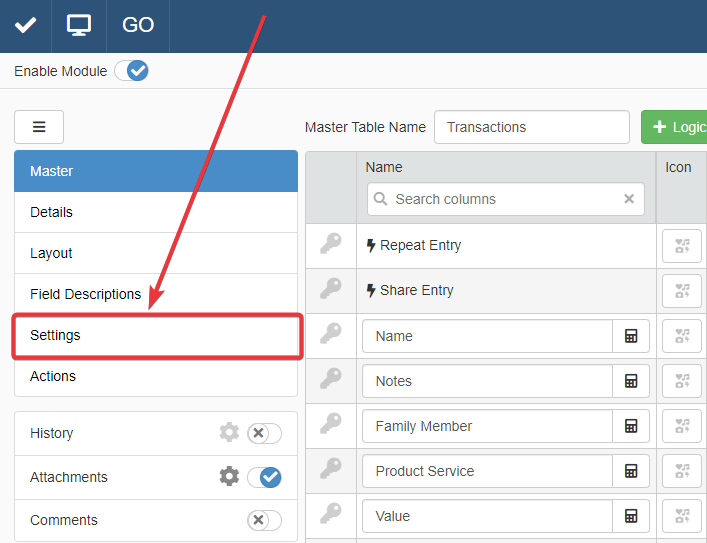
-
The Settings sub-panel has a tab for each application's table. Navigate the desired table (1) to apply the restriction.
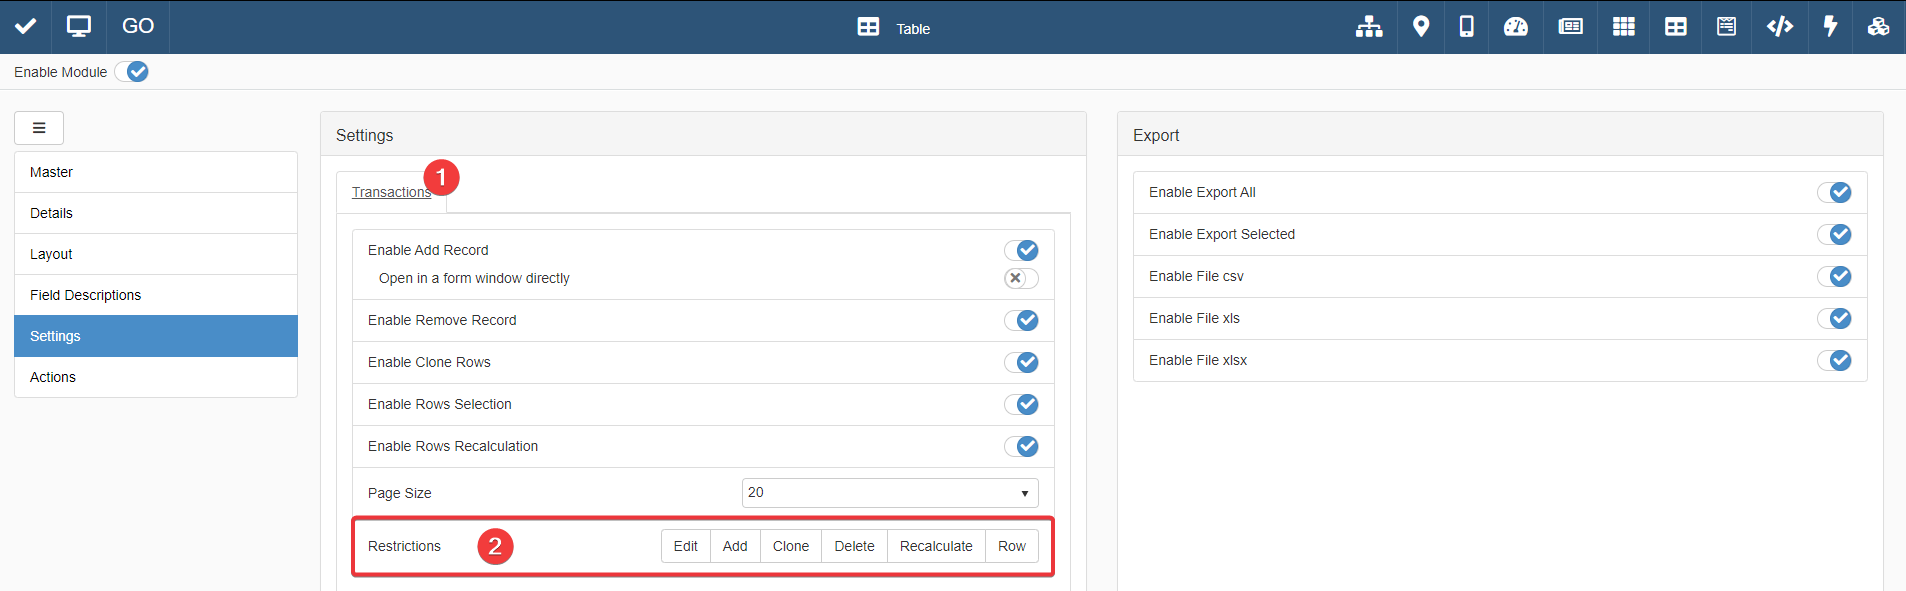
-
According to the kind of restriction, choose either Edit, Add, Clone, Delete, Recalculate, and Row in the Restriction (2) section of the Settings.
In this case scenario, you should apply the formula restriction to Edit.
Formula
Insert the formula in Settings > [Table's Tab] > Restrictions > Edit.
The formula displays either all the rows or certain rows according to the User's Group.
1 2 3 4 5 6 7 8 9 10 11 12 13 | |
Employed Functions and System Variables
Commentary
You can create more complex conditions for restriction by using Comparison functions like =AND(), =GT(), =GTE(), =LT(), =LTE(), =NEQ() or =EQ().
Make Mandatory a Motivation Field If the Supervisor Rejects a Request
Scenario
An application enables the employees to request holidays and time-off.
If a Supervisor rejects a submitted request, the Supervisor must fill the field Motivation with a motivation.
Where to Insert?
If you want to add any restriction to specific fields' cells, you must go to the Restrictions sub-panel.
-
Navigate to the table containing the field.
-
Click on the Restriction sub-panel button.

-
Click on the Cell Mandatory Restriction button next to the field you want to restrict.

Insert the formula in the Cell Mandatory Restriction for the Motivation field.
Formula
The field Motivation records a text explaining the status' choice motivation.
If the status is Rejected, then the user must insert a motivation for the rejection.
1 2 3 4 5 6 | |
Employed Functions and System Variables
Commentary
You can add any Comparison function in a Cell Mandatory Restriction to set conditions that make a field mandatory if verified. For example: =NEQ(), =ISNULL(), =ISNOTNULL(), =GT(), =GTE(), =LT(), and =LTE().
Employees Can Only Add New Rows While Managers Can Update or Delete Entries
Scenario
In a budgeting application, each user can record the expenses made, but they cannot make any change nor delete their entries.
In this scenario, only the budget's managers can update or delete the rows in the application.
Where to Insert?
If you want to add any restriction to a table regarding adding, editing, cloning or deleting rows:
-
In Design Mode, navigate to the Settings sub-panel.
-
The Settings sub-panel has a tab for each application's table. Navigate the desired table (1) to apply the restriction.
-
According to the kind of restriction, choose either Edit, Add, Clone, Delete, Recalculate, and Row in the Restriction (2) section of the Settings.
In this case scenario, you should apply the formula restriction to Edit and Delete.
Formula
The following formula verifies that the user belongs to the "Managers" group.
1 2 3 4 5 6 7 8 9 10 | |
Employed Functions and System Variables
Commentary
In the example above, only users belonging to the "Manager" User Group can either edit or delete any row of the table.
If you want to enable more than one User Group for editing or deleting rows: you can use the function =CONTAINSLIST() and =LIST() as second parameter. =CONTAINSLIST() works like the =CONTAINS() function, but =CONTAINSLIST() checks if a list contains one or more elements from =LIST().
Example
The formula checks if the user belongs to either "Managers" or "Product Owners" or "Developers" User Groups. If the user belongs to at least one of the User Groups, the application enables both editing and deleting.
1 | |
The case scenario takes as example a restriction for editing and deleting. If you want to restrict Add, Clone, and Recalculate to certain User Groups, the same formula works as well for these actions.
The Users Should View Only the Rows They Have Created
Scenario
In an application managing the family budget, each user must view only their own rows with their own expenses or income. In this way, their privacy is kept.
Where to Insert?
If you want to add restrictions about what rows a user can see in an application:
-
In Design Mode, navigate to the Settings sub-panel.
-
The Settings sub-panel has a tab for each application's table. Navigate the desired table (1) to apply the restriction.
-
According to the kind of restriction, choose either Edit, Add, Clone, Delete, Recalculate, and Row in the Restriction (2) section of the Settings.
In this case scenario, you should apply the formula restriction to Row.
Formula
The formula displays to the current user only the rows they have created.
Question
USER_ID_CREATION field is a System Field: each Storage you create has this field. Refer to USER_ID_CREATION in your formulas if you want to enable actions or display only the rows that the current user created.
1 2 3 4 5 6 7 8 9 10 11 12 13 | |
Employed Functions and System Variables
Commentary
Every time you want to restrict the displayed rows, you can use any Comparison function. For example: =NEQ(), =CONTAINS() or =CONTAINSLIST().
The pattern is comparing a one or more values with other values: if the values are the same, the row satisfies the condition and the application displays it.
Employees Should View Only Their Rows and the Managers All the Rows
Scenario
A task management application records what each user has done and when.
Employees and Managers view different sets of rows.
| User Group | Row |
|---|---|
| Employees | Only the rows they have created. |
| Managers | All the rows of all the users. |
Each row has a field recording who has performed the task.
Where to Insert?
If you want to add restrictions about what rows a user can see in an application:
-
In Design Mode, navigate to the Settings sub-panel.
-
The Settings sub-panel has a tab for each application's table. Navigate the desired table (1) to apply the restriction.
-
According to the kind of restriction, choose either Edit, Add, Clone, Delete, Recalculate, and Row in the Restriction (2) section of the Settings.
In this case scenario, you should apply the formula restriction to Row.
Formula
Each row has a Lookup drop-down list field CompanyMembersId_Lookup to assign the user to a specific tasks. CompanyMembersId_Lookup refers to the list of company members (#CompanyMembers). The Storage #CompanyMembers has among its fields the Email field. The formula uses this field on #CompanyMembers to identify the rows of users that aren't in the User Group "Managers".
The formula checks if the user is a Manager or Employees. The formula grants either total access (Manager) or display only certain rows according to the User Group (Employees).
1 2 3 4 5 6 7 8 9 10 11 12 13 14 15 16 17 18 19 20 21 22 23 24 | |
Employed Functions and System Variables
Commentary
You can use the formula pattern above to add as many restrictions and conditions as you want.
Add to the =OR() parameters as many User Groups as you want through the =CONTAINS() function. If a User Group can see only the rows satisfying certain condition, enclose them in the =AND() function together with the =CONTAINS() function.
Use the function =LOOKUP() to retrieve any information outside the current application's Storage.
Example
An example of multiple =AND() function specifying multiple cases in the =OR().
1 2 3 4 5 6 7 8 9 10 11 12 13 14 | |
Restrict Products from a Drop-Down List according to the Selected Category
Scenario
An application manages and tracks orders from a warehouse.
The user should choose an item category and be able to view and choose only the products of that category.
Where to Insert?
productCategory is a Lookup drop-down list field. Users choose the Product category from this drop-down list.
productList is a Multiselection field recording one or more products from the Storage #Products.
You must insert the formula as a Restriction Formula for the Multiselection.
-
In the Design Mode, go to the table containing the two fields.
-
Click on the Create the Lookup Relation button () of the Lookup field you want to apply the restriction formula.
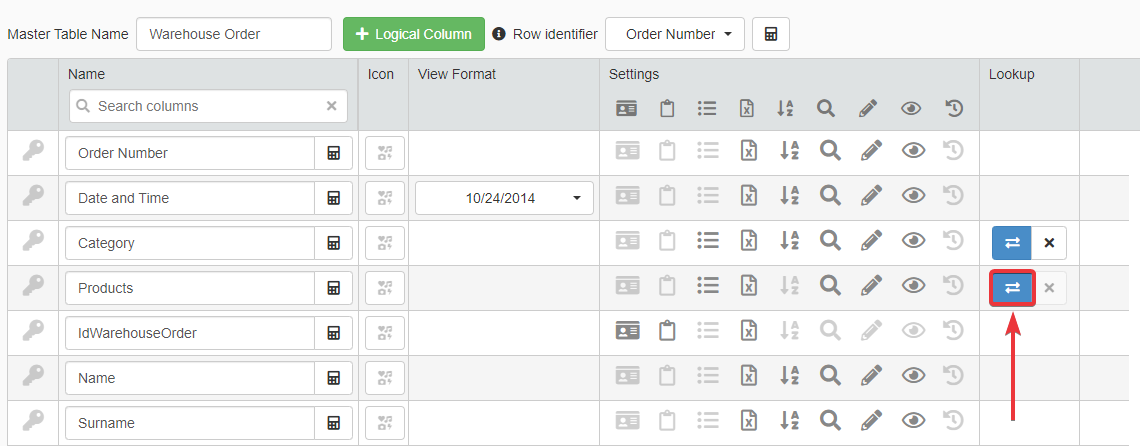
-
In the options window, click on the icon corresponding to the Restriction Formula.
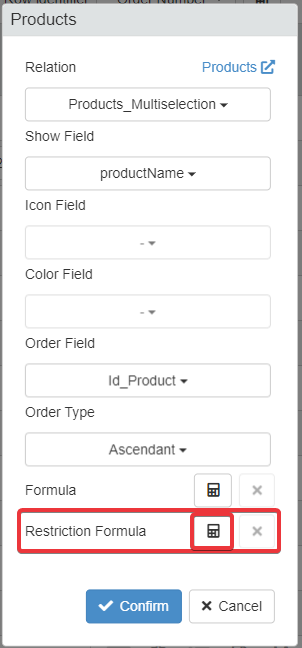
Formula
The formula shows in the product's list only the items belonging to the chosen category.
1 2 3 4 5 6 7 8 9 10 11 12 13 14 15 16 17 18 | |
Employed Functions and System Variables
Commentary
Every time you have two Lookup drop-down lists or one Lookup drop-down list and a Multiselection field, use the =LOOKUPLIST() function to filter the items according to value of one of the two fields.
As condition, you can use any function that compares two values; for example: =EQ(), =NEQ(), =GT(), =LT(), =GTE(), and =LTE(). You can join as many functions as you like through the =AND() and =OR() functions.
Allow Choosing Certain Project Statuses according to the Current Status
Scenario
You have an application to record the status of different projects.
Once the project owner has chosen a new status for the project, they shouldn't revert it to previous stages.
Where to Insert?
You must insert the formula as a Restriction Formula in the drop-down list Lookup options' window.
-
In the Design Mode, go to the table containing the Lookup drop-down list.
-
Click on the Create the Lookup Relation button () of the Lookup field you want to apply the restriction formula.
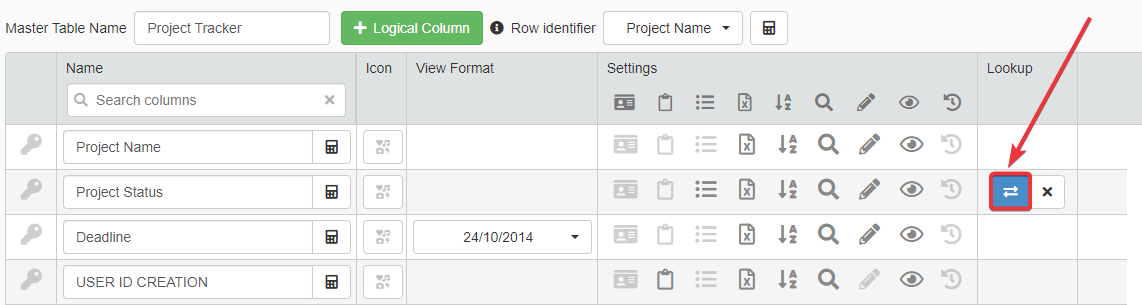
-
In the options window, click on the icon corresponding to the Restriction Formula.
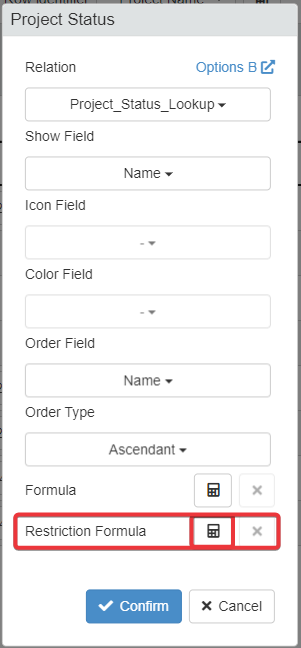
The Lookup drop-down list is projectStatus field and takes the options from the Storage sProjectStatuses.
sProjectStatuses contains the following projects' statuses with their related Id:
| Id | Status |
|---|---|
| 1 | Draft |
| 2 | Submitted |
| 3 | Approved |
| 4 | Rejected |
The default value is the Id 1 (i.e. the Draft status) in Table > Formula > Default Value for the field.

Insert the formula in the Lookup drop-down list's Restriction Formula.
1 2 3 4 5 6 7 8 9 10 11 12 13 14 15 16 17 18 19 20 21 22 23 | |
Example
=LIST(1;2) means that the formula must display from the Storage sProjectStatuses only the options with Id 1 and 2.
Commentary
You can set up as many conditions as you want to display certain values from the options' Storage in a Lookup drop-down list.
As condition, you can use any function that compares two values; for example: =EQ(), =NEQ(), =GT(), =LT(), =GTE(), and =LTE(). You can join as many functions as you like through the =AND() and =OR() functions.
You can also employs the =CONTAINS() function and the $CURRENTUSER.GROUPNAMES system variable to show certain sets of options only to specific User Groups.
Example
An example showing how to differentiate options in a Lookup or Multiselection field by the User Group.
1 2 3 4 5 6 7 8 9 | |
Centralize Who Can Edit or View Data through a Dedicated Application
Scenario
An organization is using eLegere as platform for a forum where users exchange tips and ask questions about their products. The application is called Answers.
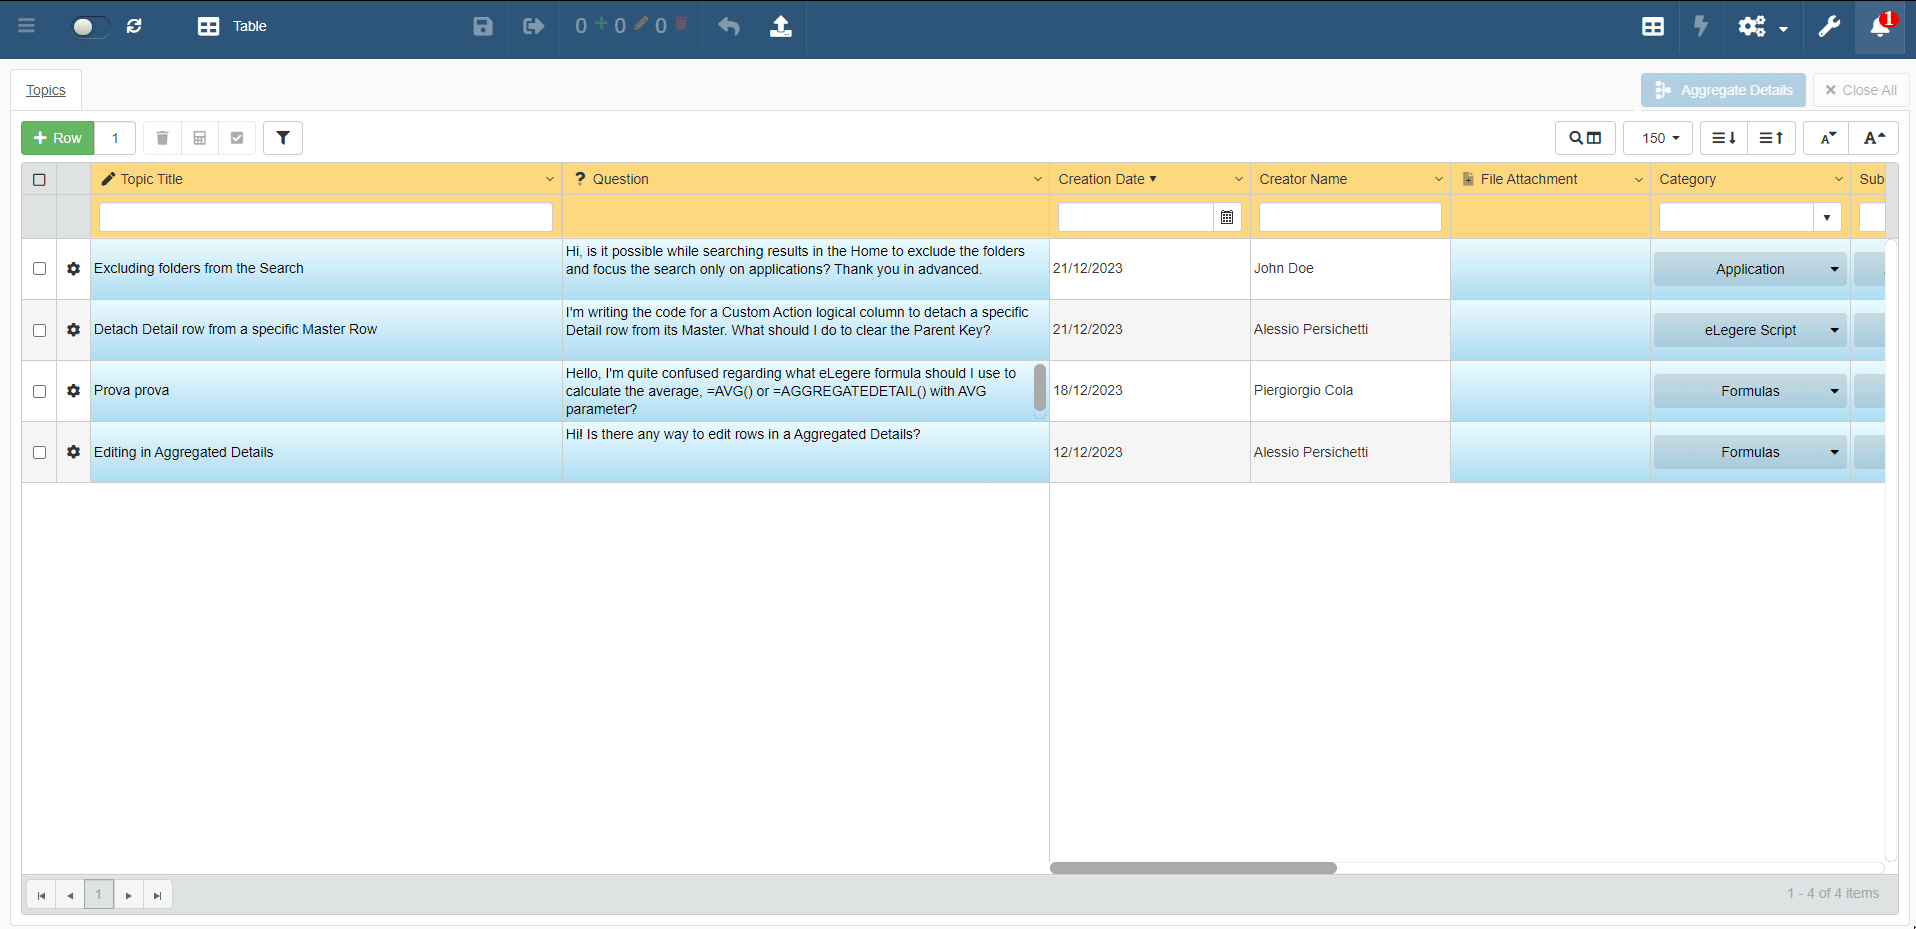
Each row on the Master table is a question's topic. Each question on the Master table has Detail table called Thread: it contains the answers from other users. In both the tables, there is a dedicated column to flag and hide posts with inappropriate content.
The organization prefers to centralize users' management (e.g. moderation, banned users, and so on) and related permissions in an application instead of using User Groups.
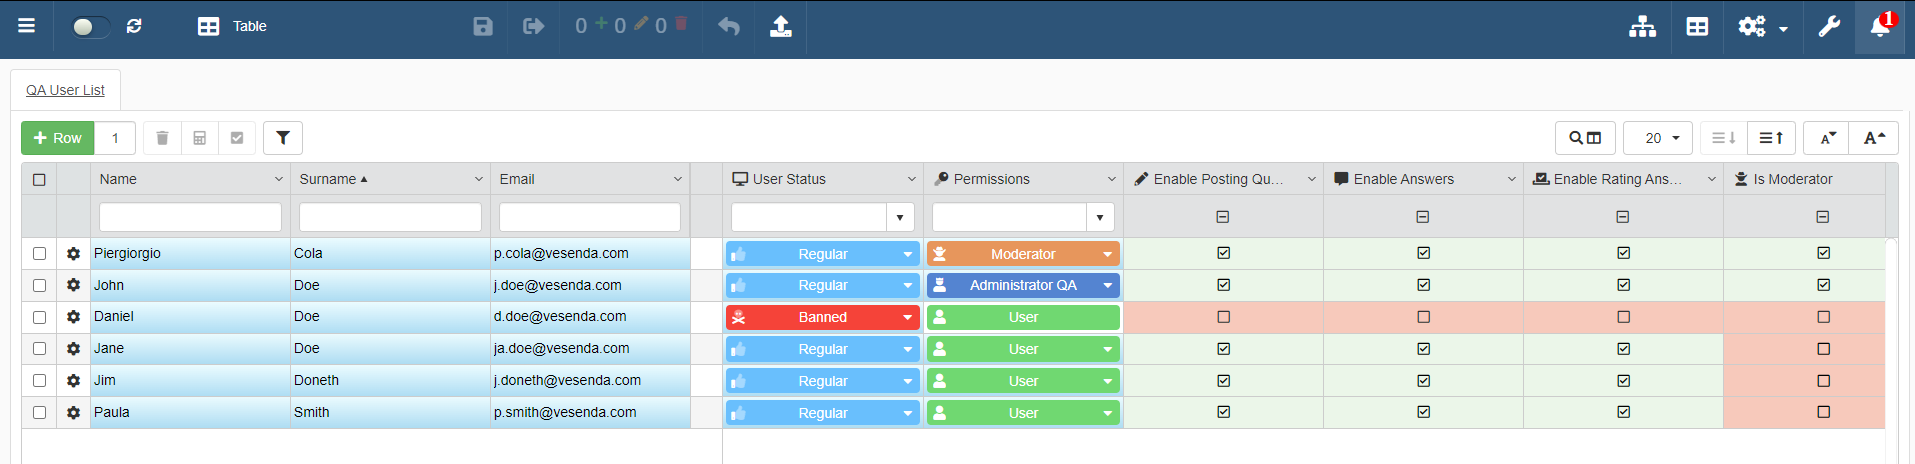
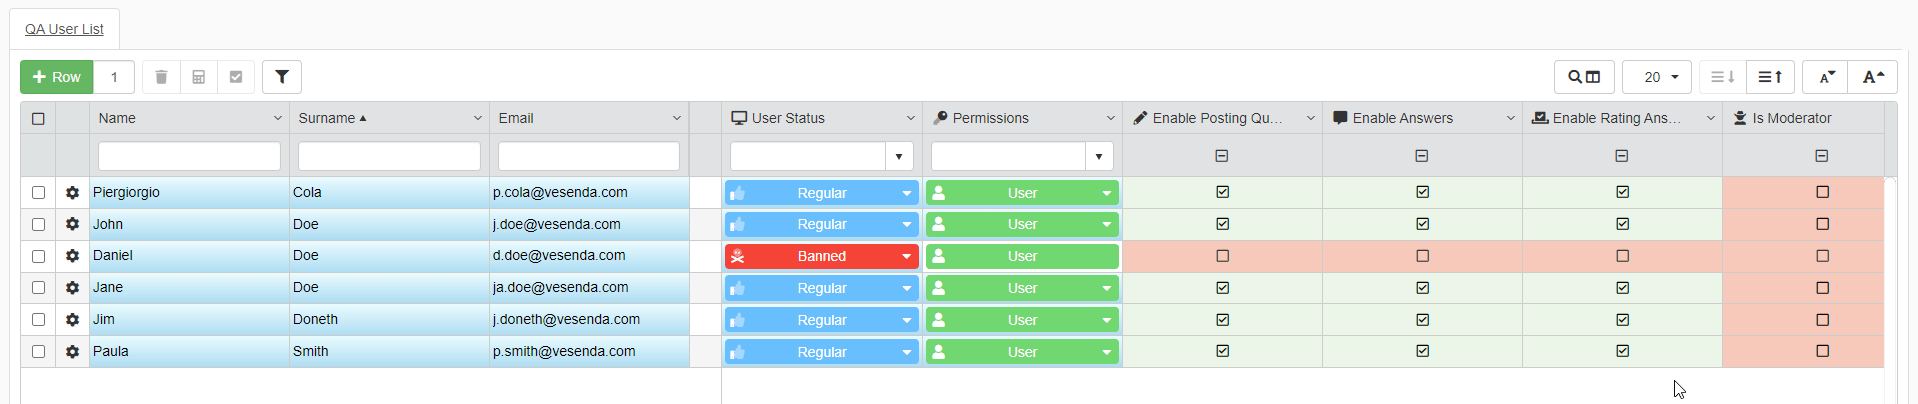
The application which manages the users is called User List and has the following fields:
| Field Name | Type | Description |
|---|---|---|
| Name | String | The user's name |
| Surname | String | The user's surname |
| String | Email address | |
| UserStatus | Numeric | Field used for a Lookup drop-down list. It stores the reference to a Storage containing the users' statuses (e.g. Regular, Banned.). |
| Permissions | Numeric | Field used for a Lookup drop-down list. It stores the reference to a Storage containing the users' roles. According to the permissions, the application enable certain operations by assigning a true value to the Boolean fields below. |
| EnablePostingQuestions | Boolean | If true, the user can post questions in the application. If false, the user can't post questions. |
| EnableAnswers | Boolean | If true, the user can post answers to the questions. If false, the user can't post answers. |
| EnableRatingAnswers | Boolean | If true, the user can rate the answers. If false, the user can't rate the answers. |
| IsModerator | Boolean | If true, the user can moderate questions and answers and hide inappropriate content. |
| EnableCategoriesEdit | Boolean | If true, the user can add new categories and subcategories for threads in a dedicated application. |
| EnableUserManagement | Boolean | If true, the user can add users and manages their permissions in the User List application. |
| IdUserQA | Identity | The Identity field identifying each user univocally. |
Each Boolean field stands for a permission (e.g. Enable Posting Question, Enable Answers).
Assigning a role calculates the assigned permission automatically. The administrators can customize the permissions for each user.
Also, administrators can suspend o ban users from the forum activities in the same application.
Where to Insert?
You must insert the formulas in the Answers application's Design Mode. From Answers, the formulas will access the Users List application's Storage and read each assigned permission, enabling or forbidding certain actions. In particular, you must insert the formula on the Settings for the Restriction section. There is a formula for each Restriction type.
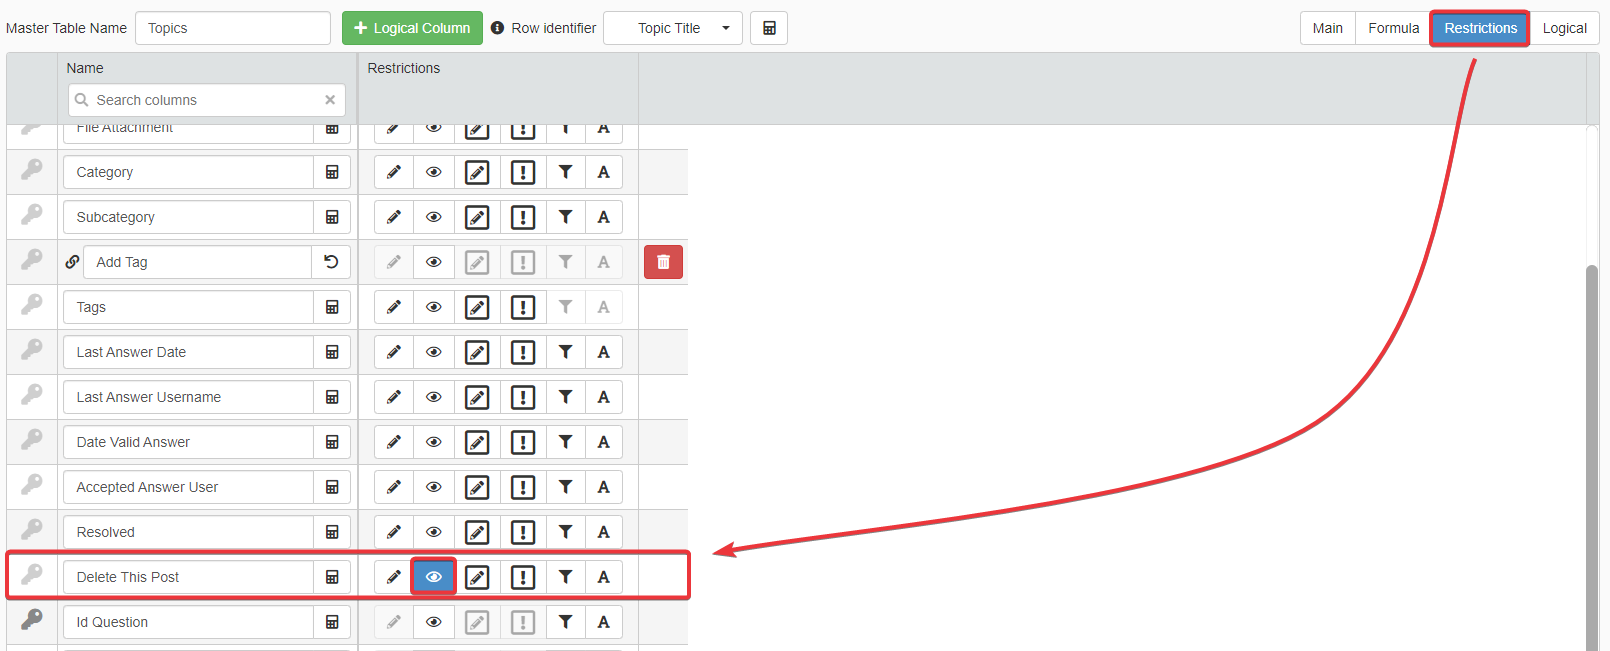
Also, another formula in the Restriction panel for the Column Visibility Restriction is required. You must insert such formula for both the Delete this Post (on Master table) and Moderators Delete (on the Detail Table Thread) columns.

Formula
Edit
1 2 3 4 5 6 7 8 9 10 11 12 13 14 15 16 17 18 19 20 21 22 23 24 25 26 27 28 29 30 31 32 33 34 35 36 37 38 39 40 | |
Add
1 2 3 4 5 6 7 8 9 10 11 12 13 14 15 16 17 18 19 20 21 22 23 24 25 26 27 28 29 30 31 32 33 34 35 36 37 38 39 40 41 | |
Delete
1 2 3 4 5 6 7 8 9 10 11 12 13 14 15 16 17 18 19 20 21 22 23 24 25 26 27 28 29 30 31 32 33 34 35 36 37 38 39 40 41 | |
Row
1 2 3 4 5 6 7 8 9 10 11 12 13 14 15 16 17 18 19 20 21 22 23 24 25 26 27 28 29 30 31 32 33 34 35 36 37 | |
Column Visibility Restriction on Master and Detail Tables
Insert the formula on both Master and Detail tables in their Restriction panels. You must insert the formula in the Column Visibility Restriction for the Delete this Post and Moderators Boolean fields.
1 2 3 4 5 6 7 8 9 10 11 12 13 14 | |
Employed Functions and System Variables
Commentary
You can use the same formula pattern to:
- make editable certain columns only (Restrictions > Column Editability Restriction)
- make editable certain cells (Restrictions > Cell Editability Restriction)
- allow launching certain Custom Actions (Custom Actions panel > [Choose a Custom Action from the List] > Restrictions > Execution)
only to specific user statuses or flagged options in the dedicated permissions' application. Change the columns' names in the placeholders within the use case' formula.
In brief, use the same formula patterns when a Storage contains the users' permission and you must access them from another application to allow certain action or display only specific data.