Details - Showing secondary data related to the row
Note
This tutorial presupposes what done in Lookups: Cells with a List of Options to Choose a Value from tutorial. If you have missed or skipped the previous tutorial or you want to experiment and go back, do not worry! You can import this .eap file to sync or restore with what you see in this documentation. Learn about resetting by using .eap files. If you don't use the .eap, what you see might differ slightly from the screenshots.
You will learn what Details are, how to create them, and how you can apply data editing restrictions on Details.
You can extend further the possibility to store data in an eLegere application. Details are tables related to a Master table's row.

The Master table store multiple entries. You can associate a secondary table containing further data to a Master table's entry. These secondary tables are the Details.
Details are one way to represent a Relation between two Storage fields as a secondary table attached to a single Master Table's entry. (See Rules for Relations and Lookups to understand the topic of Relations and their representation.)
The tutorial teaches you how to create Details by guiding you through some step-by-step examples.
Note
The tutorial explains first the steps to create a Detail and its Relation. The tutorial will require to repeat the same pattern of operations many times. If you prefer to understand the theory first before practice, go to Relations and Details. Then go back to the beginning and follow the tutorial. Otherwise, continue to read in order.
Transactions divided by Product and Service in Transactions Products and Services
Take the application Transactions Products and Services you have built as exercise in the previous tutorial.
You will create a Detail listing the transactions falling under each product or service category in Transactions Products and Services.
The steps to create the Detail are the following.
- Creating the Relation in Transactions Products Services
- Configuring the Relation as Detail in Transactions Products and Services application
Creating the Relation in Transactions Products Services
You must establish a Relation on the Transactions Products Services Storage. Details and Lookups require a Relation. For this reason, this stage will be similar to the creation of a relation for a Lookup.
In the next stage, you will configure the application to represent the relation as a Detail. For now, create a new Relation as follows.
-
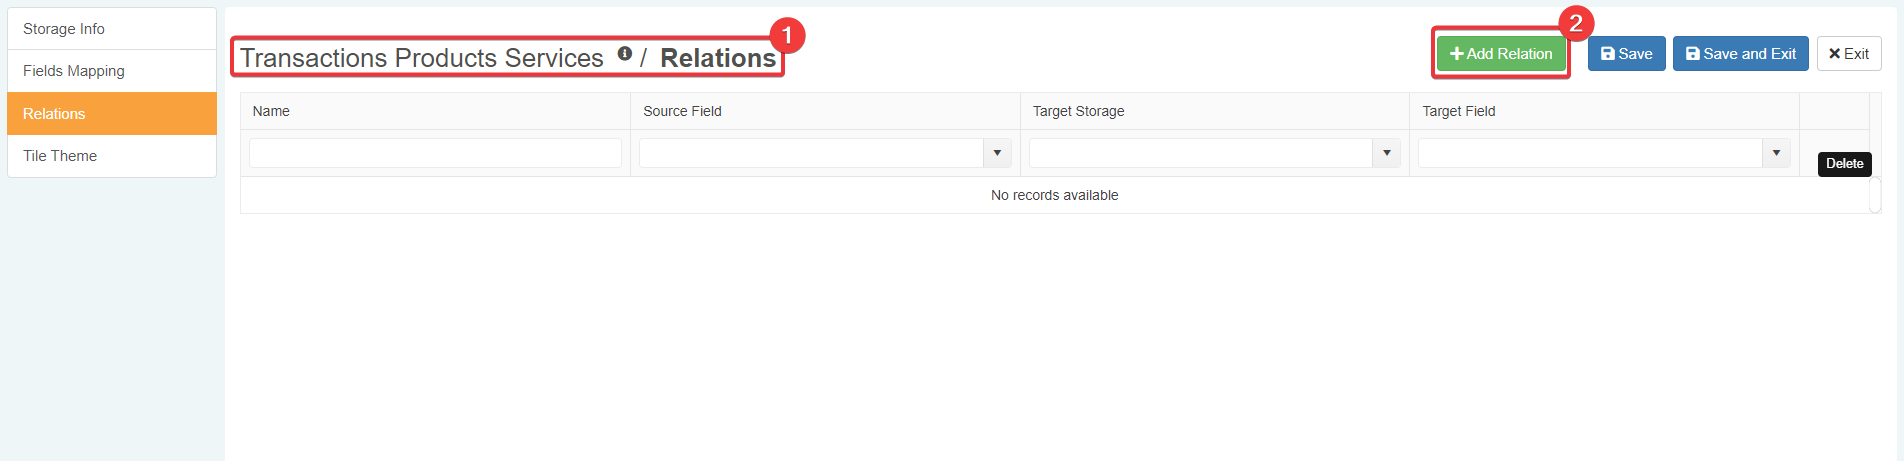
Enter the Storage editor of Transactions Products Services.
-
In the Relations sub-panel, create a new Relation and choose Transactions as Storage.
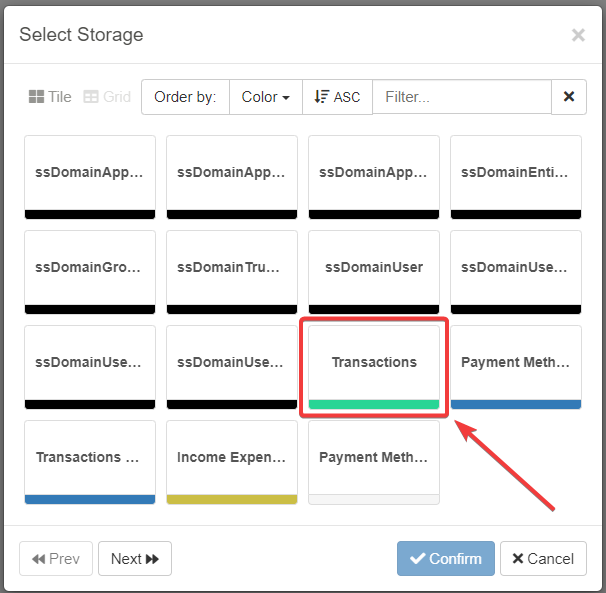
-
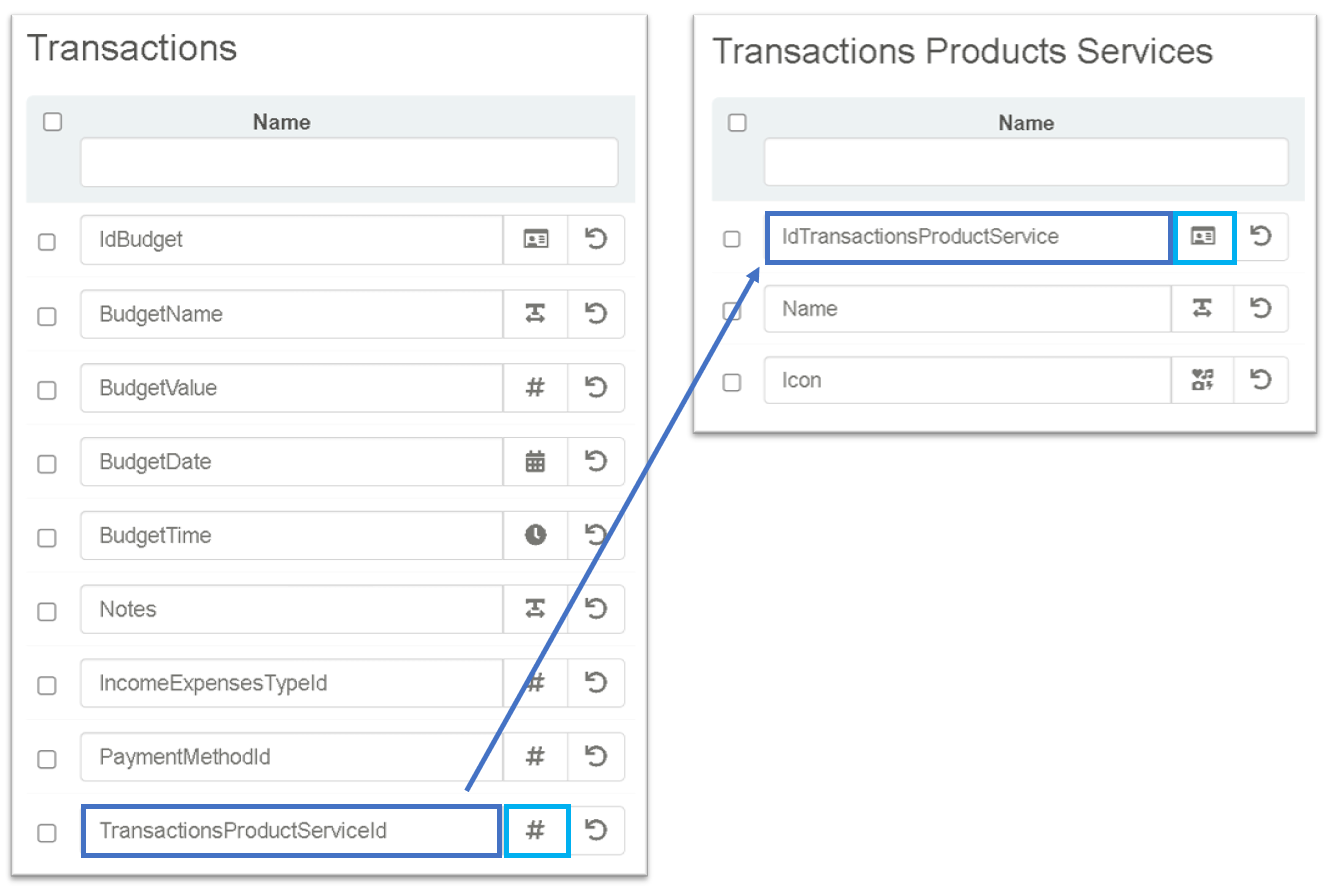
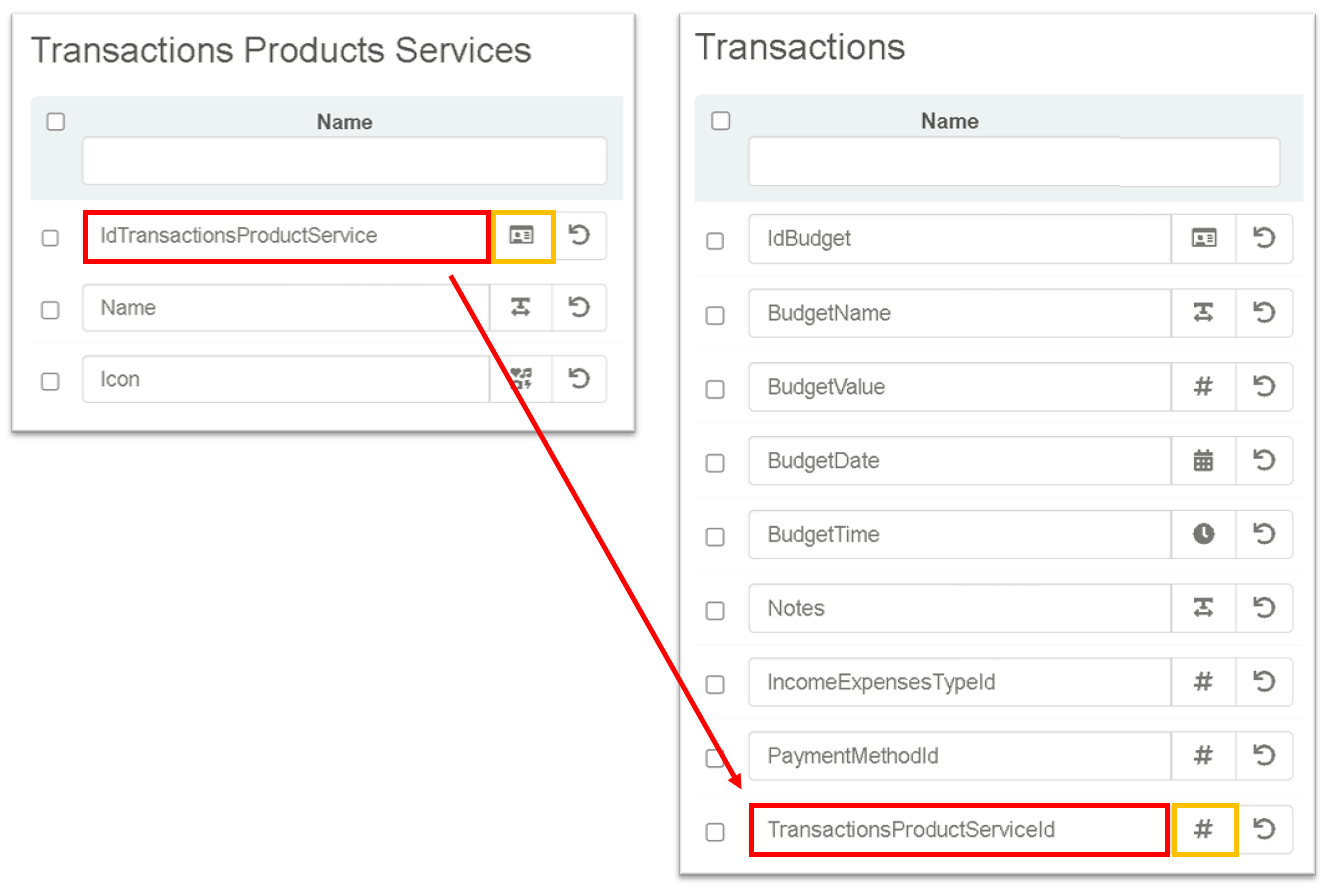
Choose as source field
IdTransactionsProductServiceandTransactionsProductServiceIdas target field. Name the relationTransactions_Details. The relation from an Identity field to a Numeric field is correct. You will discover in Relations and Details why in this case you invert Numeric and Identity fields in the relation.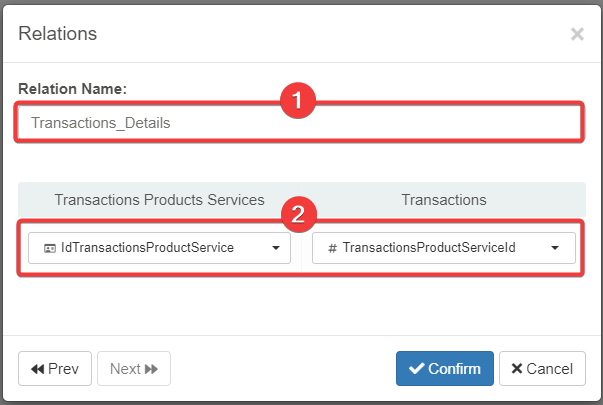
-
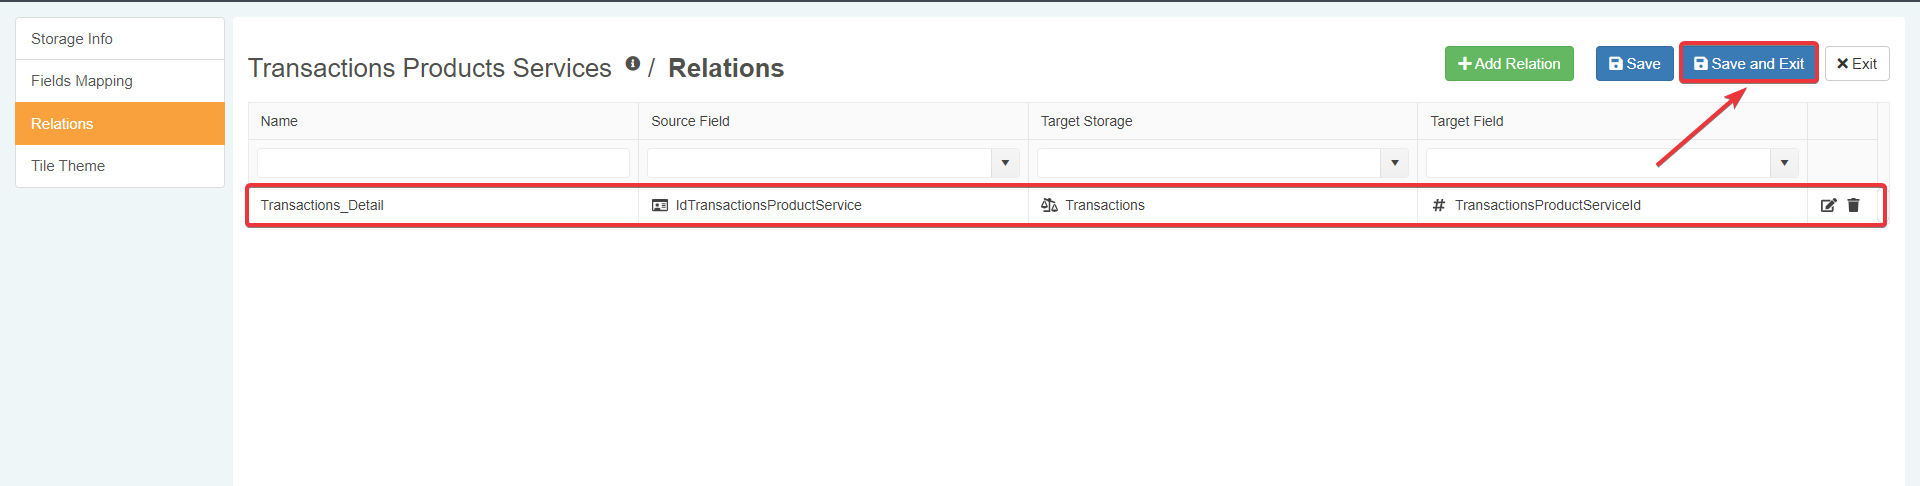
Save all the changes on the Transactions Products Services Storage.
Configuring the Relation as Detail in Transactions Products and Services application
In Rules for Relations and Lookups you have learnt that Relations are independent from their representation in an application. For both Lookups and Details you must establish a Relation first. But Lookups and Details differ in their configuration within application. You will learn about how Details differ and their configuration.
You must configure the Transactions Products and Services application to represent Transactions_Details relation as a Detail.
-
Enter the Design Mode of Transactions Products and Services.
-
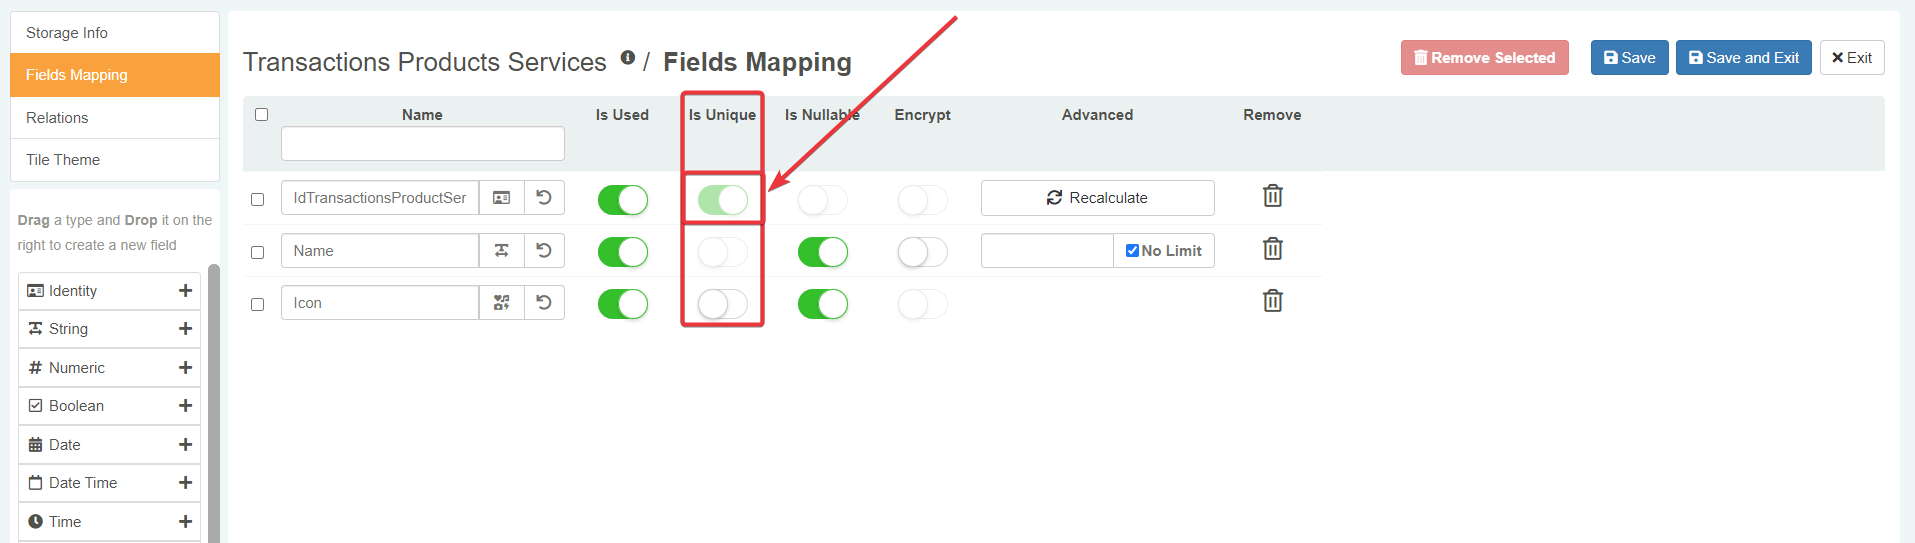
Enable the field
IdTransactionsProductServiceas Primary Key by clicking the Is Primary Key button () next to the field's textbox.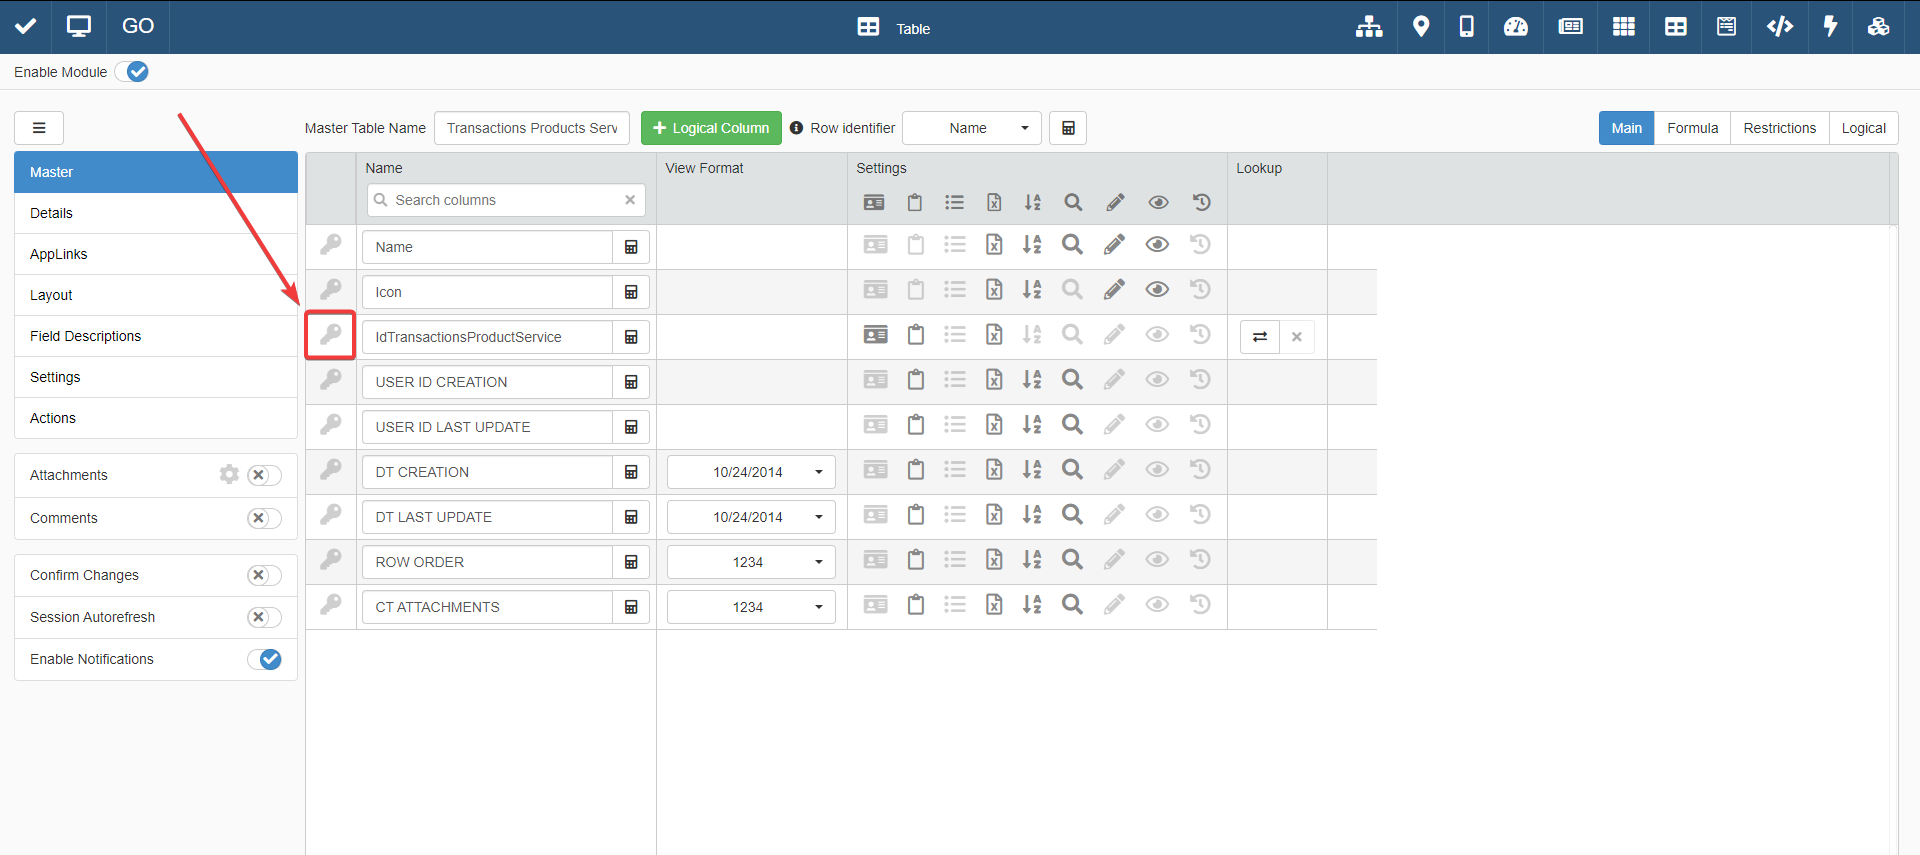
Adding Details requires enabling a Primary Key. The application associates the Detail's entries to each Master's entry by the Primary Key.
You can set as Primary Key only fields that have Unique option enabled on the Storage.
Primary Keys are useful for other functions like Sharing Rows. (You will learn later one use of the Primary Keys in the tutorial section Share with another family member your transactions.)

Hint
It is a good practice to employ Identity fields as Primary Keys.
-
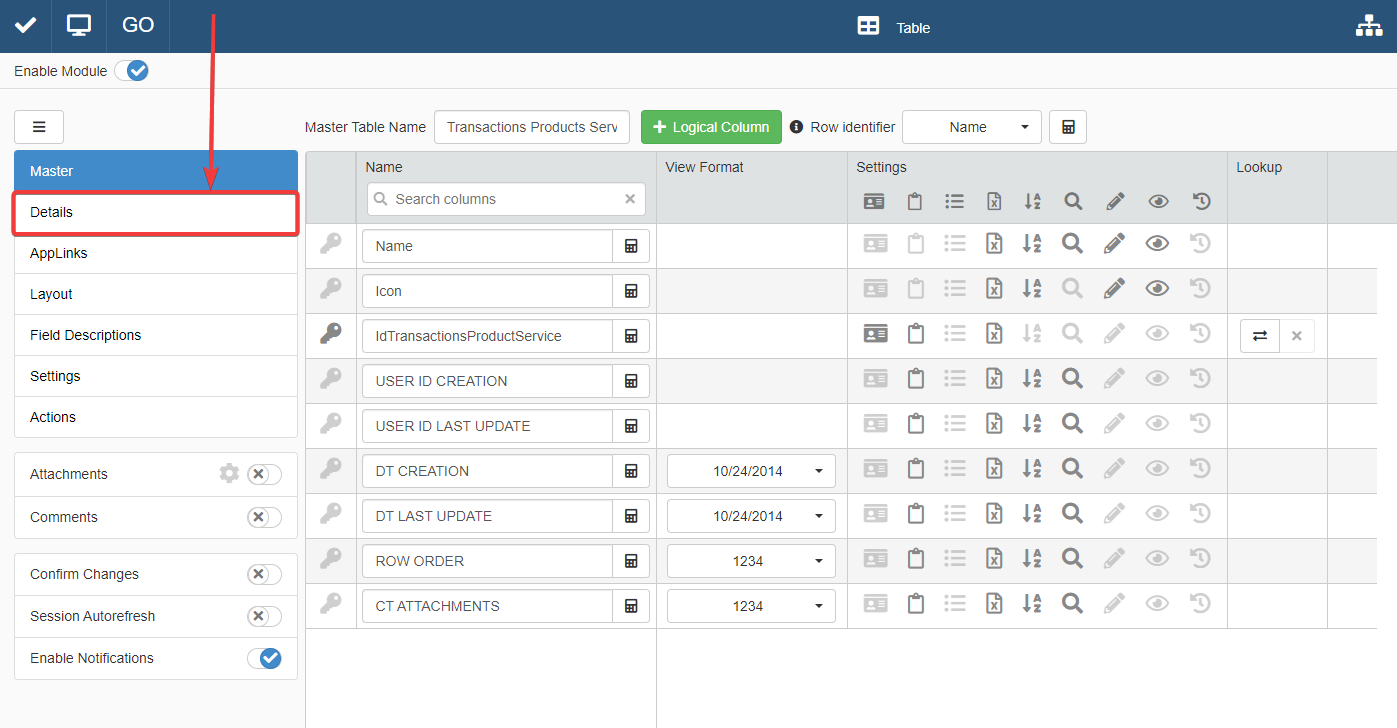
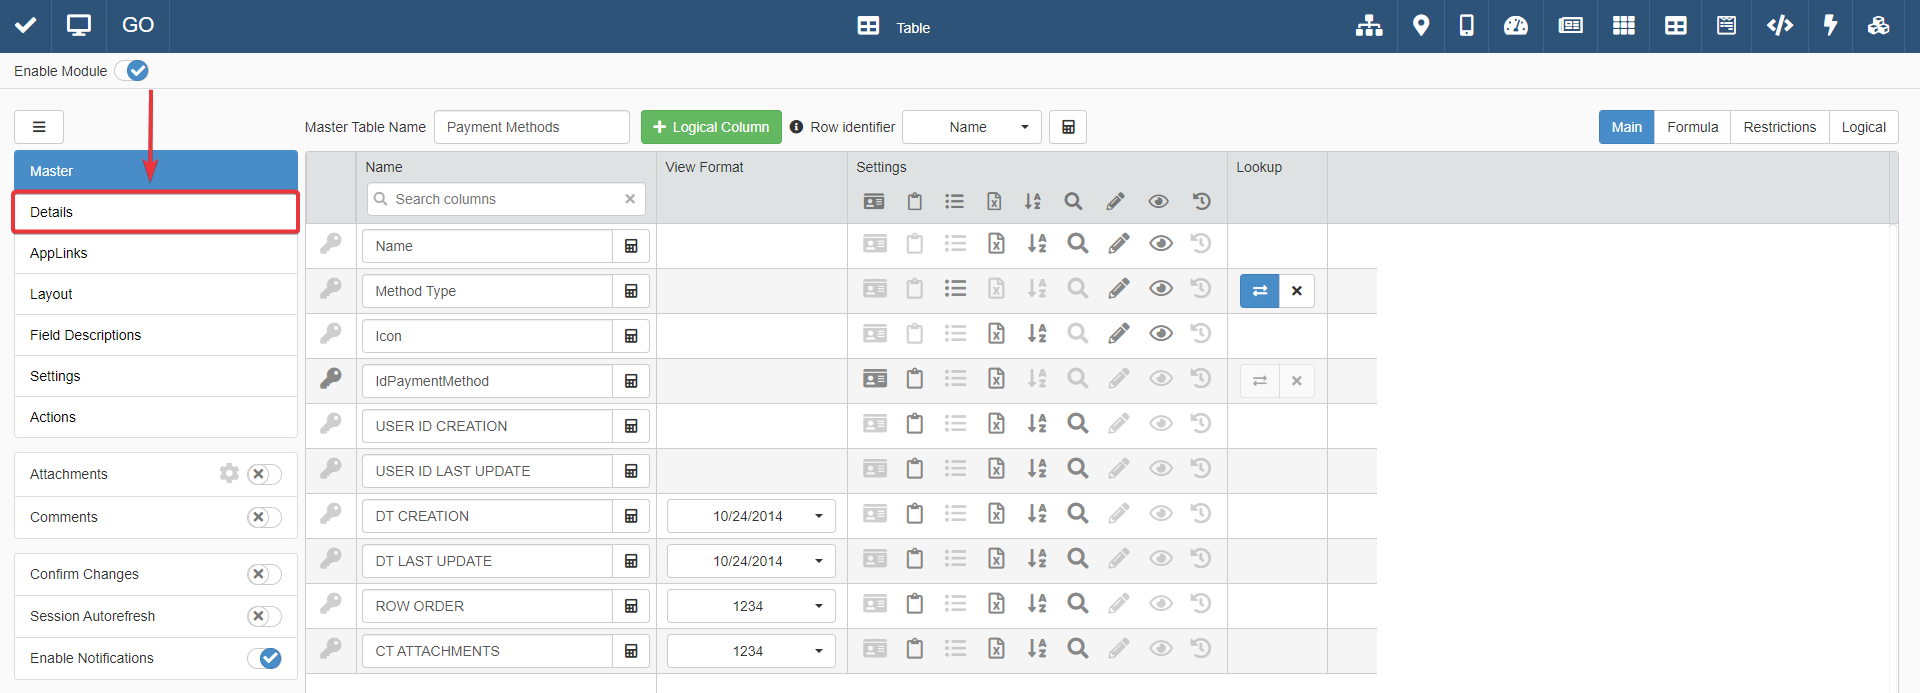
Click on the Details tab on the left task-bar.
-
You will access the Details sub-panel.
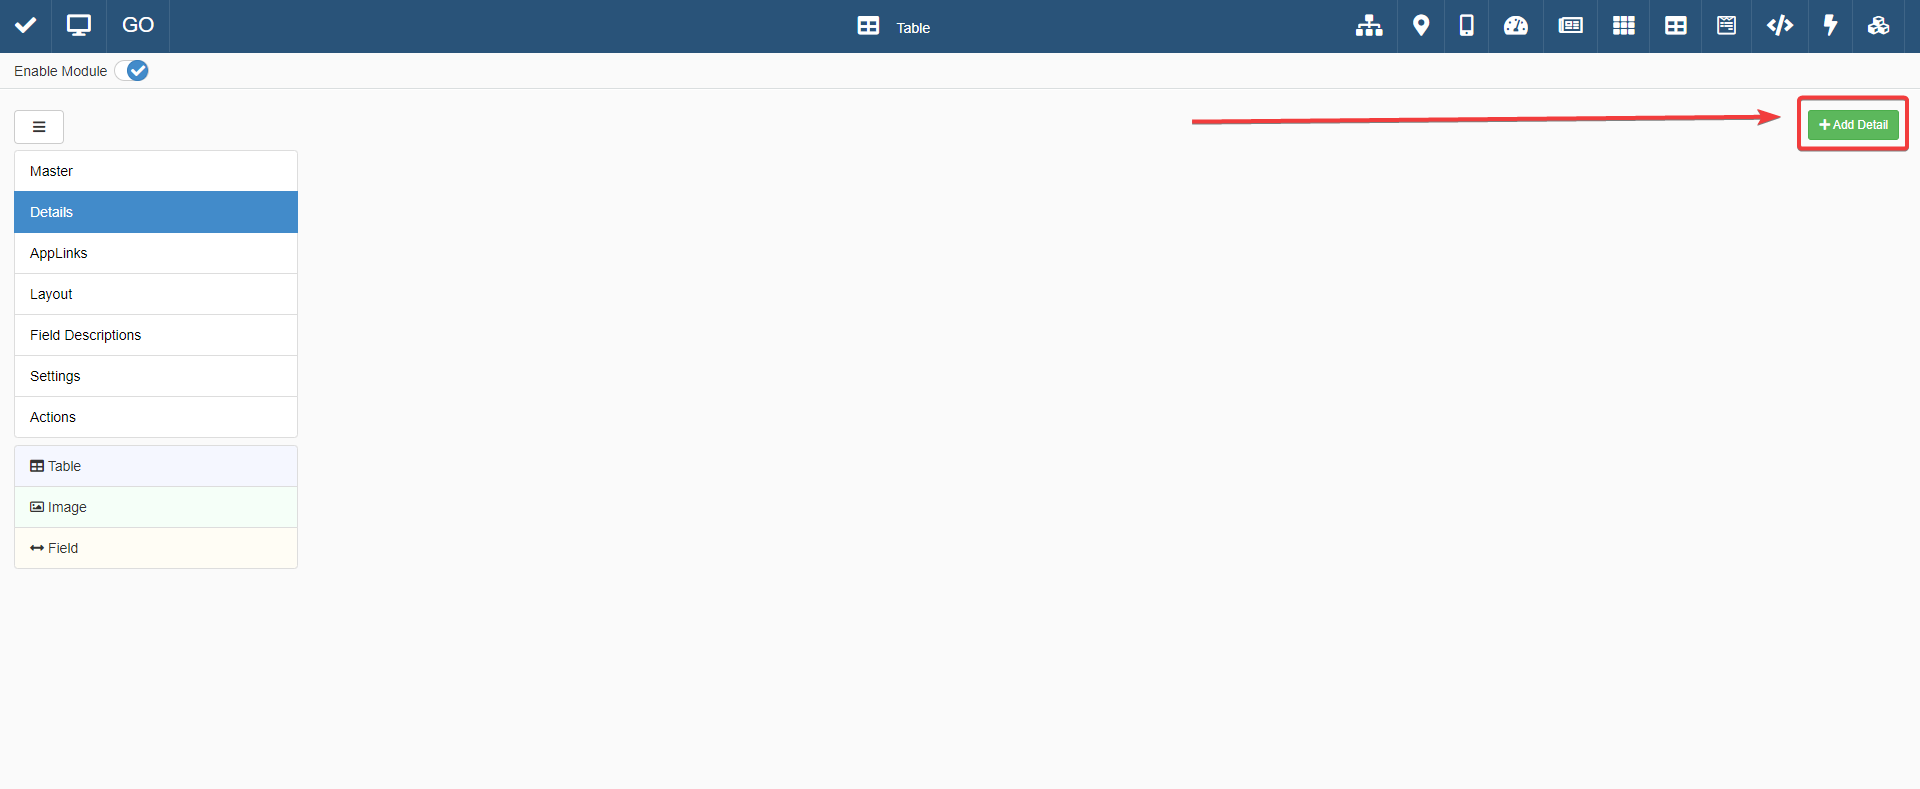
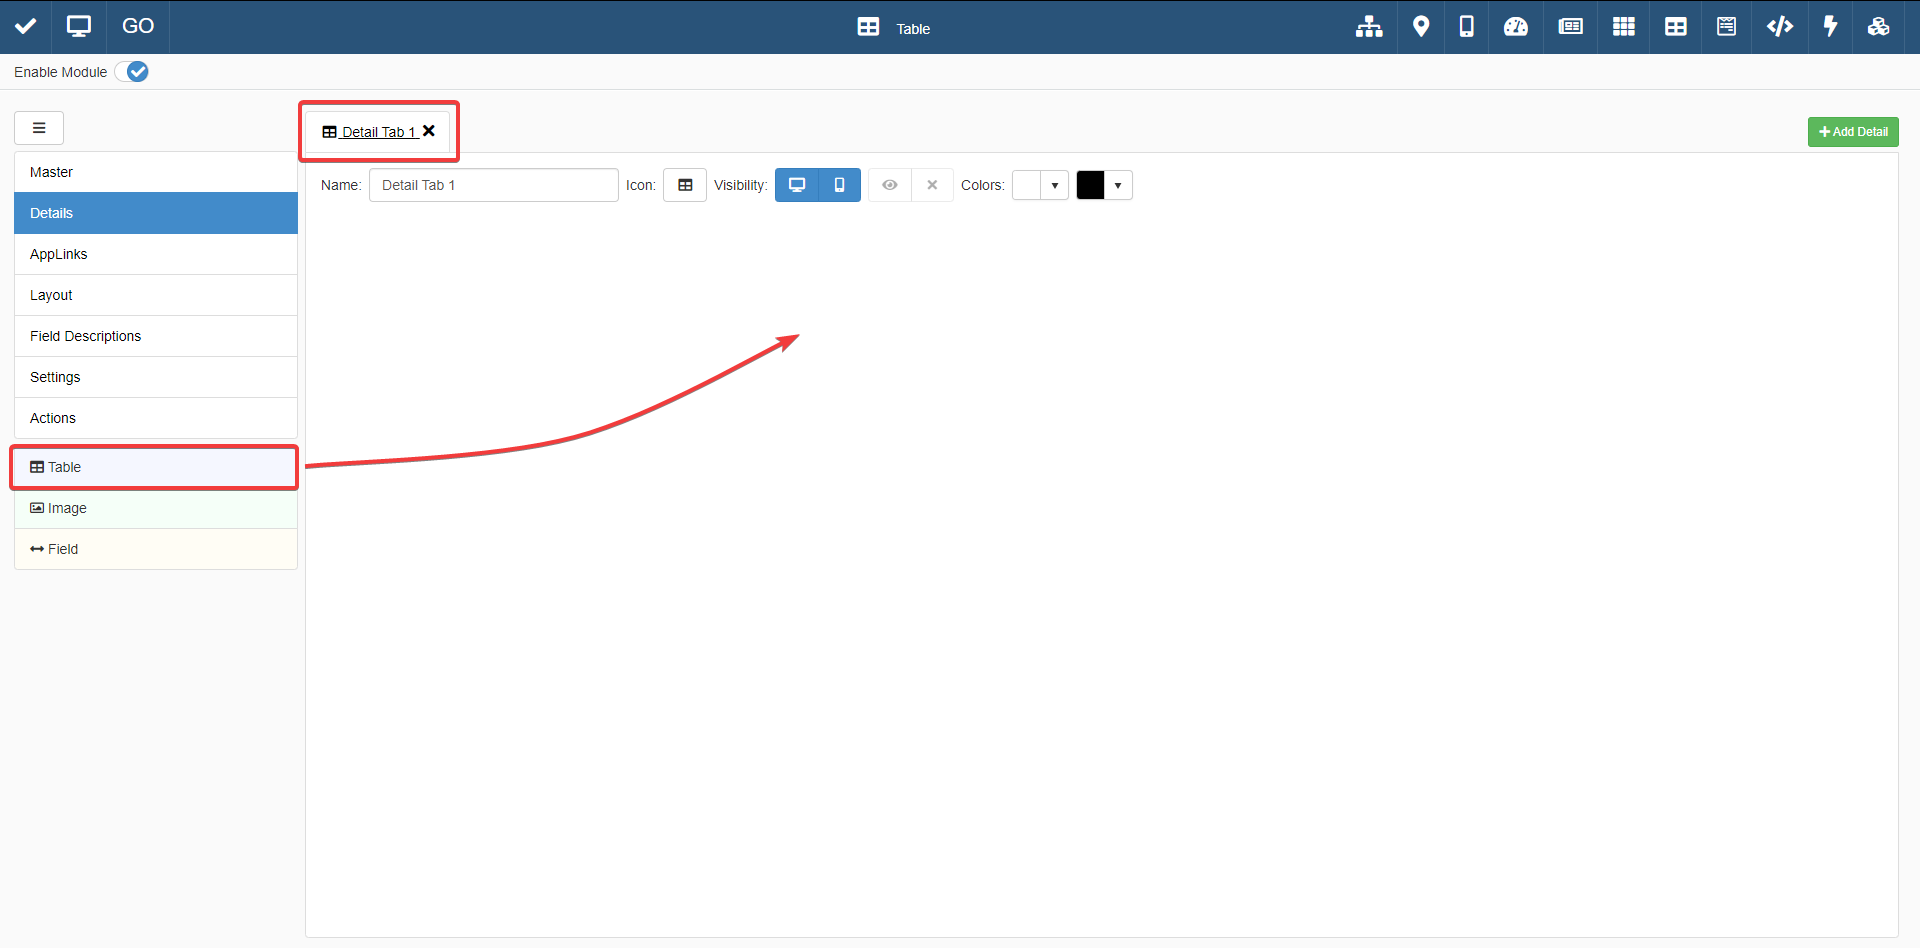
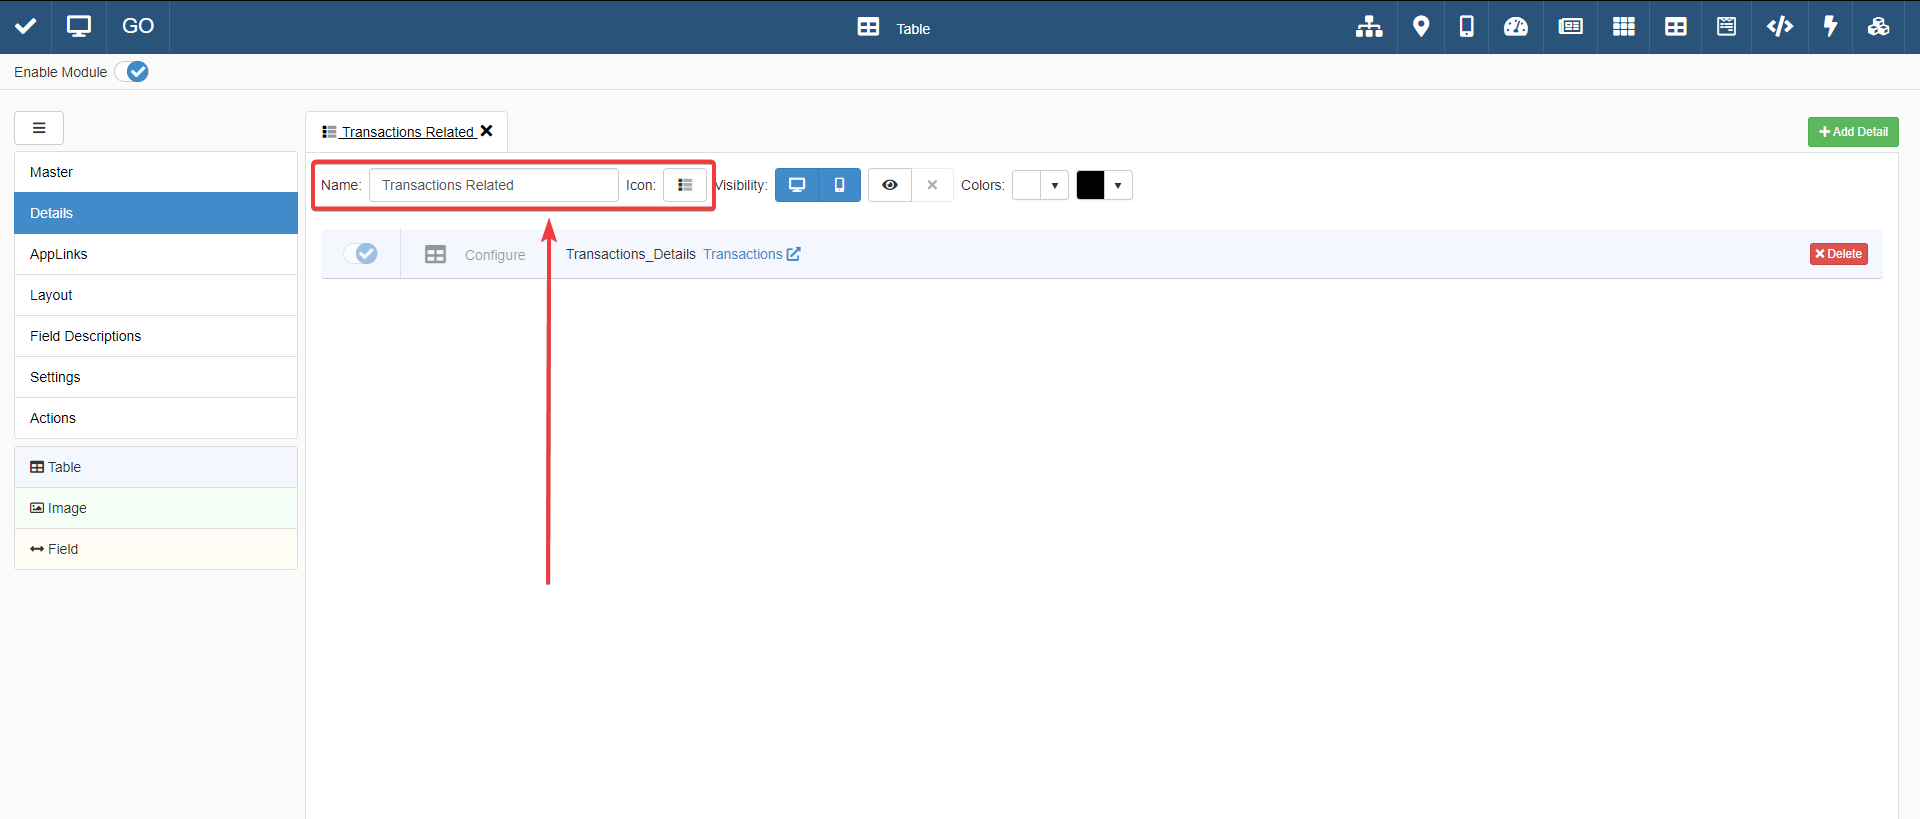
Click on the Add Detail button on the upper right corner of the sub-panel. A new Detail tab will appear in the sub-panel.
Clicking on Add Detail creates a new Detail Tab.
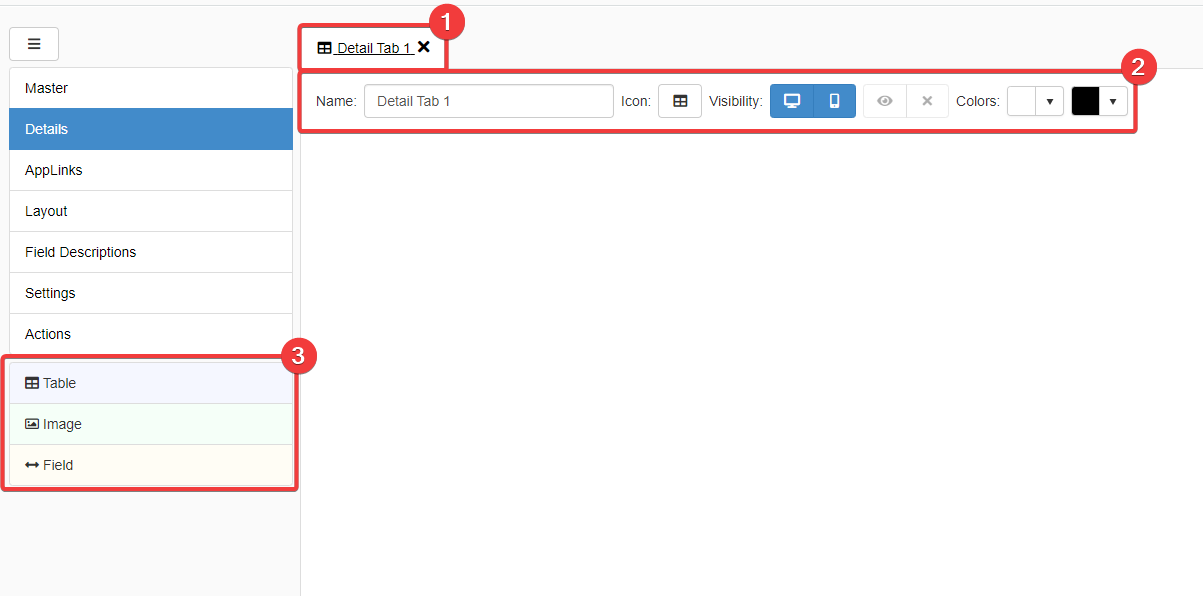
- (1) Detail Tab: How the tab appears in the applications.
- (2) Settings: You can decide a label for the Detail, choose an icon, desktop and mobile options, visibility restrictions, and colors.
- (3) Details Available: You can populate a Detail tab with different sorts of Details.
Detail types:
- Table A table from a Storage in a relation with one of the current application's fields.
- Image Showing an image gallery from a Uri field of a Storage.
- Field Showing in a Detail's Tab one or more Master Table's fields to lower the number of columns.
For this tutorial you need only Table () Detail.
-
Drag & Drop the Table option () below the task-bar to the center of the sub-panel.
-
A window to choose the Relation to use as Detail table will appear. Choose
Transactions_Detailsas table.
-
The window will display the fields' settings of the Storage Transactions like the configuration of the Master table.
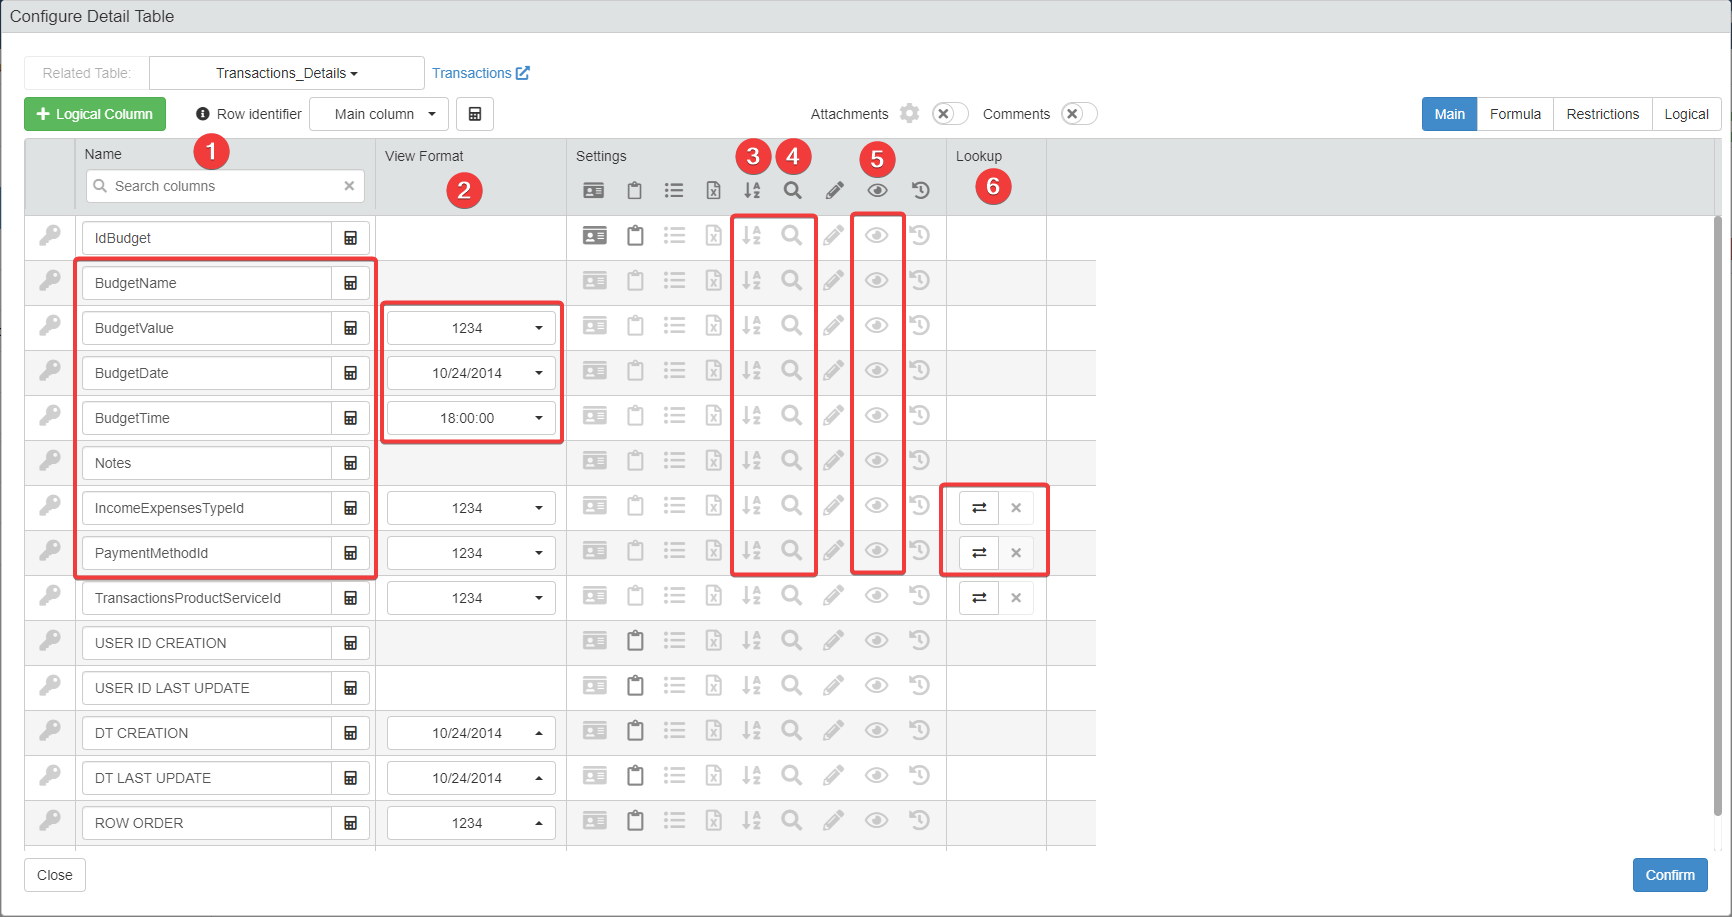
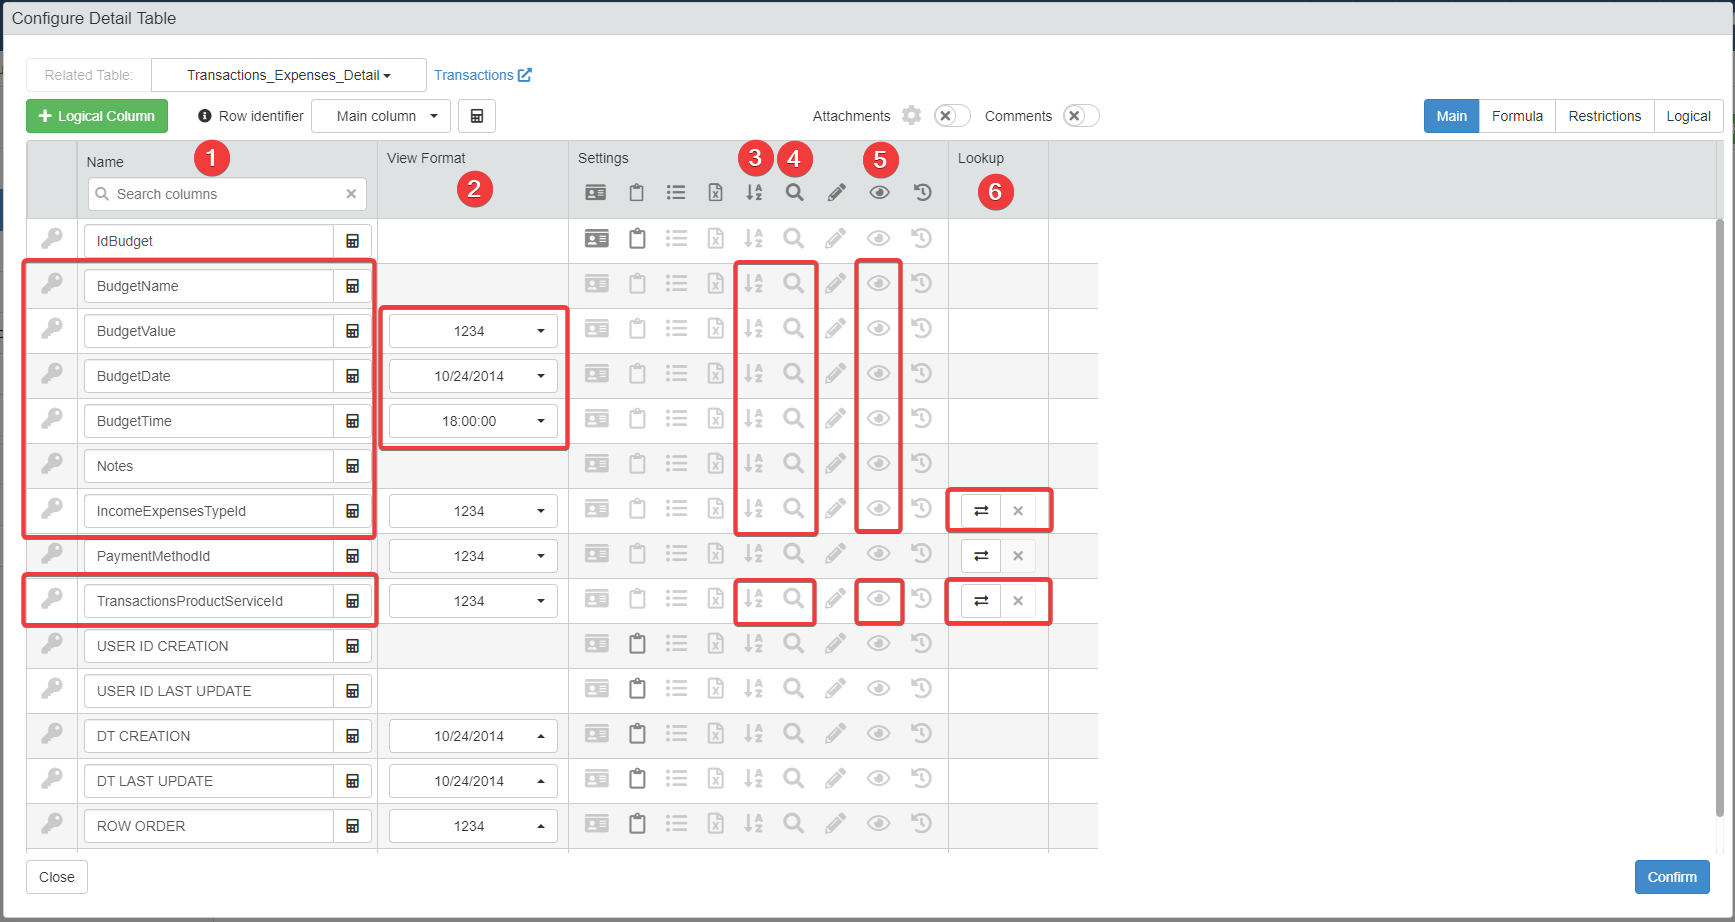
Change the following settings for the table.
- (1) Set the Column Headers' Labels. (Type the same labels of Personal Budget application.)
- (2) Choose the Format for BudgetValue, BudgetDate, and BudgetTime fields.
- (3) Enable the sortability of the fields highlighted by clicking the Is Sortable () button.
- (4) Enable the searchability of the fields highlighted by clicking the Is Searchable () button.
- (5) Enable the visibility of the fields highlighted by clicking the Visible in the Grid () button.
- (6) Configure the Lookups ().
The configuration should be like the following.
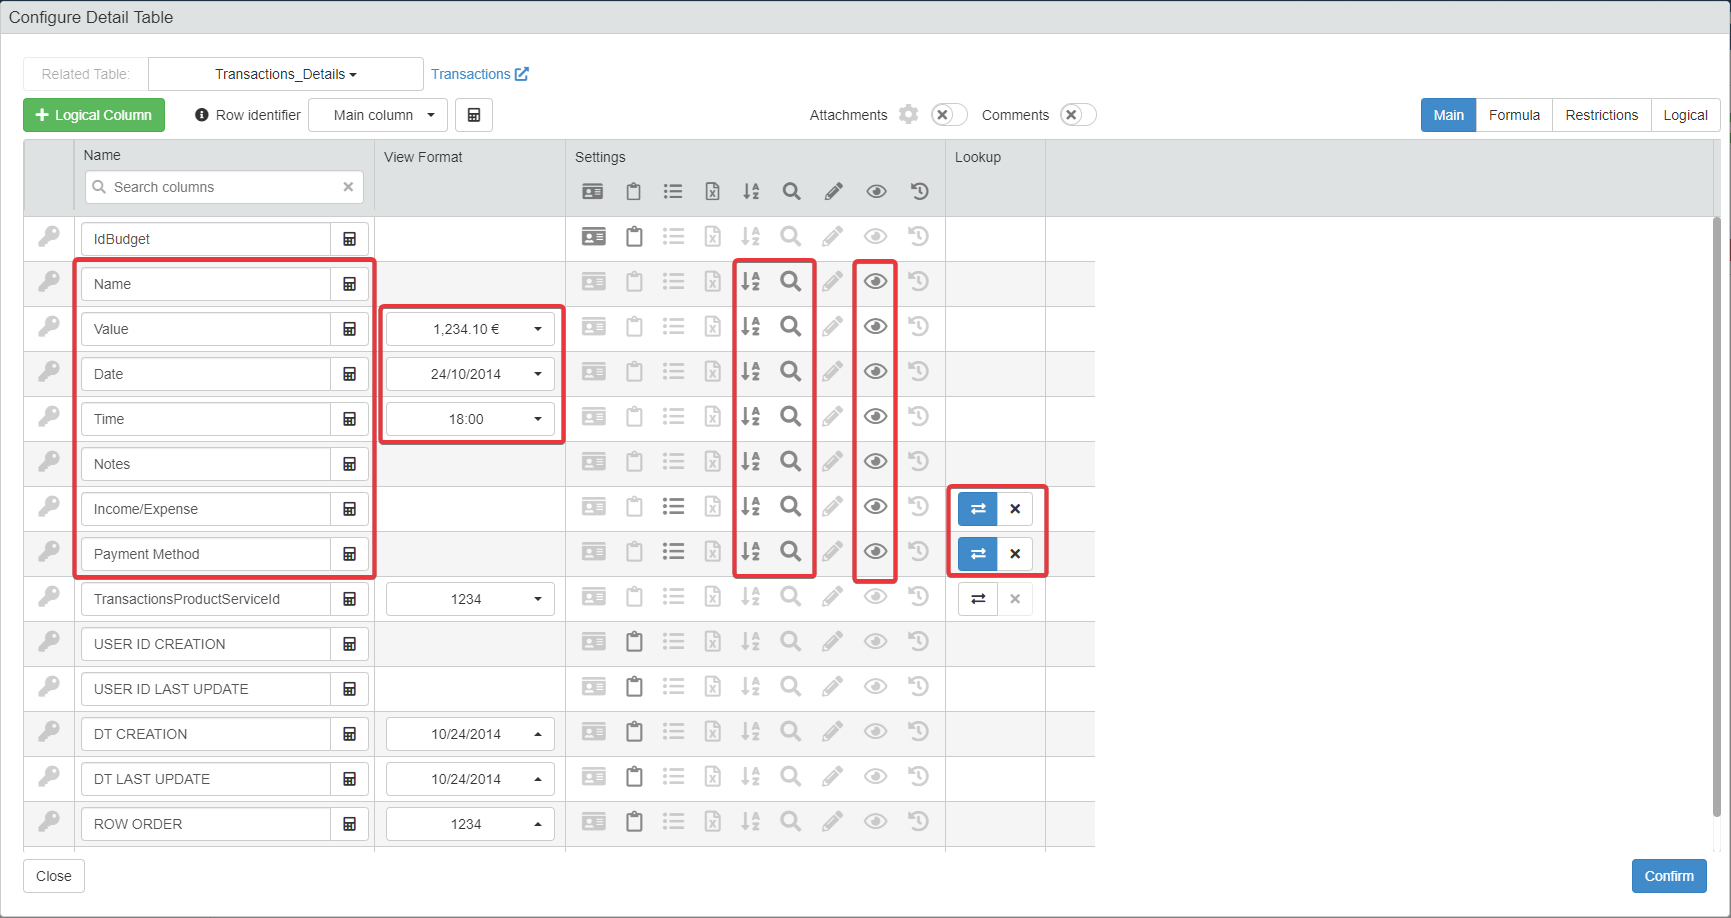
You can ignore the configuration of
TransactionsProductServiceId. Since you are configuring a Detail of Transactions Products and Services, you do not need to show the information twice both in the Master and the Detail. -
Click on the Confirm button on the Detail Table Setting window to confirm the settings.
-
You have configured the Detail. Customize name and icon of the Detail's tab.
- Type a name for the Detail's tab in the textbox. Call the Detail's tab Transactions Related
- Choose an icon for the tab, like (search
fa-th-list).
-
Customize the layout of Transactions Related in Layout.
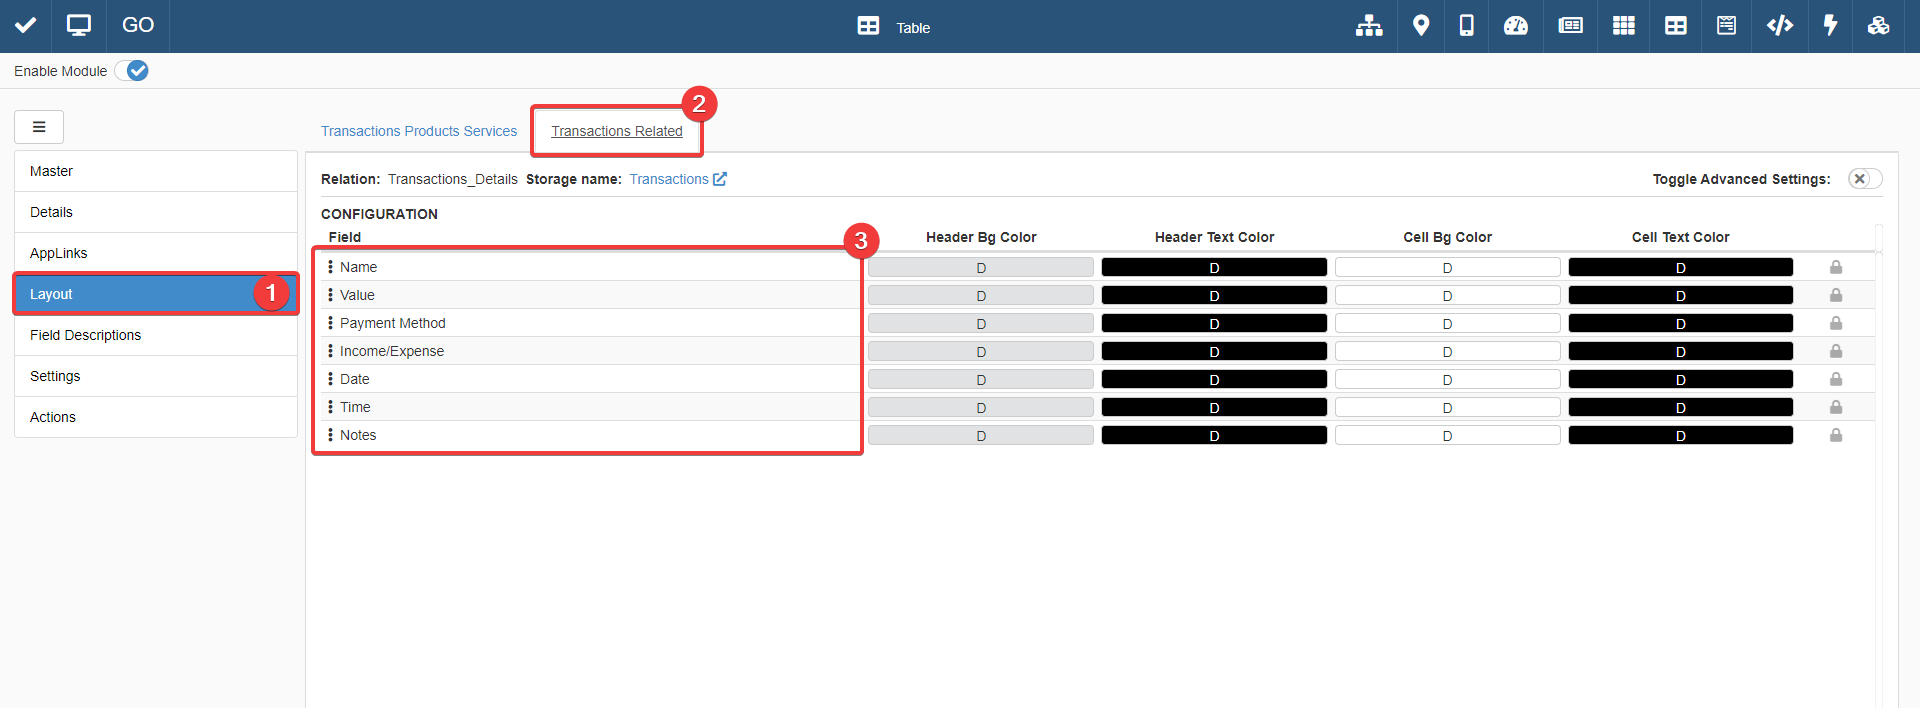
Arrange the columns' order as follows:
- Name
- Value
- Payment Method
- Income/Expense
- Date
- Time
- Notes
-
Save any change in Transactions Products and Services's Design Mode.
You have now a Detail for each product and service category with all the transactions falling in each category.
Inserting Data in Details
The goal of the Transactions Related Detail is to show the transactions for category: the user does not have to enter any data.
Attention
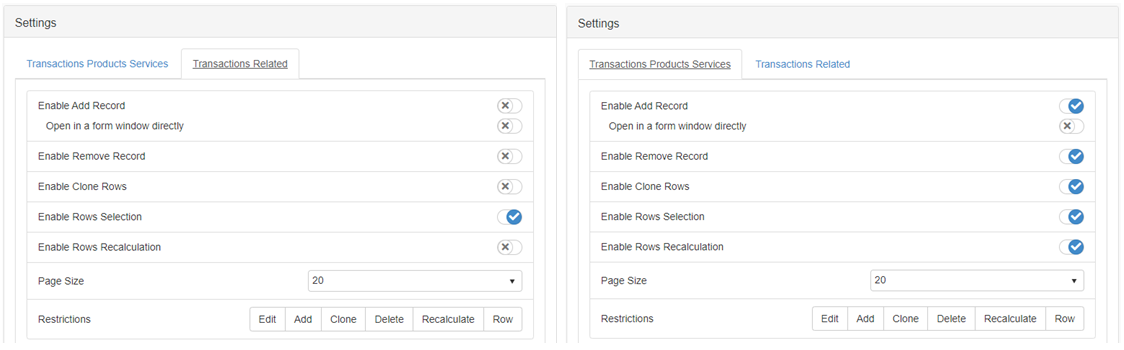
Note that you can add, remove or modify a row in a Detail if the related configurations are activated.
In case you want to enable changes in the Detail's entries:
- Enter the Design Mode of Transactions Products and Services.
-
Click on the Settings tab on the left taskbar.
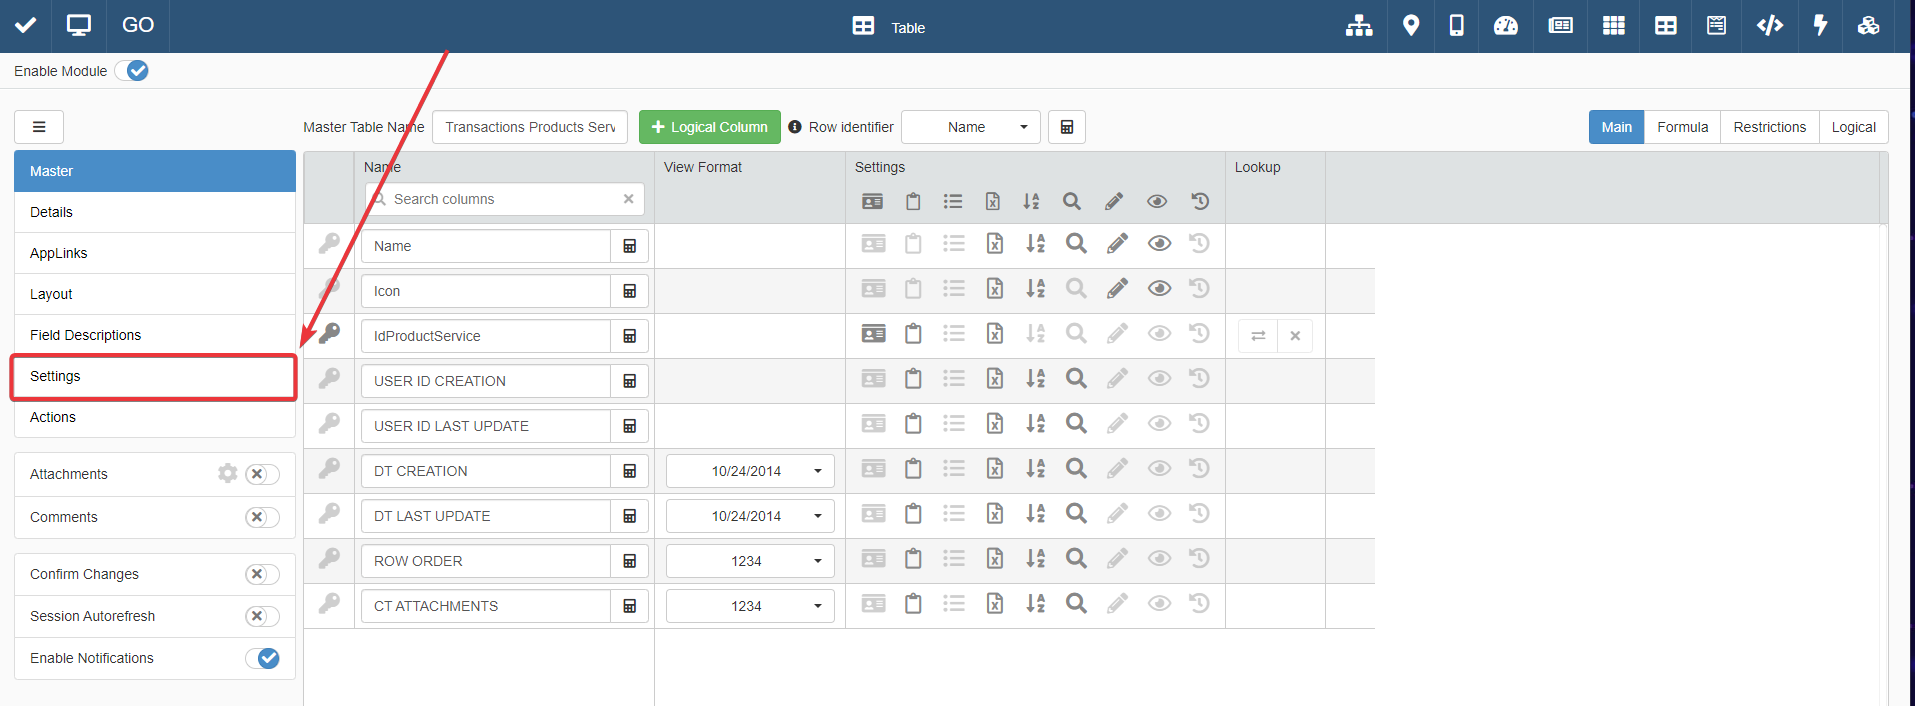
-
You will access the Settings of the tables. Click on the Transactions Related tab.
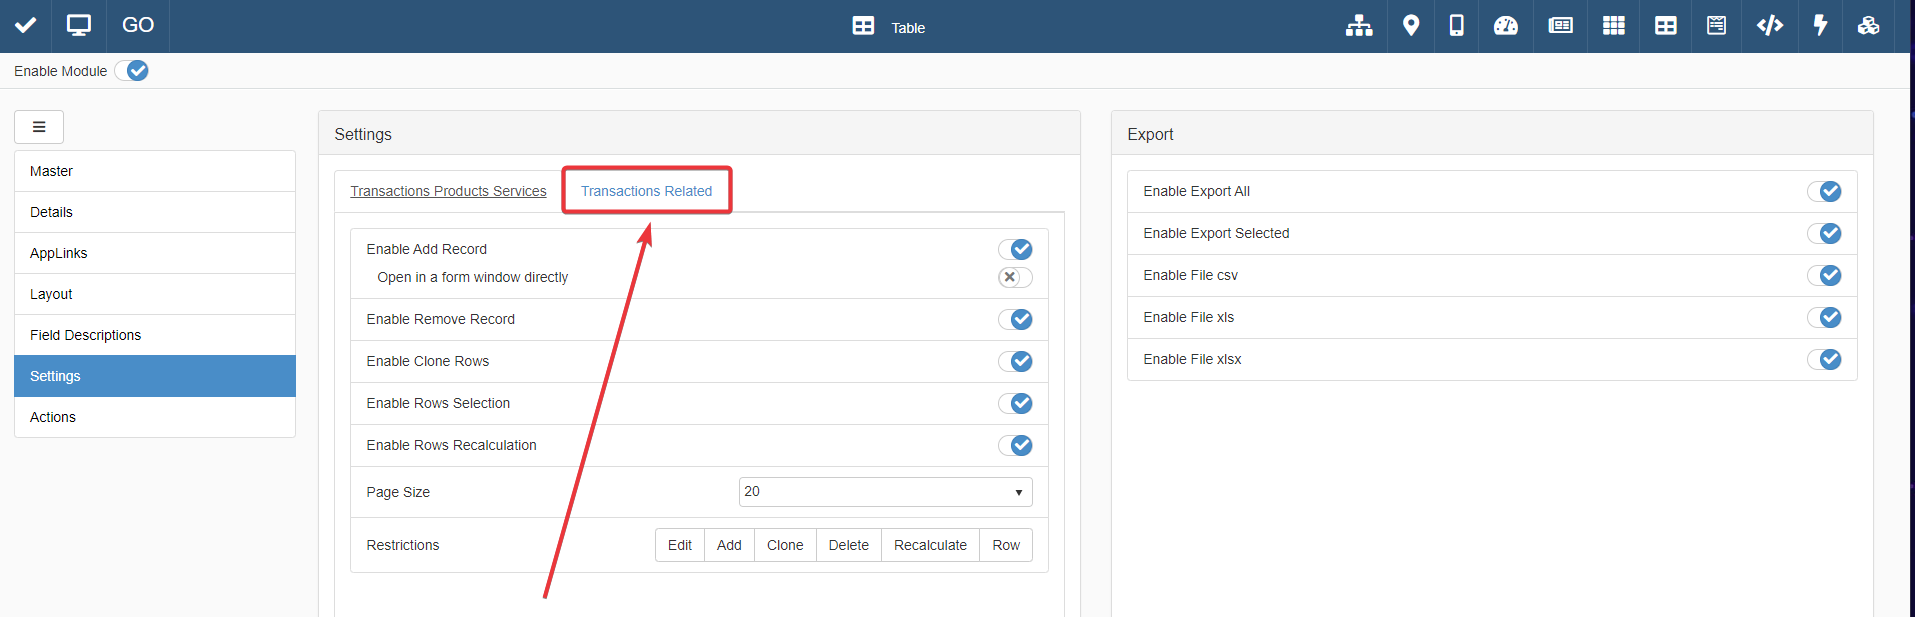
-
Modify the following settings:
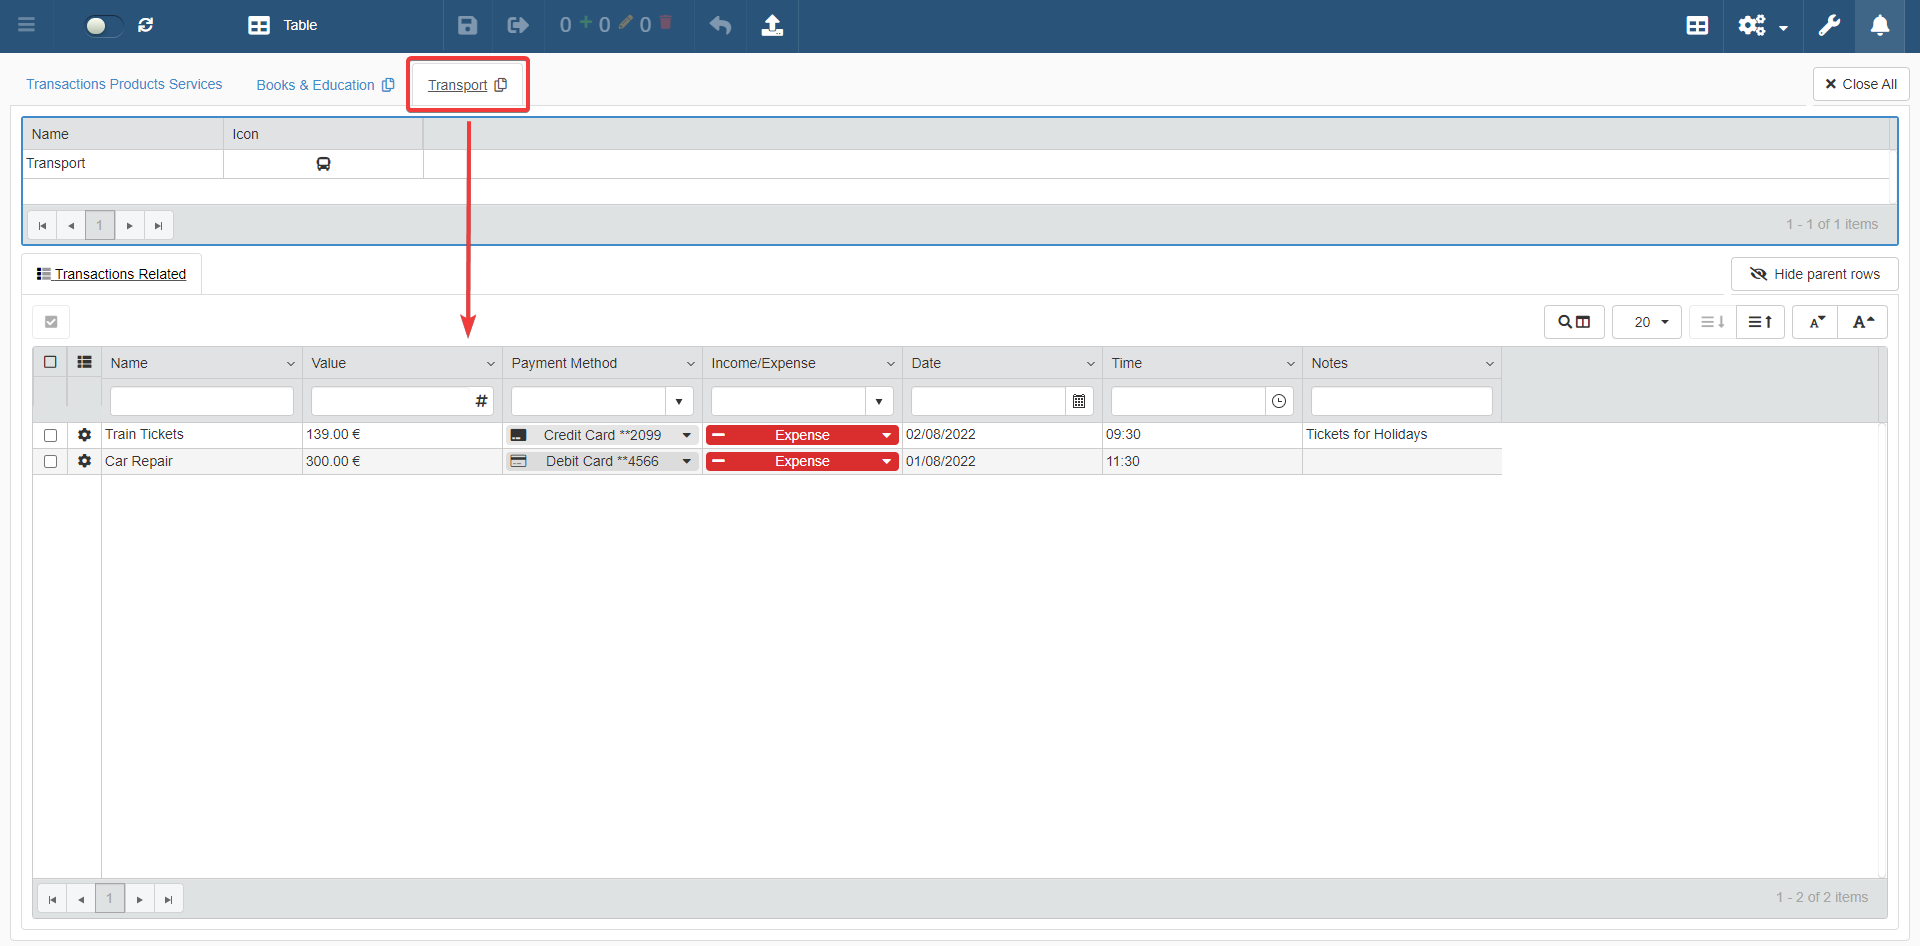
How to View the Details of a Row
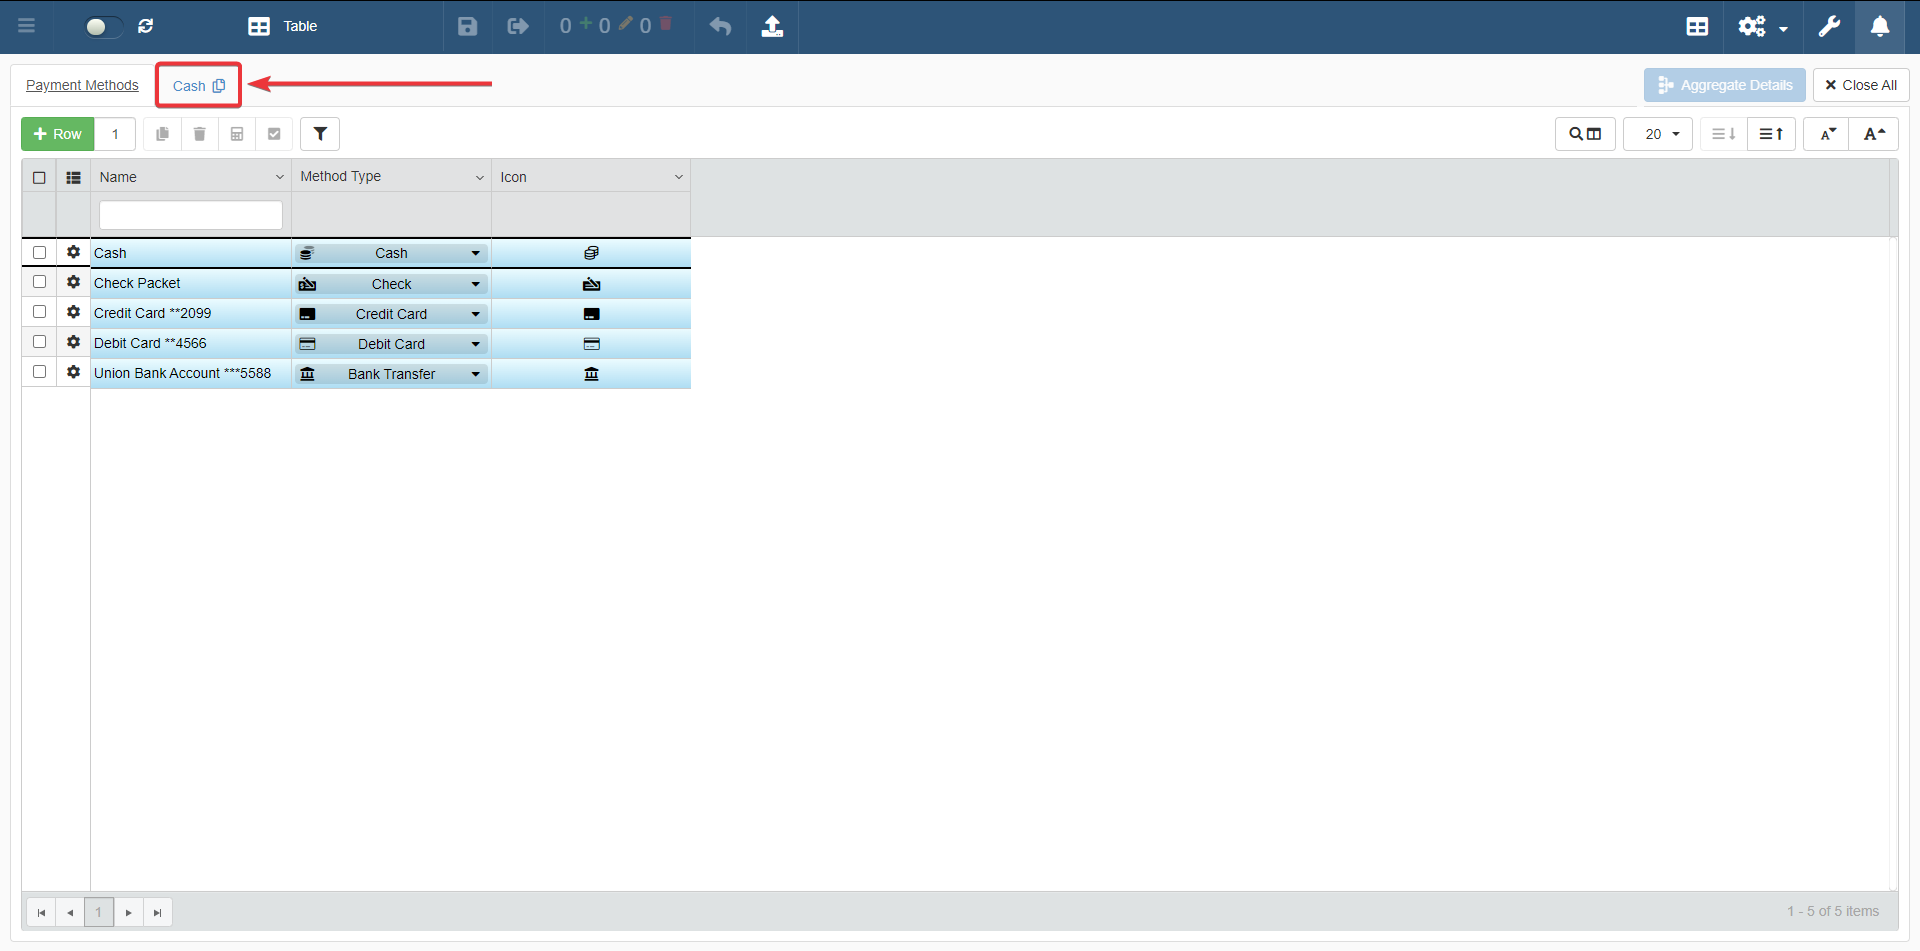
A brief explanation of how to access Details.
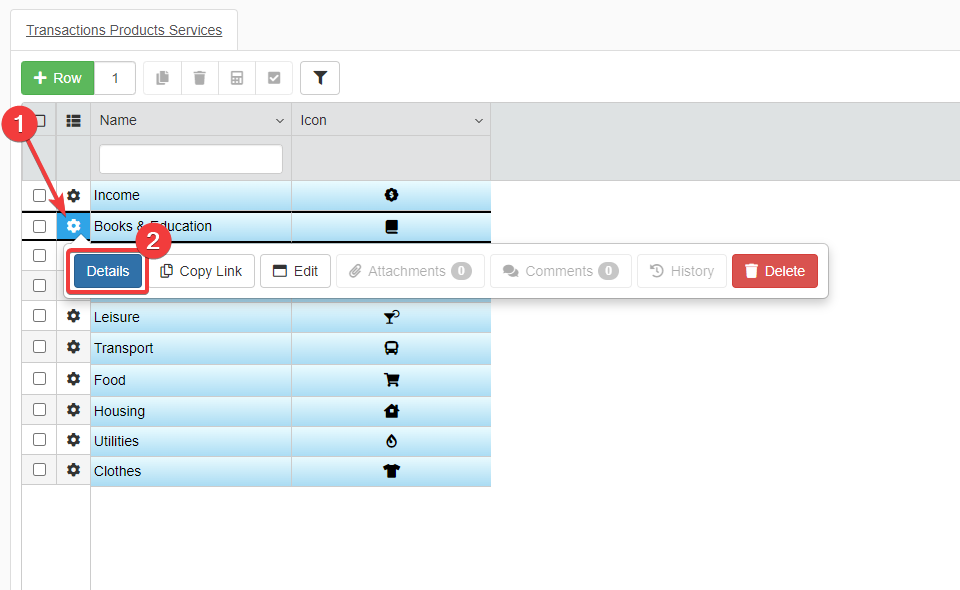
- Click on the Row Options button () between the check-box and the first column of the entry.
-
Click on the Details button on the pop-up strip.
Hint
As alternative, you can double-click the Row Options button () to access the Details.
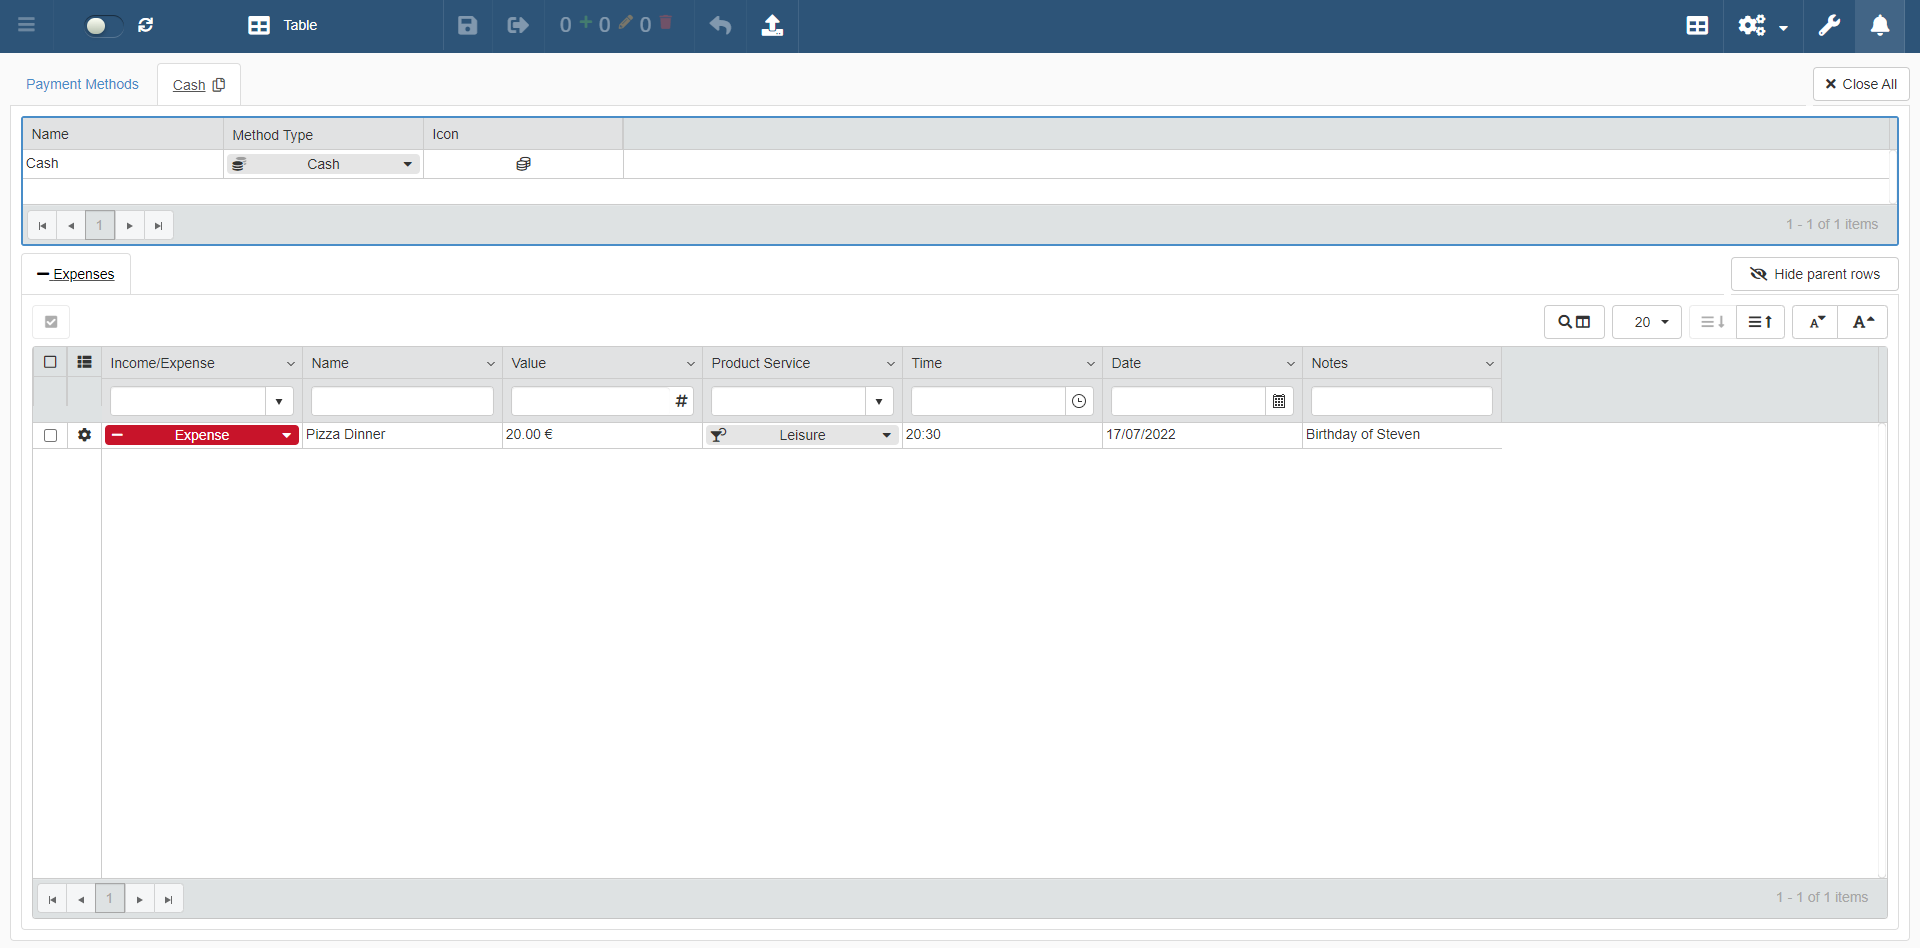
Hint
If you want to save space in the window: you can hide the Parent Row section of the Detail table. Click on the Hide Parent Rows button. (Click on the Show Parent Rows if you want to display the parent row again.)
Hint
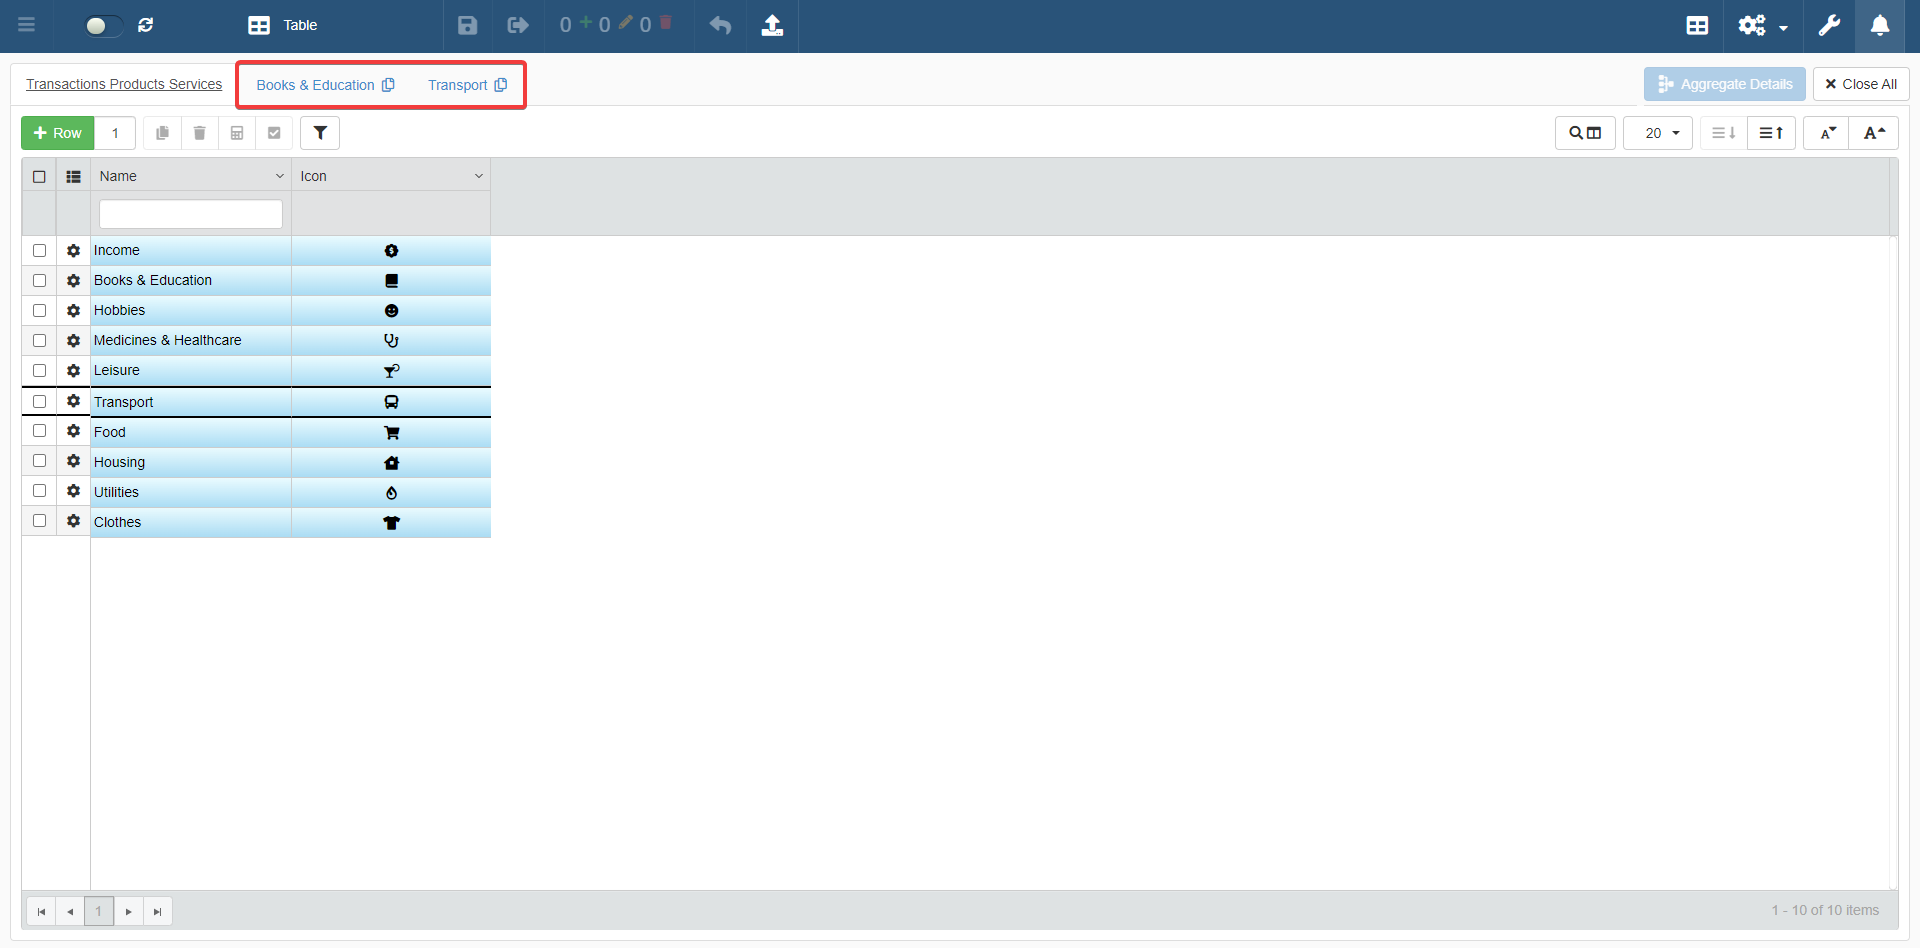
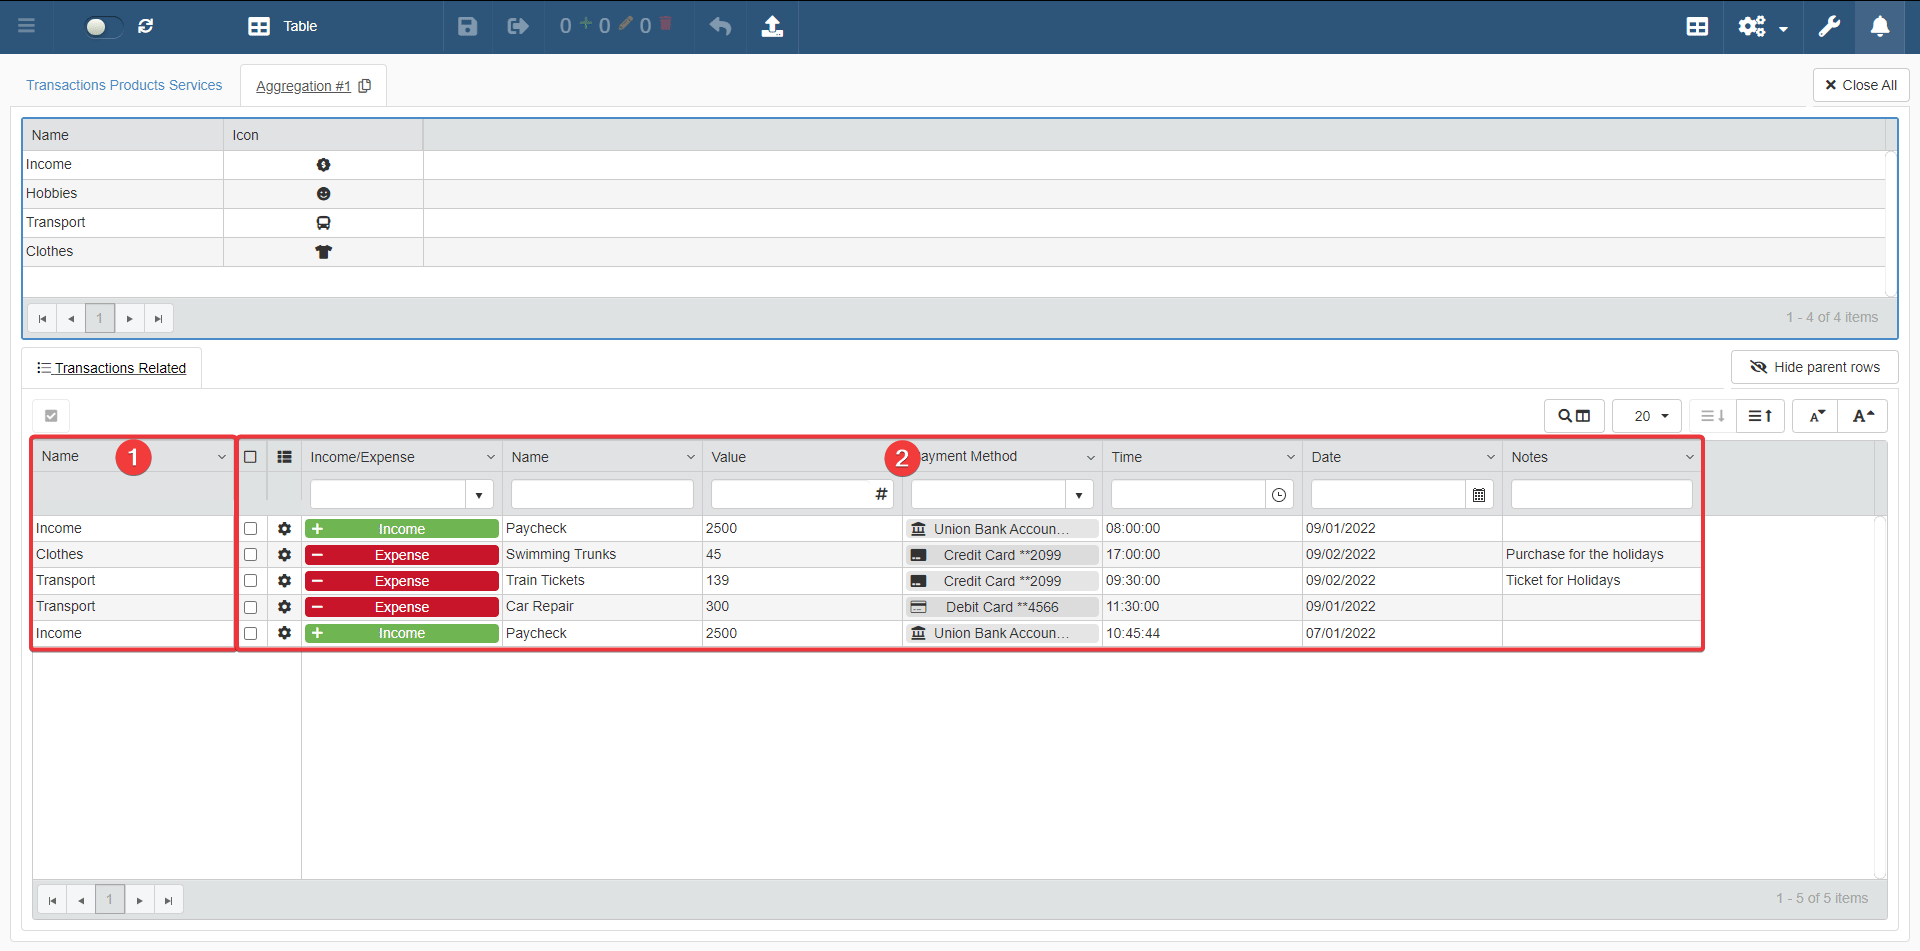
You can view the Details of multiple rows all at once in a single table.
-
Check the Master table's rows you are interested to see the Detail's data.
-
Click on the Aggregate Details button on the right corner of the Master table.
You will see a single table with the data of all the selected rows' Details.

The Aggregate Details works like any other Detail table with two exceptions made:
- The column Name (1) on the left specifies to what Master table's row the Detail's row belongs. On the right, there is the standard table containing all the aggregated rows (2).
- You cannot neither add nor delete rows, even if Design Mode's Settings panel has the Enable Add Record and Enable Remove Record enabled.
Relations and Details
Here is a brief explanation about Relations and Details.
Note
This part gives for granted the notions explained in Rules for Relations and Lookups section.
Relations for Details are the contrary of Lookups: if in a Lookup the source field is a Numeric field and the target field an Identity field, in Details:
- source field is an Identity field in the Storage with primary data (Transactions Products Services).
- target field is a Numeric field in the Storage with secondary data (Transactions).
Hint
You do not need to create a new Numeric type field for this Detail. Previously used fields for the Lookup relation already have the data you need: Transactions has already a Numeric field employed for a Lookup with Transactions Products Services.
In the previous tutorial, the Lookup has associated a category to multiple transactions.
In this tutorial, you are building a Detail. The Detail lists all the entries that you have associated to a category. That is why the Details works in the opposite way of Lookups.
| Application Storage | Detail Storage |
|---|---|
| Identity field | Numeric field |
Lookups
Each transaction refers to a single product or service category (Numeric > Identity).
Details
For a single product or service category, there are multiple transactions (Identity > Numeric).
How to divide Expenses by Payment Method in Payment Methods
Take the application Payment Methods you have built during the previous tutorial.
Suppose that you want to see for each payment method the expenses made.
You will summarize each transactions in Payment Methods through a Detail called Expenses. Even in this case, the Transactions Storage will contain the data to display in the Detail Expenses.
The steps to create a Detail like Expenses are the following.
- Establishing the Relation
Transactions_Expenses_Detail - Configuring the Expenses Detail in the Payment Methods Application
- Restriction on the Expenses Detail data by using a Formula
Establishing the Relation Transactions_Expenses_Detail
Establish the Relation Transactions_Expenses_Detail between IdPaymentMethod in Payment Methods and PaymentMethodId in Transactions.
You will use Transactions_Expenses_Detail to create the Detail Expenses.
-
In Storages, enter the editor of the Payment Methods Storage.
-
In Payment Methods, establish a Relation with Transactions.
The fields for the Relation are
IdPaymentMethodin Payment Methods and thePaymentMethodIdfield in Transactions. Name the RelationTransactions_Expenses_Detail.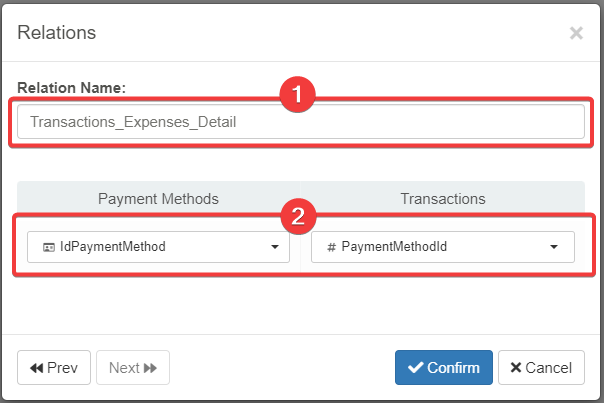
-
Click on the Save and Exit button.
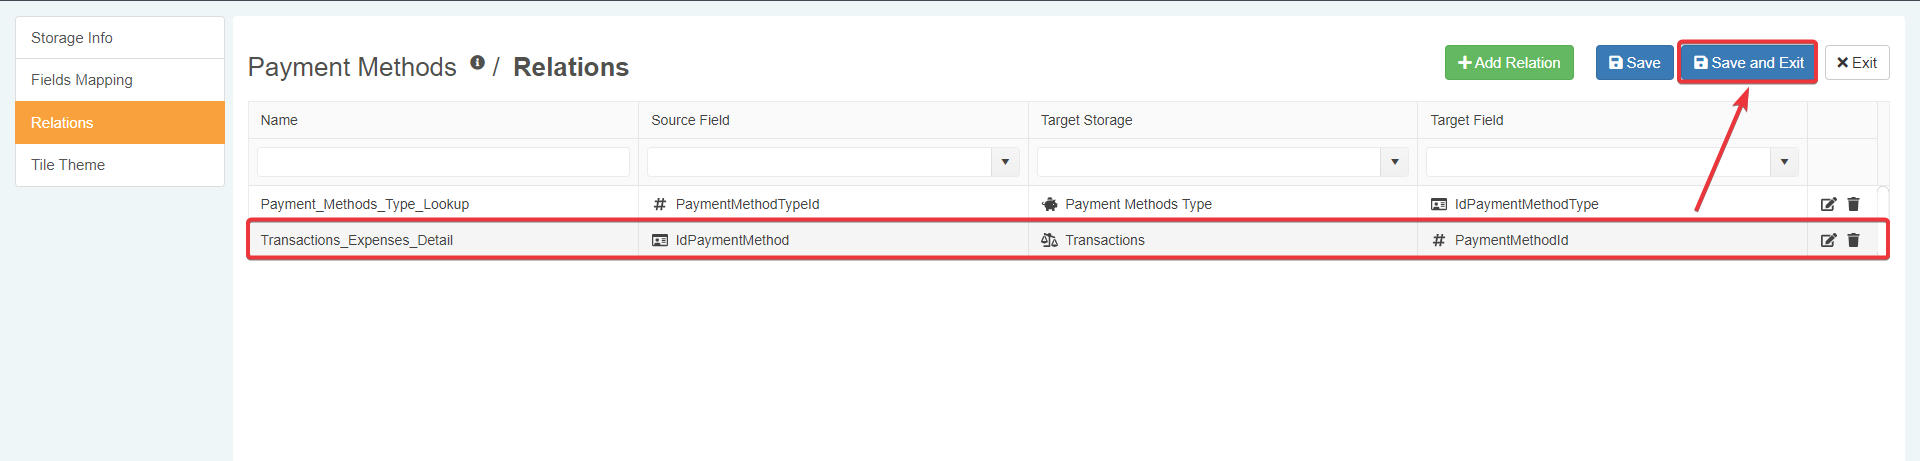
You have established the Relation needed for Expenses.
Configuring the Expenses Detail in the Payment Methods Application
You must configure the Payment Methods application to represent Transactions_Expenses_Detail as Detail of the Master table.
-
Enter the Design Mode of the Payment Methods application.
-
Enable the field
IdPaymentMethodas Primary Key by clicking the Is Primary Key button () next to the field's textbox.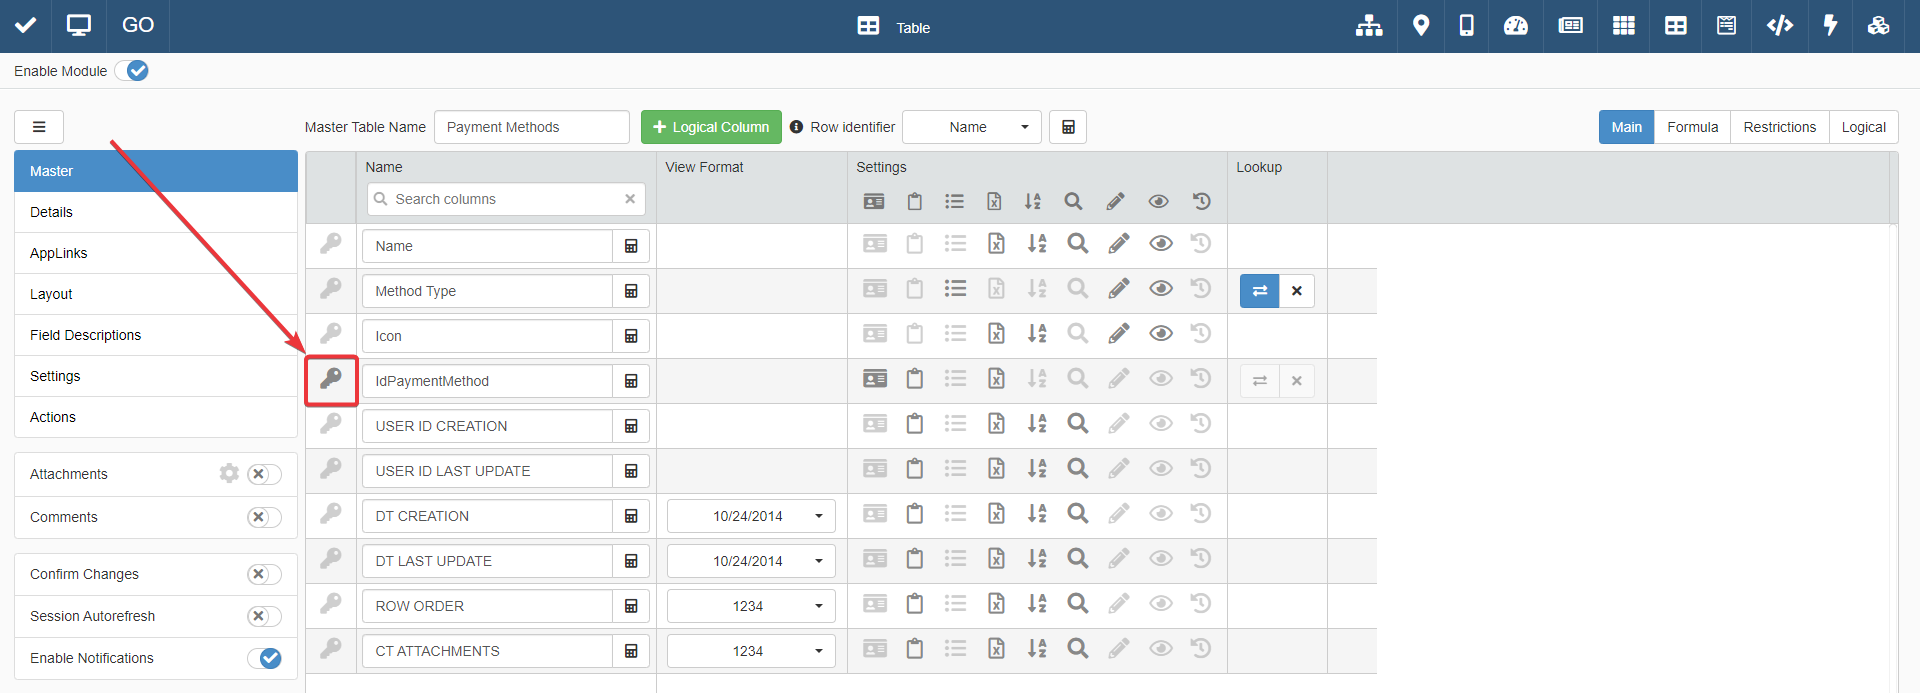
-
Click on the Details tab in the left task-bar. You will access the Details sub-panel.
-
Click on the Add Detail on the upper-right corner of the Details sub-panel.

-
Drag & Drop the Table option () below the task-bar to the center of the sub-panel. Choose
Transactions_Expenses_Detailas table for the Detail.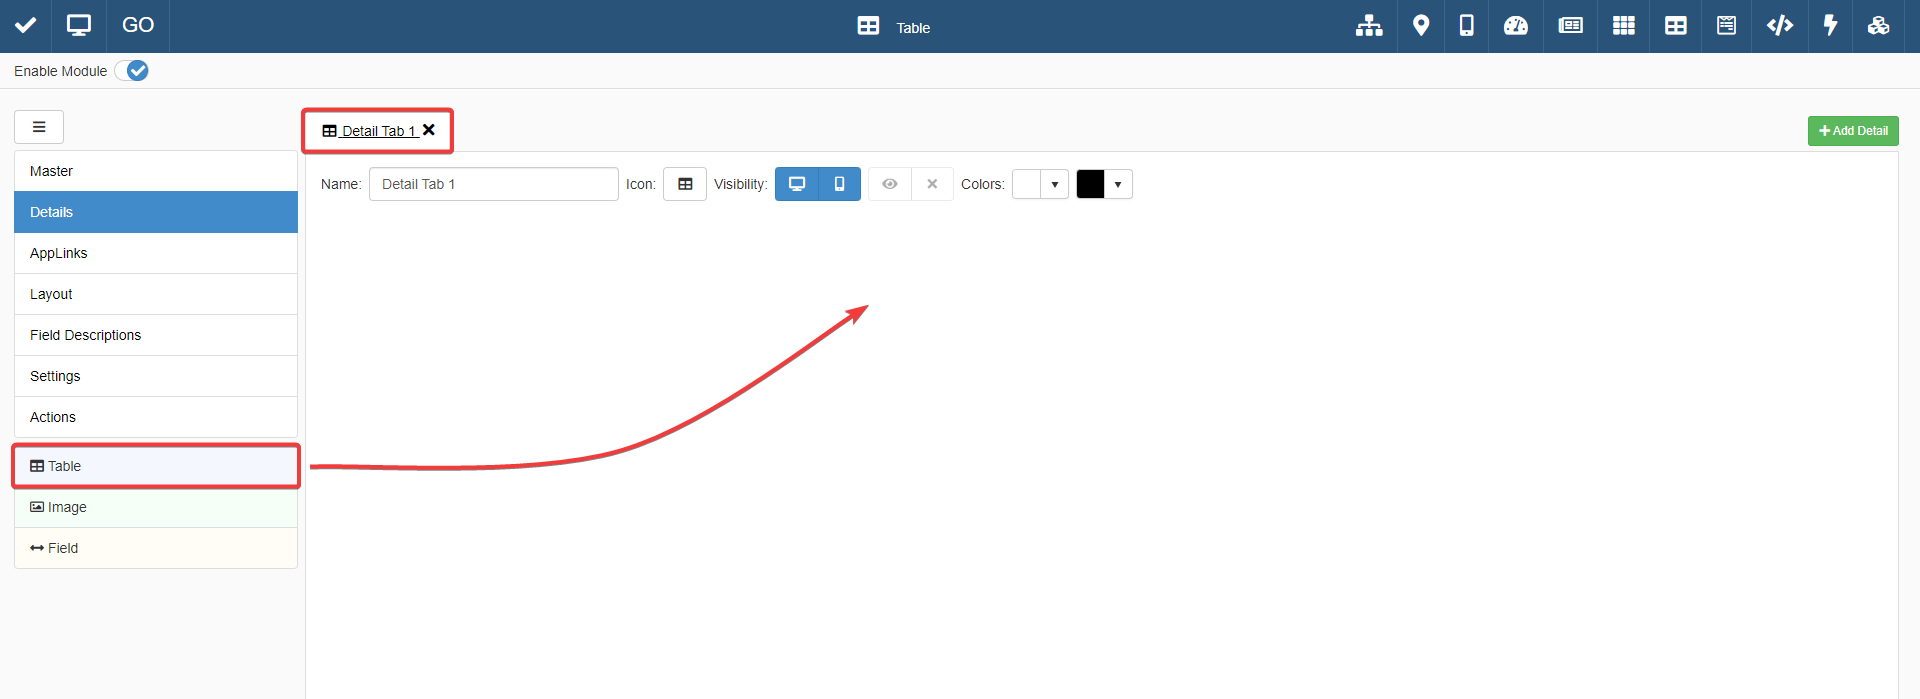
-
The window will display the fields of the Storage Transactions.
Change the following settings for the table.
- (1) Set the Column Headers' Labels. (Type the same labels of Personal Budget application.)
- (2) Choose the Format for BudgetValue, BudgetDate, and BudgetTime fields.
- (3) Enable the sortability of the fields highlighted by clicking the Is Sortable () button.
- (4) Enable the searchability of the fields highlighted by clicking the Is Searchable () button.
- (5) Enable the visibility of the fields highlighted by clicking the Visible in the Grid () button.
- (6) Configure the Lookups ().
The configuration should be like the following.
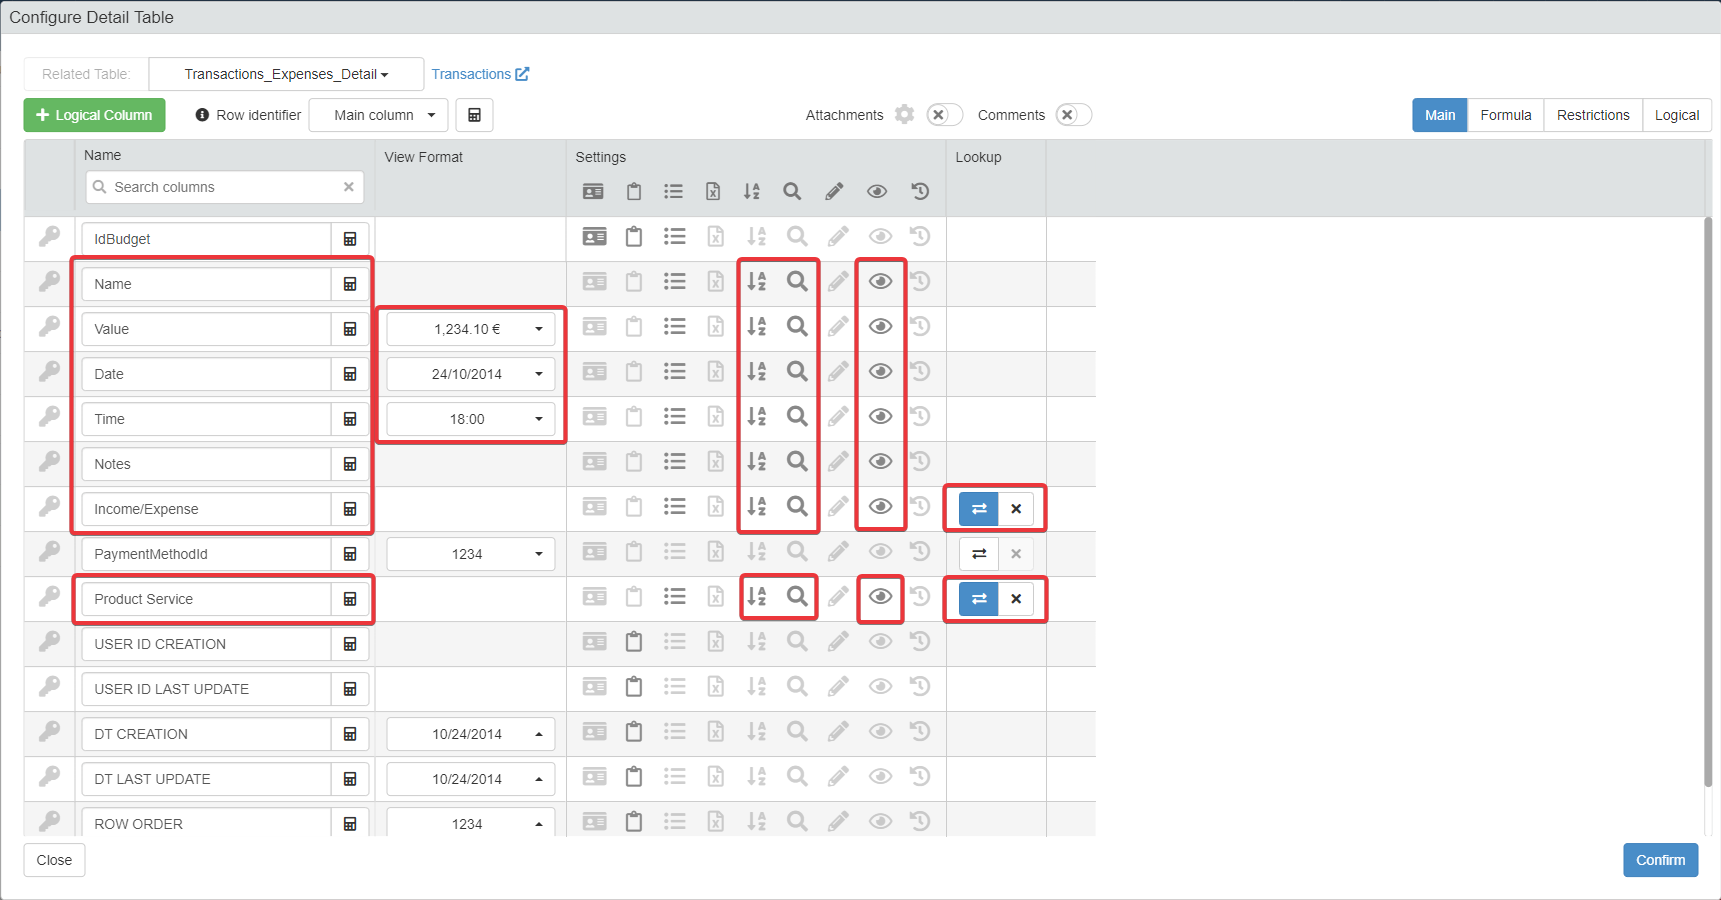
You can ignore the configuration of
PaymentMethodId. Since you are configuring a Detail of Payment Methods, you do not need to show the information twice both in the Master and the Detail. -
Click on the Confirm button on the Detail Table Setting window to confirm the settings.
-
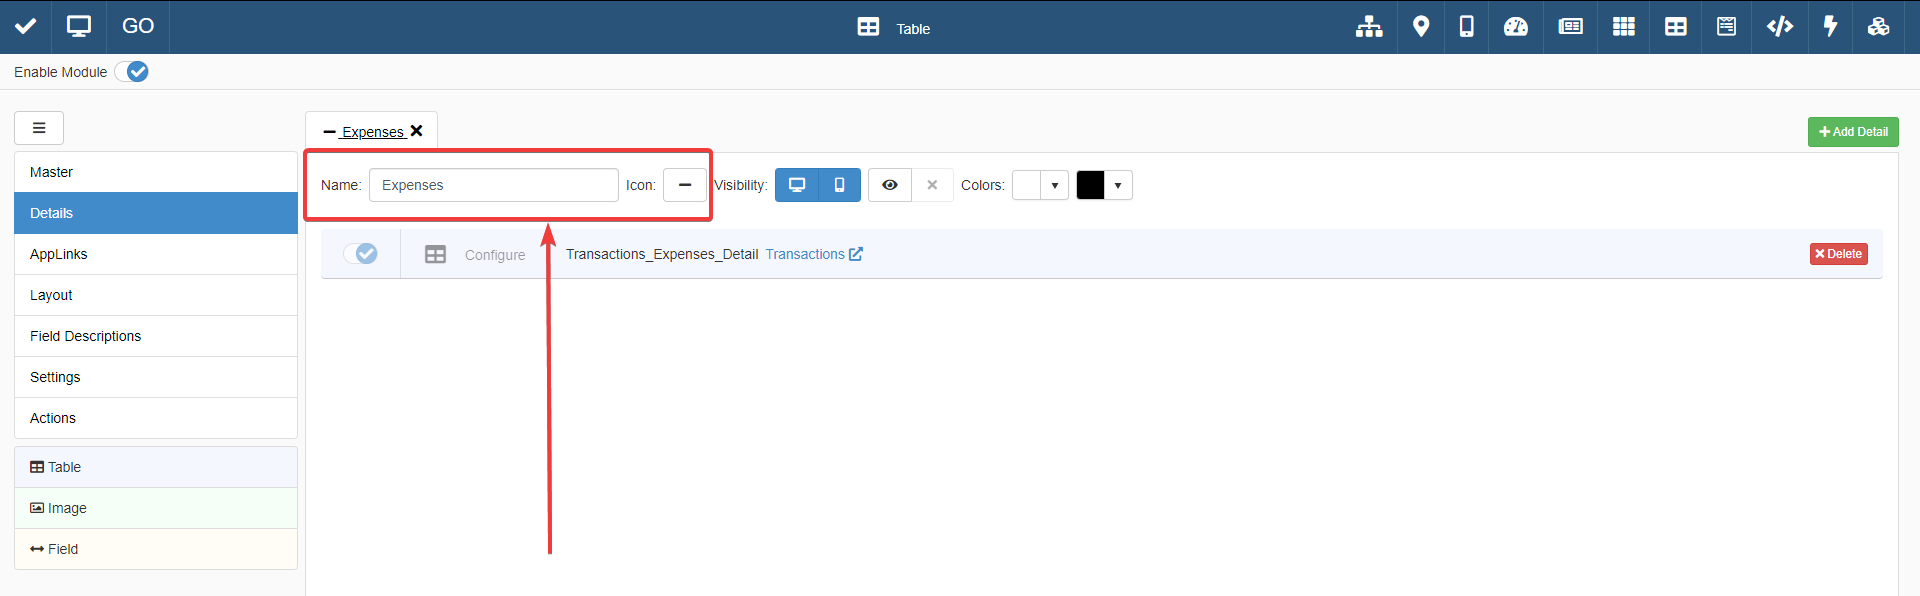
You have configured the Detail. Customize name and icon of the Detail's tab.
- Type the Detail's name in the textbox. Call the Detail's tab Expenses
- Choose an icon for the tab, like (search
minus).
-
In the Layout sub-panel, click on the Expenses tab and customize and arrange the columns.
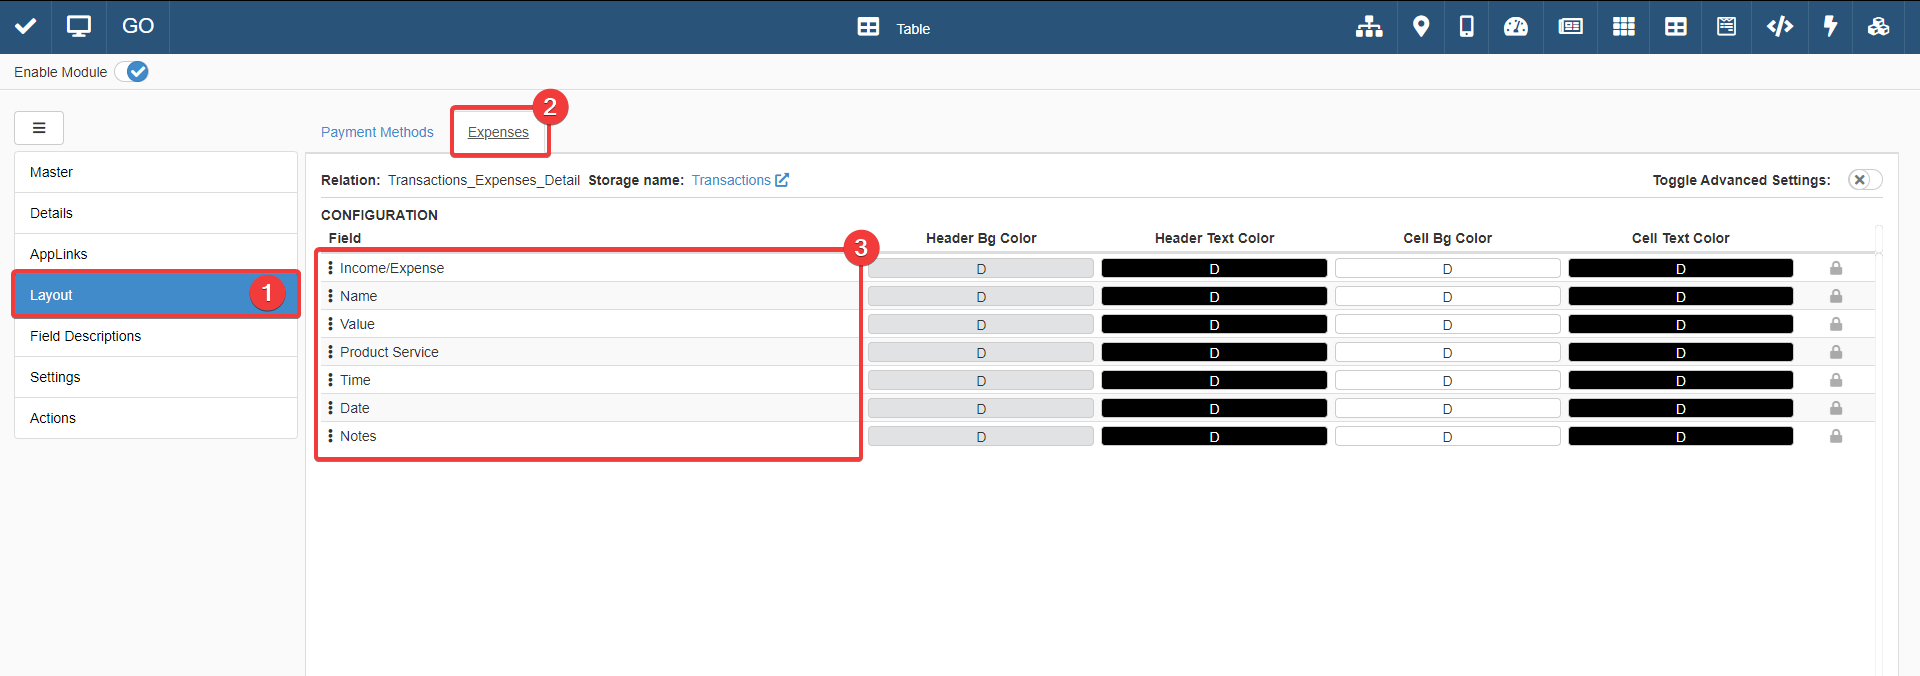
Arrange the columns' order as follows:
- Income/Expense
- Name
- Value
- Product Service
- Date
- Time
- Notes
Restriction on the Expenses Detail data by using a Formula
-
At this point, Expenses displays all the entries because there are no restrictions.
You need to configure a restriction so that Expenses must list only the Expenses associated with the Payment Method.
You are going to use Formulas to configure the restrictions for the Details. Go back to the Design Mode of Transactions Products and Services.
-
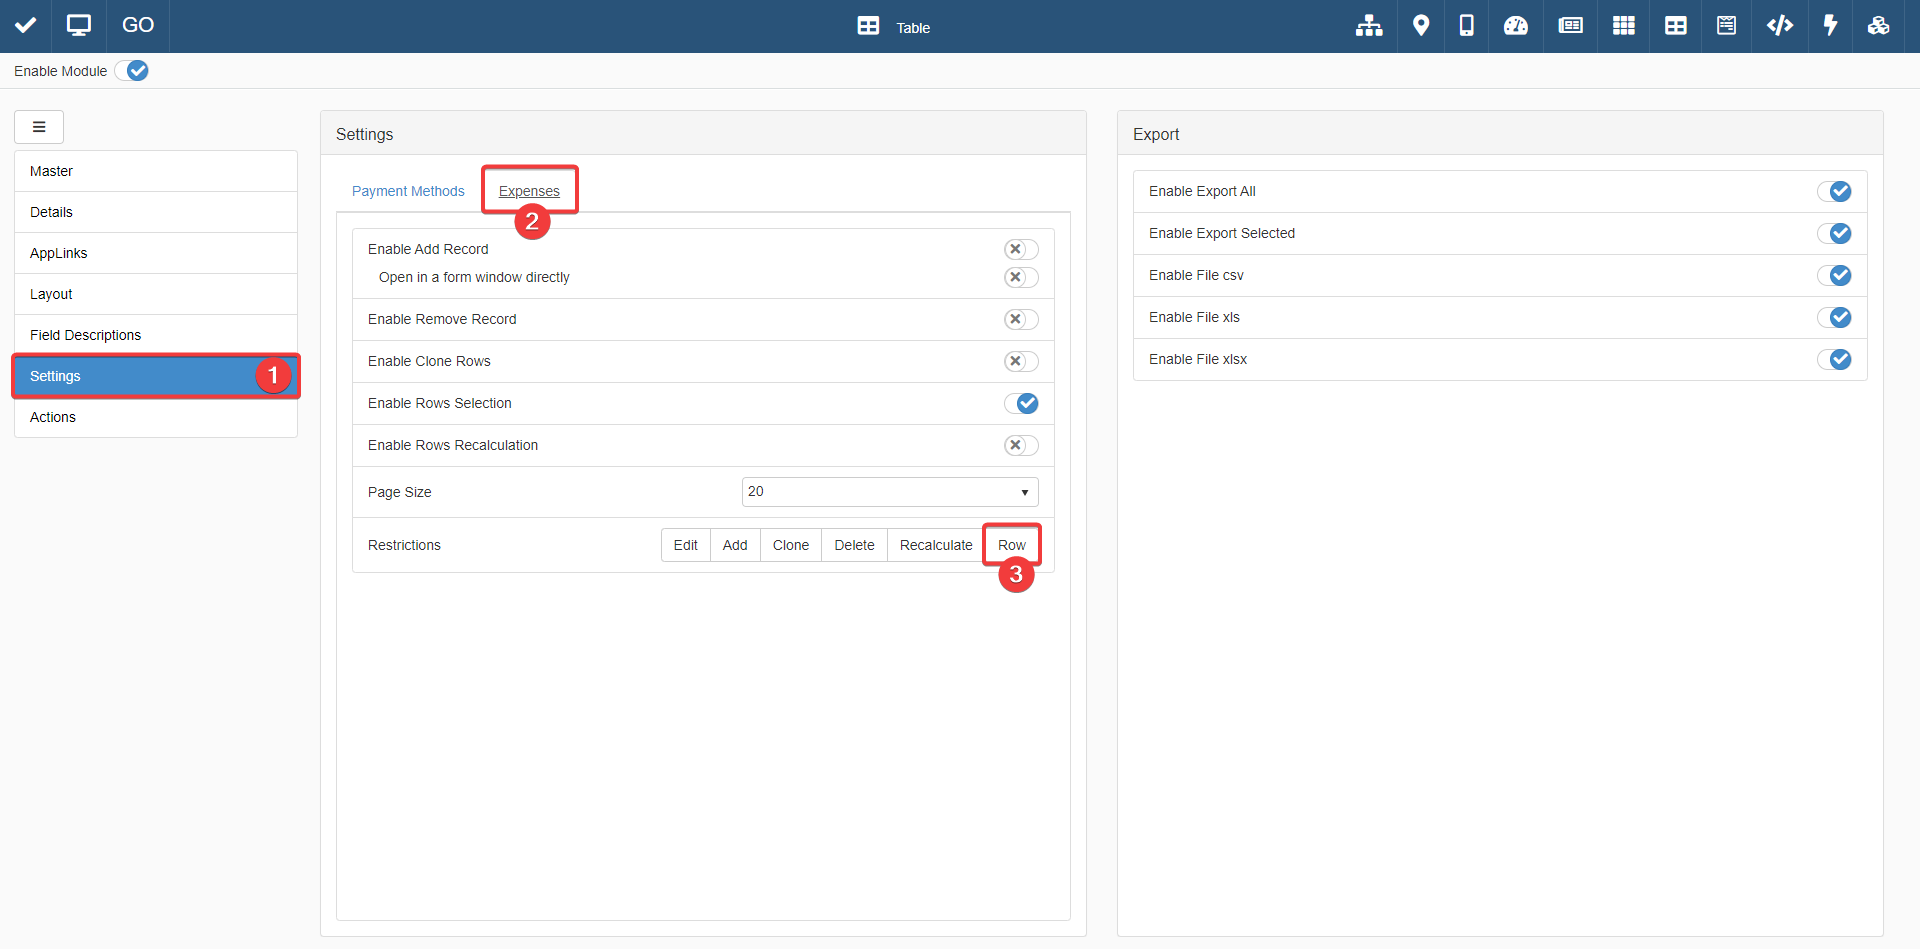
(1) Click on the Settings sub-panel on the left task-bar.
-
(2) In the left part of the sub-panel, click on the Expenses tab.
-
(3) Click on Restrictions > Row.
-
-
The Formula Editor will appear.

Type or copy & paste the following formula:
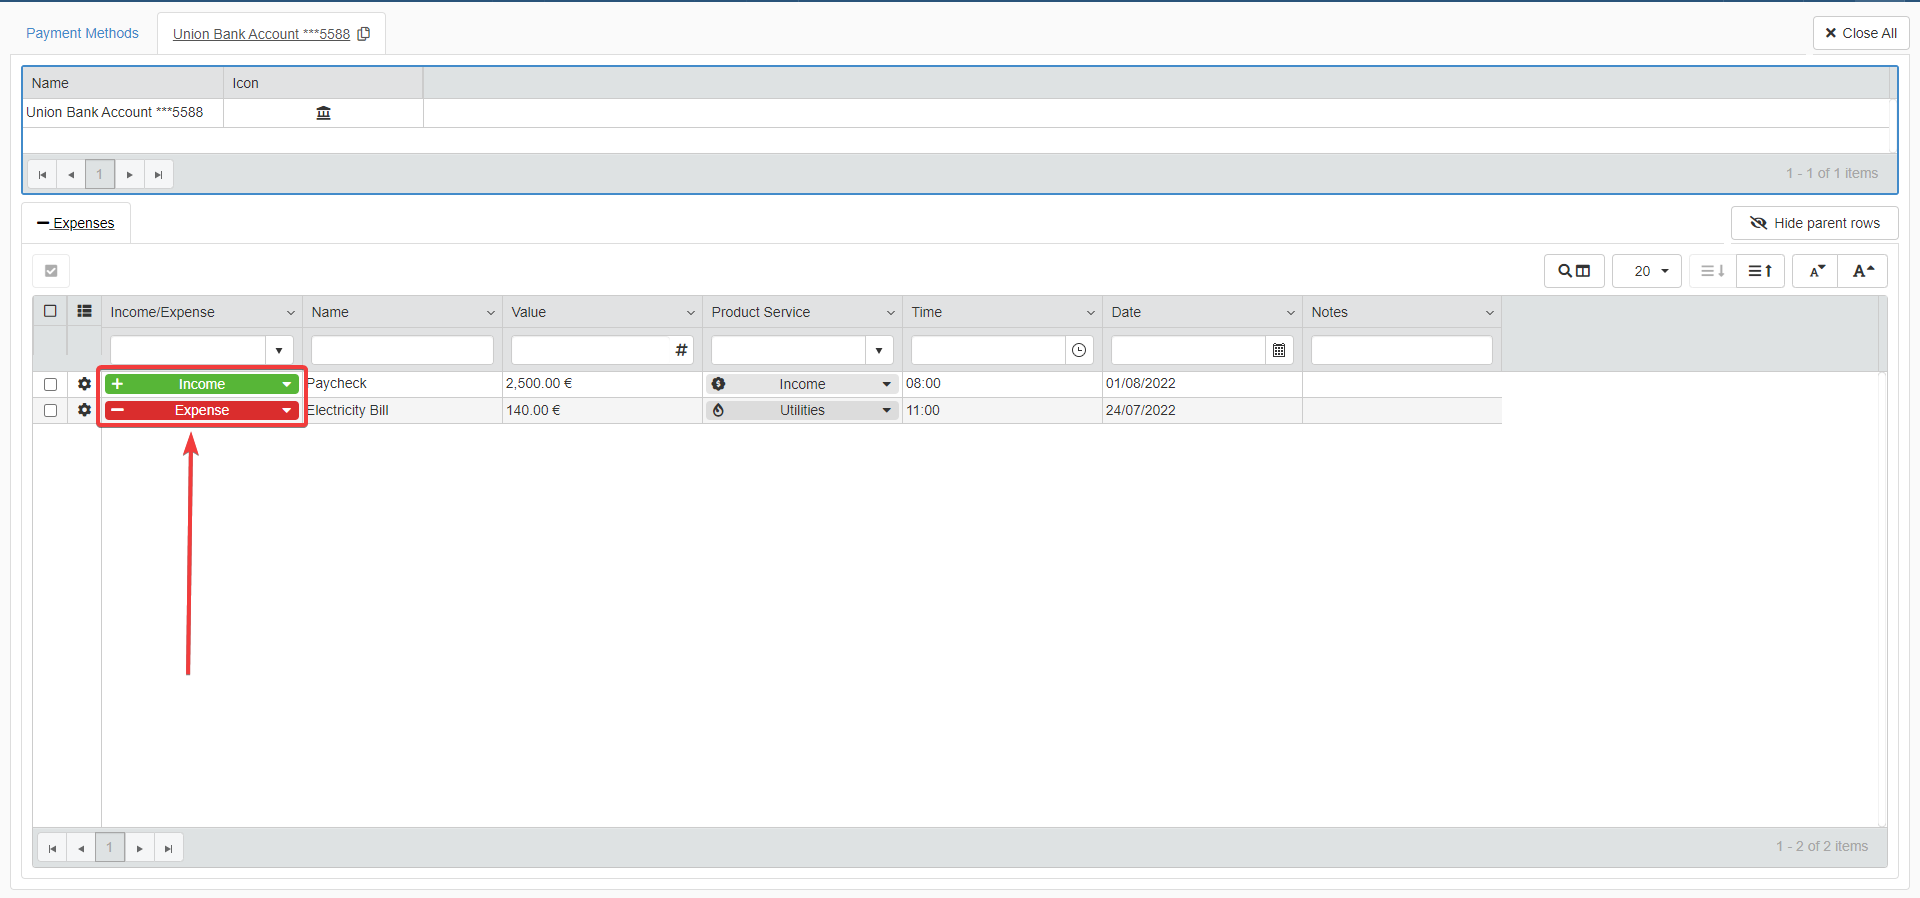
The Formula specifies to pick up only the entries with the field1=EQ($CURRENTSTORAGE.IncomeExpensesTypeId; 1)IncomeExpensesTypeIdequal to 1. 1 is the ID visible for the entry "Expense" in Income Expense Type. This is why you made visible the ID column in Income Expense Type: you must know the exact ID of the option.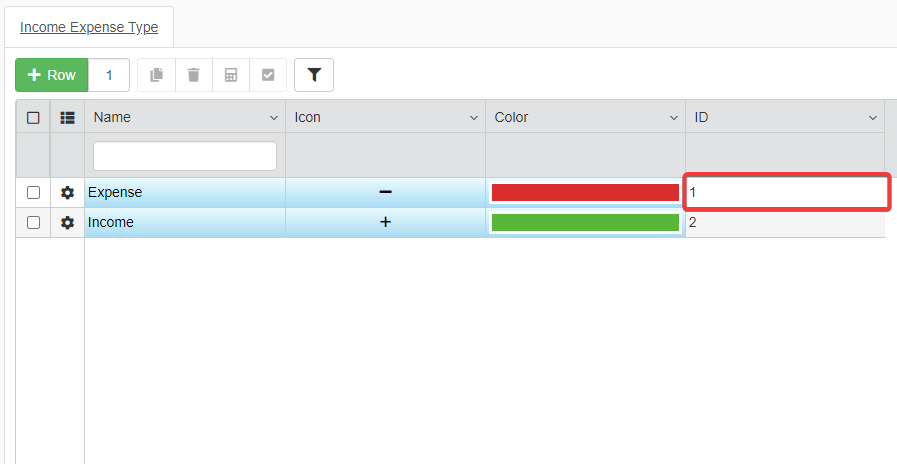
At this point, the Expenses Detail will display only the entries of transactions classified as
Expense.
-
Save all the changes in Payment Methods's Design Mode.
Now, you have associated secondary data from another Storage to the entries of Payment Methods. Each payment method will have a Detail with all the expenses made.

The Detail will display only the entries classified as Expenses thanks to the Formula in the Row Restriction
Exercise: Divide the Income entries by Payment Method in Payment Methods
Try by yourself to add a Detail in Payment Methods for the Income received for each payment method. (Here you find the solution.)
Hint
You can establish multiple Relations using the same fields. Differentiate Relations on the same fields by using names that make clear their role (e.g. Relation_Name_Detail, Relation_Name_Lookup).
Customizing Details' Tab
Note
This step is optional.
Like other parts of an application, you can customize the appearance of Details' Tabs as well.
You will learn how to assign a color to each tab. This helps identifying a tab at first glance. In fact, using colors becomes useful when your application has a lot of Details to navigate.
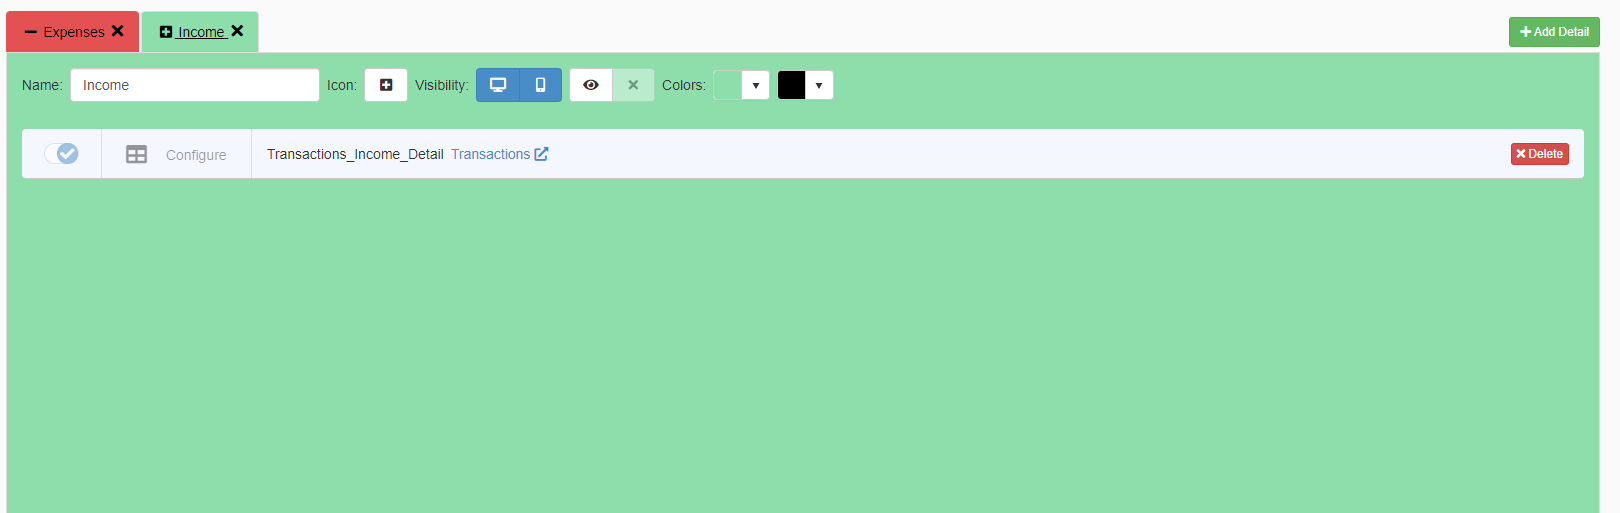
For instance, change the color of the tabs for the Income and Expenses Details in Payment Methods.
- Go back to the Details sub-panel in Design Mode.
-
In Details, you can notice two drop-down color palettes labelled as Colors.

- (1) The color palette on the left changes the color of the tab.
- (2) The color palette on the right changes the text color of the Detail's tab.

Click on color palette 1 and choose a shade of red for the Expenses Detail tab.
-
Repeat Step 2 but for the Income Detail tab. Choose a shade of green to distinguish Income from Expenses.
-
Save the changes in Design Mode.
At this point, you can hide the Income/Expense column in both the Details. The Details group each entry by type and the colors identify the entry type.
- Go back to the Details sub-panel in Design Mode.
-
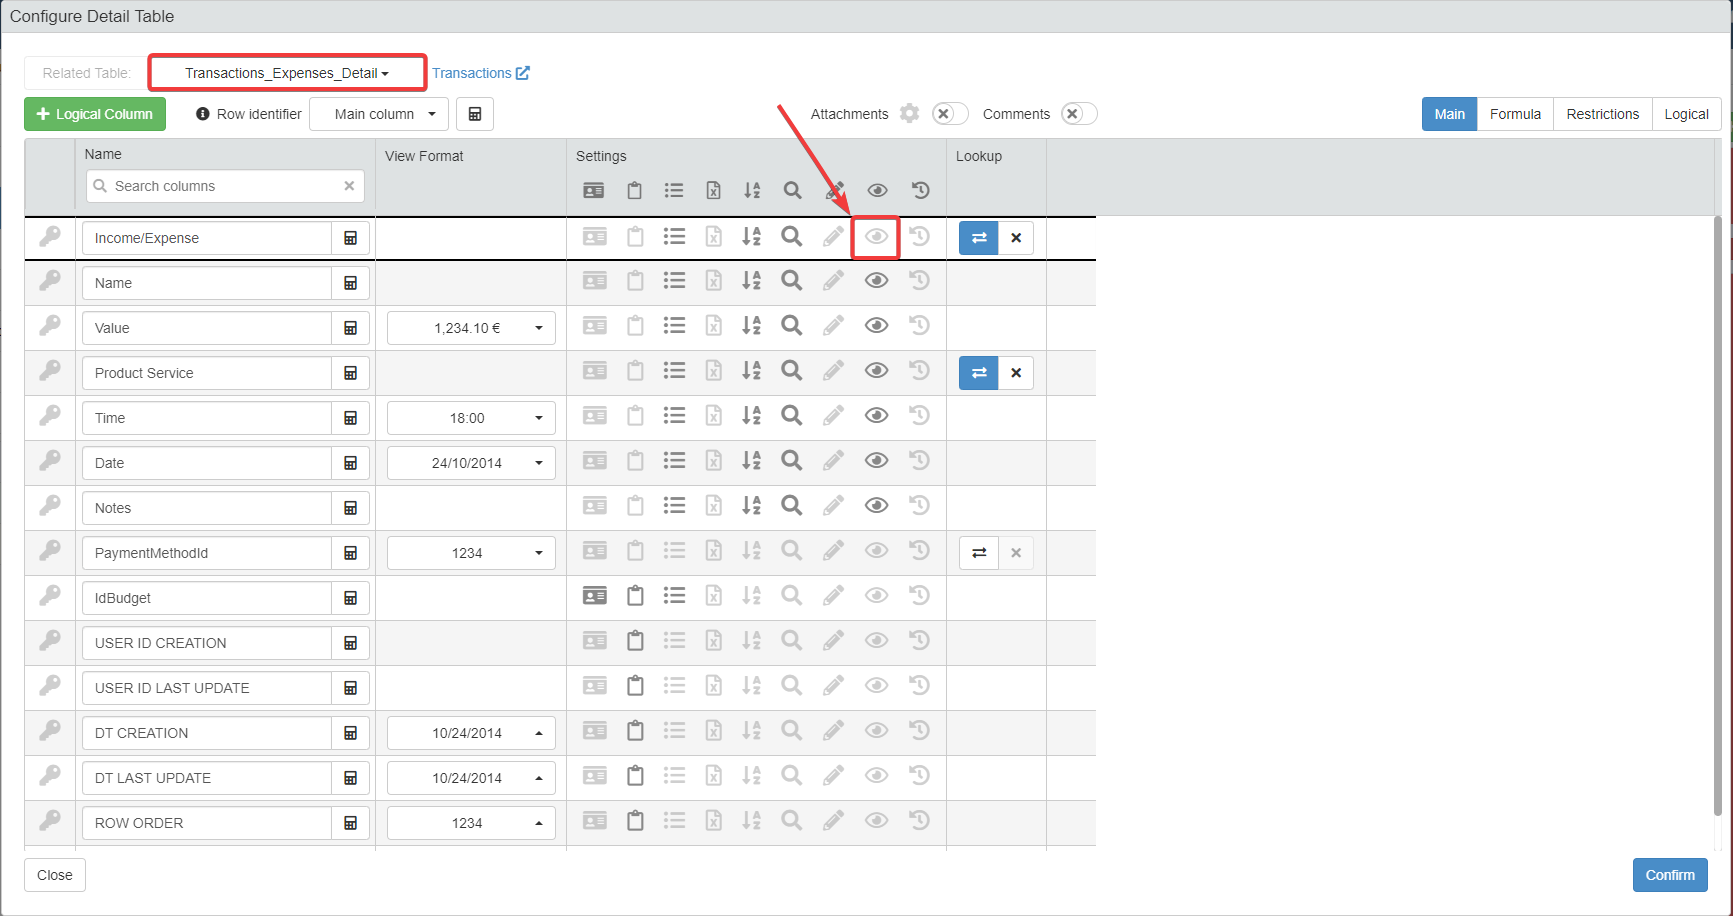
Click on the Configure button () next to the Detail Table's row.
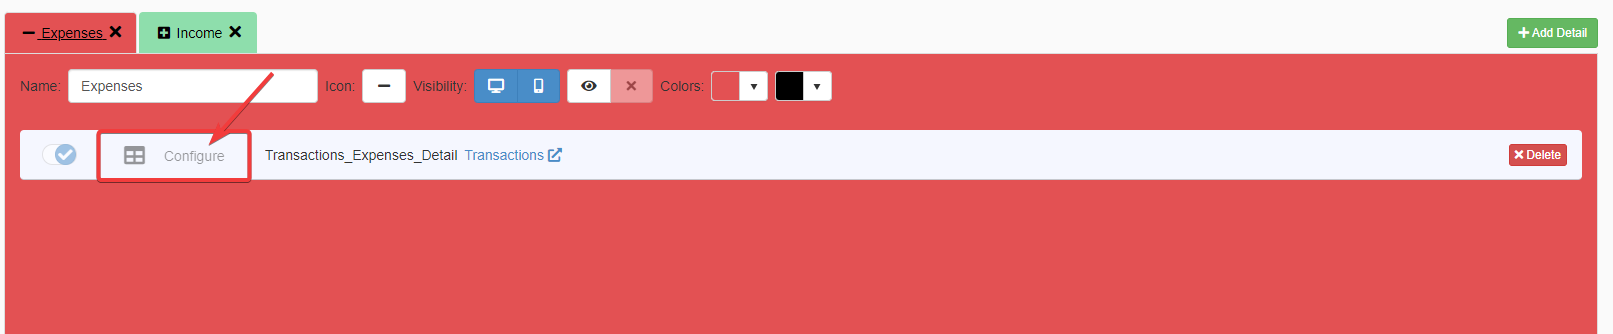
-
Disable the Is Visible in Grid option () for the Income/Expense column.
-
Repeat Step 3 for the Income Detail.
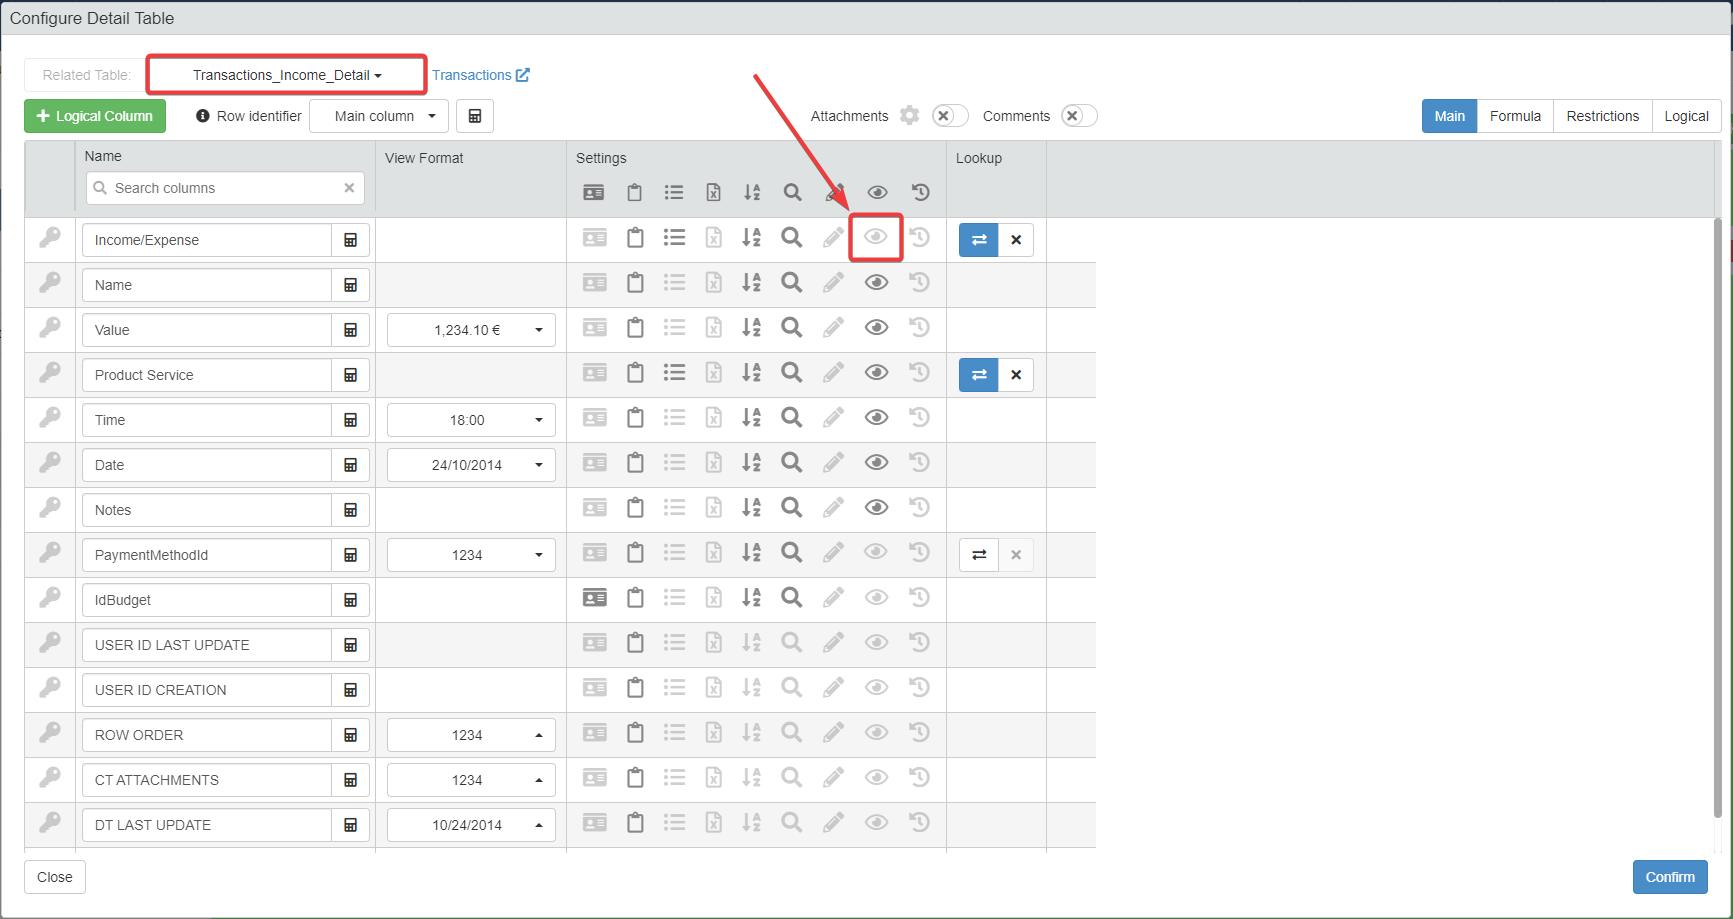
-
Save all the changes in Design Mode.
Accessing the application Payment Methods, you will see the colored Detail tabs without the Income/Expense column.
Congratulations, you have learnt how to create Details!
At this point, you have designed a very functional and powerful application without any knowledge of coding. But you can empower it by introducing automated processes.
Success
Continue with the Automate your application tutorial. You will learn the fundamentals of workflow automations for eLegere by examples: Logical Columns, Custom Actions, eLegere Script, and Scheduled Jobs.