Lookups - Cells with a List of Options to Choose a Value from
Note
This tutorial presupposes what done in Customizing the Application's Appearance tutorial. If you have missed or skipped the previous tutorial or you want to experiment and go back, do not worry! You can import this .eap file to sync or restore with what you see in this documentation. Learn about resetting by using .eap files. If you don't use the .eap, what you see might differ slightly from the screenshots.
Lookups enable you to configure table cells with a default lists of values to choose from. You will learn the basics of Lookups and how to design them.
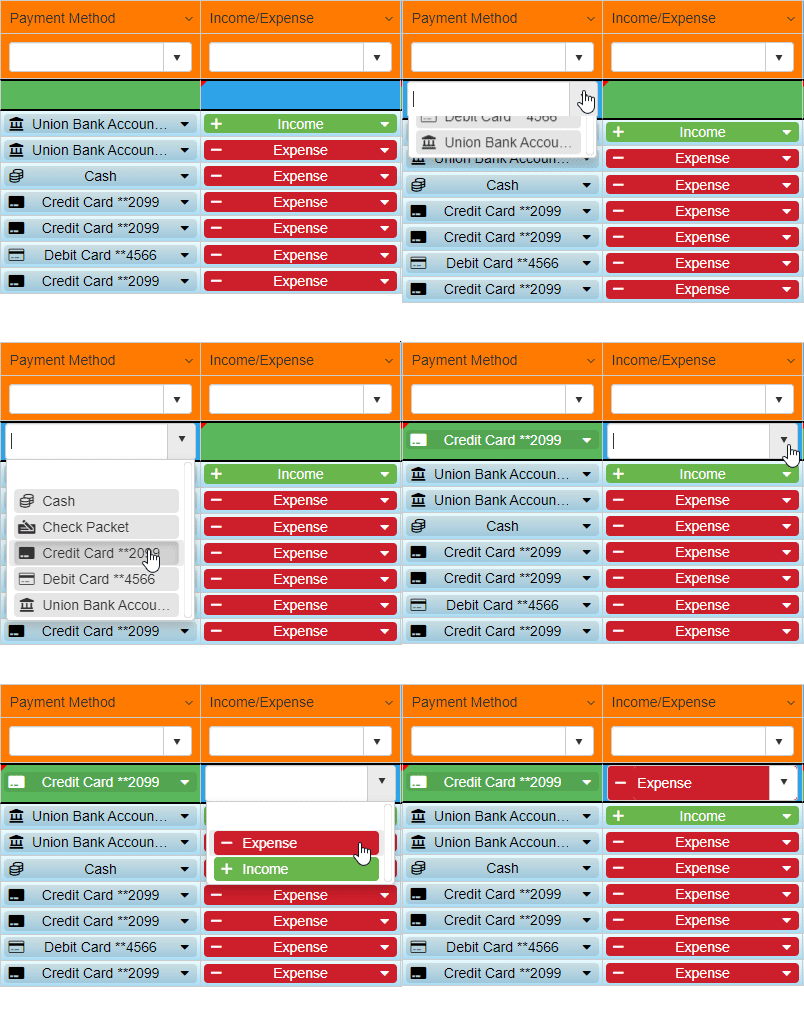
After Building Your First App: Personal Budget and Customizing the Application's Appearance, you have a fully functioning application to record your income and payments. But you can improve an eLegere application in multiple ways. One of these ways are Lookups.
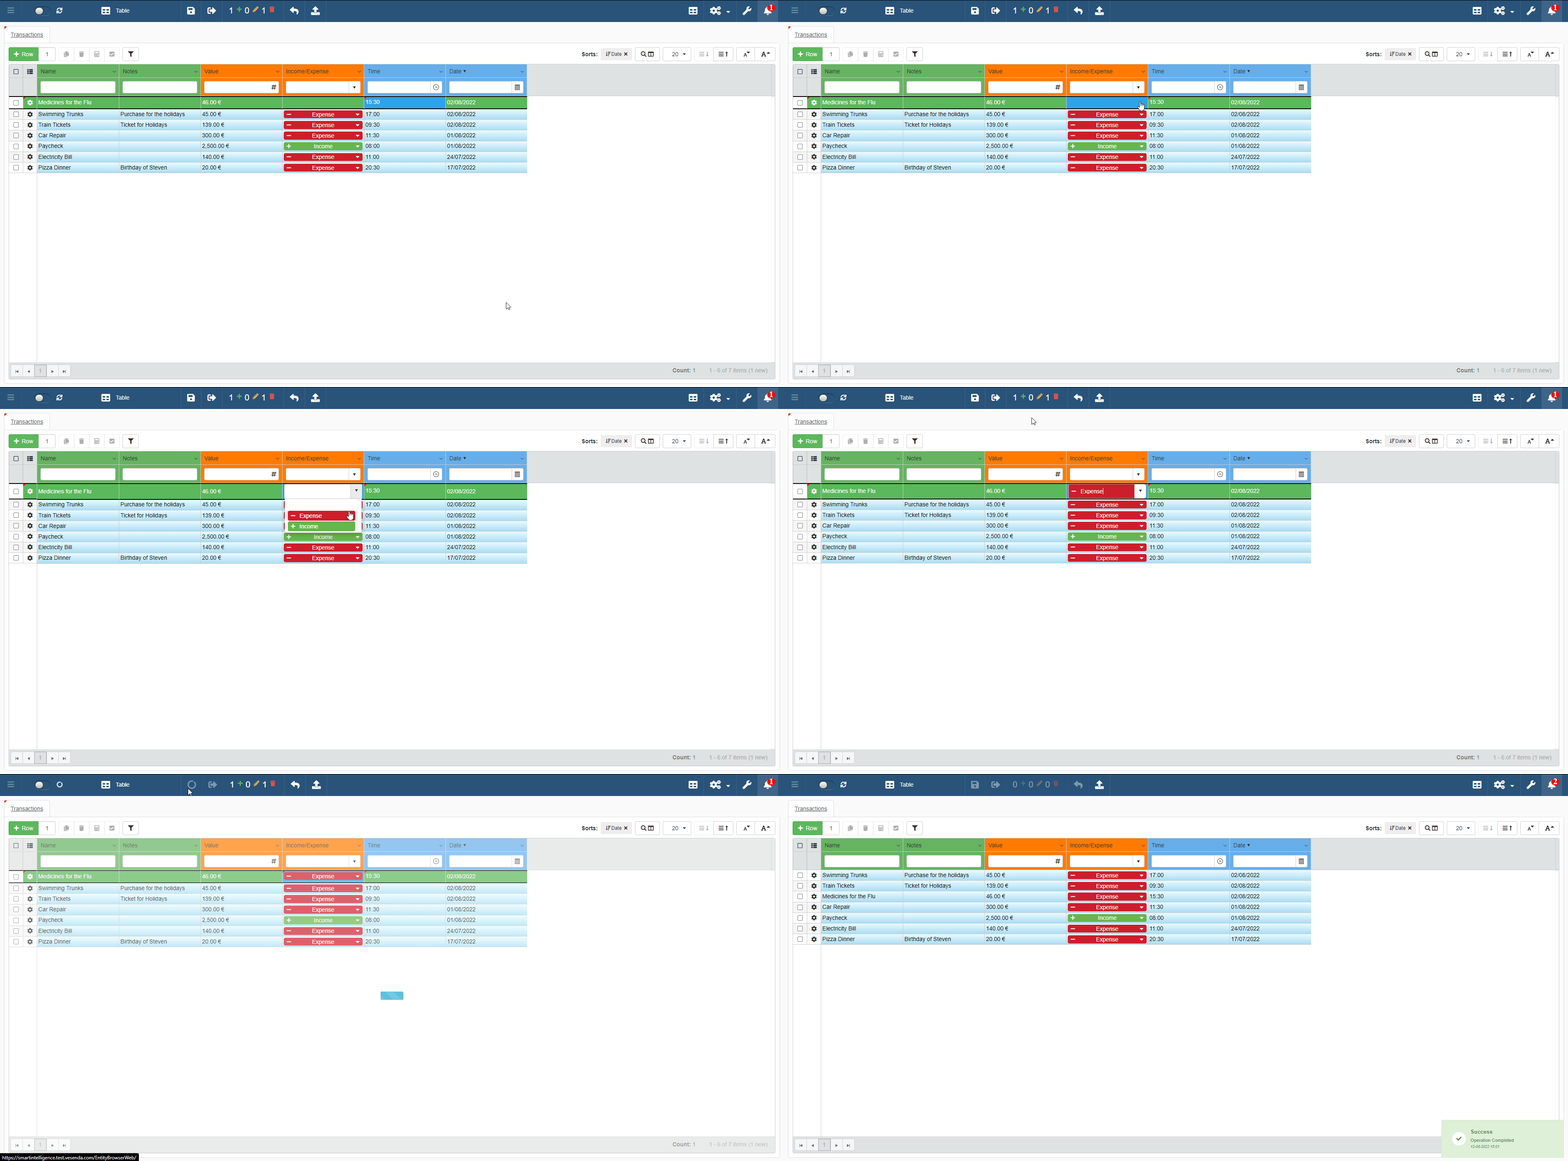
Lookups are drop-down lists of values to fill a table cell. The user clicks on the row's cell with the Lookup and can choose one the values from the list as record.
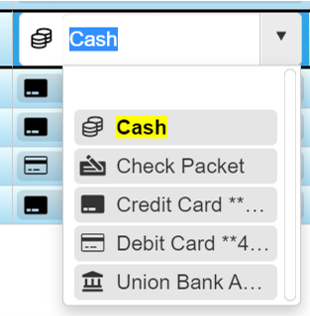
Lookups are useful if you want to provide a limited set of values for a field and unnecessary data repeat.
The tutorial teaches you how to create Lookups by guiding you through some step-by-step examples.
You will learn about what constitutes any Lookup: Relations between Storages. During the explanation, you will acquire some good practices and rules to manage Lookups and Relations as well.
Note
The tutorial explains first the steps to create a Lookup and its Relation. The tutorial will require to repeat the same pattern of operations many times. If you prefer to understand the theory first before practice, go to Rules for Relations and Lookups. Then go back to the beginning and follow the tutorial. Otherwise, continue to read the sections in order.
Create a Lookup for the Expense or Income Type Column
Learn to build your first Lookup for Personal Budget: differentiate the choice between expenses and incomes.
At this stage, you have only the Storage Transactions. (The picture displays two example fields.)
The first thing you need is a Storage. Every Lookup requires a Storage with the list of fixed values to choose from.
Suppose that for each entry of Personal Budget you need a Lookup field specifying if the entry is an income or an expense.

To do the above, you need to:
- Create and Configure the Storage for the Lookup
- Establish a Relation in Transactions
- Enable the Lookup Relation on Personal Budget
- Configure the Column for the Lookup Relation.
Create and Configure the Storage for the Lookup
In this stage, you are going to create a Storage to record the options of the drop-down list.
-
Create a new Blank Storage and call it
Income Expense Typeby following the procedure in Building Your First App: Personal Budget. -
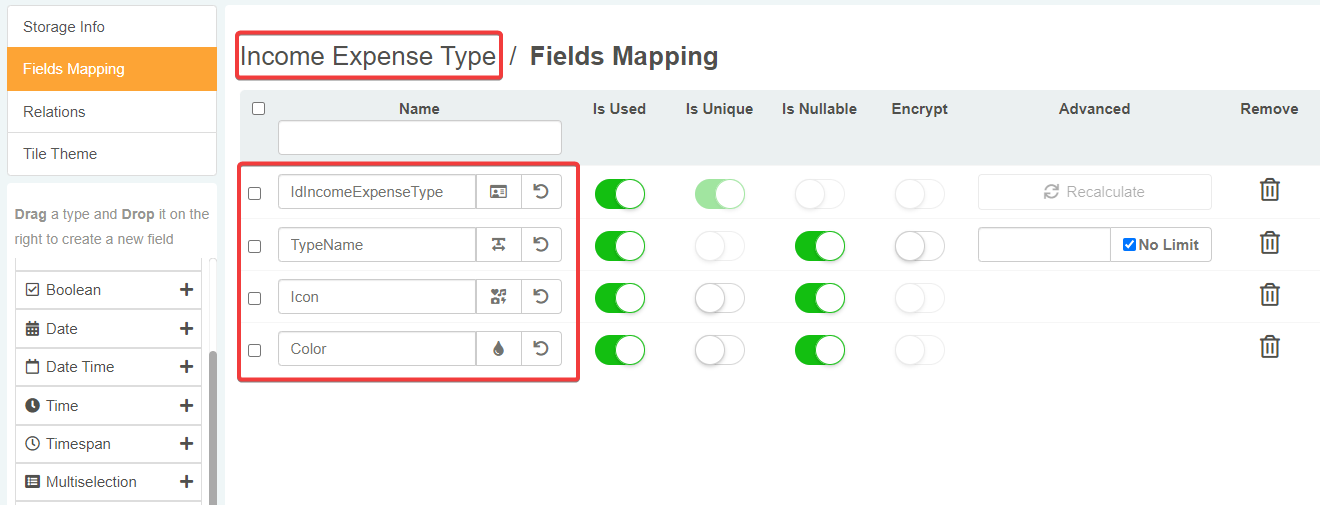
Add the following fields to Income Expense Type Storage.
IdIncomeExpenseTypeIdentity The Identity for the entries ofIncome Expense TypeStorage.TypeNameString The field storing the name of the option.IconIcon The field storing the icon representing the option.ColorColor The field storing the color to highlight the option.
Hint
Lookups do not require Color and Icon type fields to work and they are optional. Color and Icon fields help to assign a distinctive icon and color to the option. Assigning a distinctive icon and color helps identifying the options more easily in the list.
-
Save the Storage and create a new application called Income Expense Type. Income Expense Type must use the Storage of the same name (i.e. Income Expense Type).

-
In Design Mode of Income Expense Type, make visible the Identity field
IdIncomeExpenseType. In the Master sub-panel, click on Is Visible on the Grid button () on theIdIncomeExpenseType's row.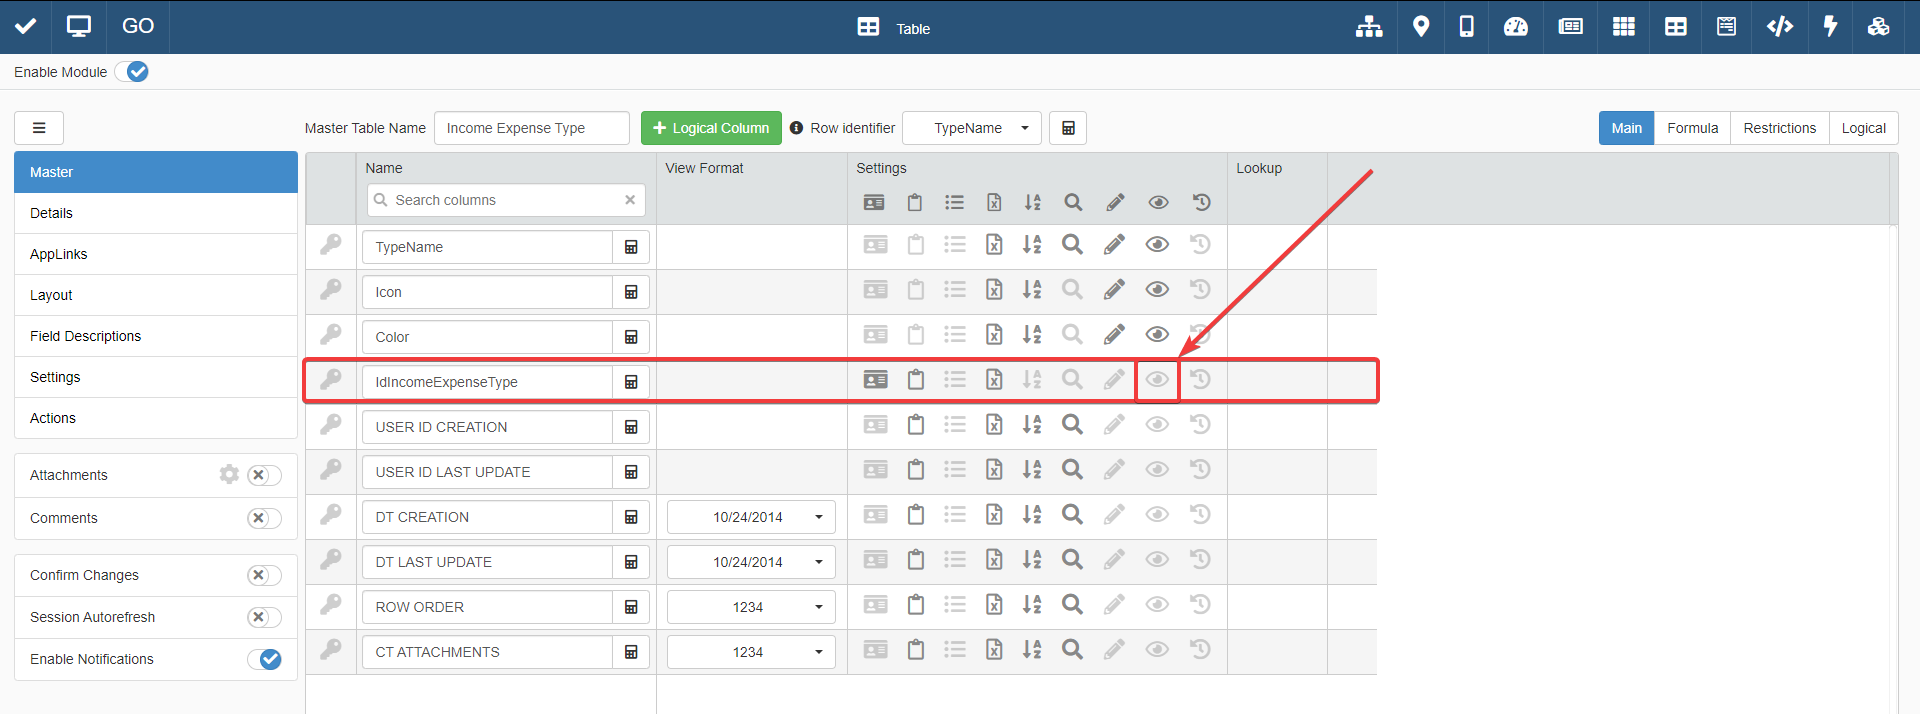
The next steps and the next tutorials require making visible
IdIncomeExpenseTypeto refer to specific elements through their IDs. You will understand later why is useful to see the IDs of Storage's entries in Further Study: Default Value for Lookups and when you will restrict data visibility.Info
Users cannot edit Identity type fields. Applications assign the ID to the field automatically. Each numeric ID is unique.
-
Change the name of the fields as follows. Afterwards, save the changes in Design Mode.

- Name
- Icon
- Color
- ID
-
Insert and save the following entries in the Master table of Income Expense Type as they appear in the image below. (The Application assigns the IDs to the ID field automatically. No further action is required.)

Hint
Defining an icon and a color is optional. The Lookup will work despite
ColorandIconfields exist or are empty. But defining an icon and a color helps identifying the option in the Lookup more easily.
Establish a Relation in Transactions
In the previous step, you have created the storage recording the options for the drop-down list. Now, you must create a Relation between the data of Income Expense Type Storage and Transactions Storage. Since the Lookup will appear in Personal Budget, you will establish the Relation in Transactions (the Storage used by the Personal Budget Application).
-
Add to the Transactions Storage a Numeric field type called
IncomeExpensesTypeId.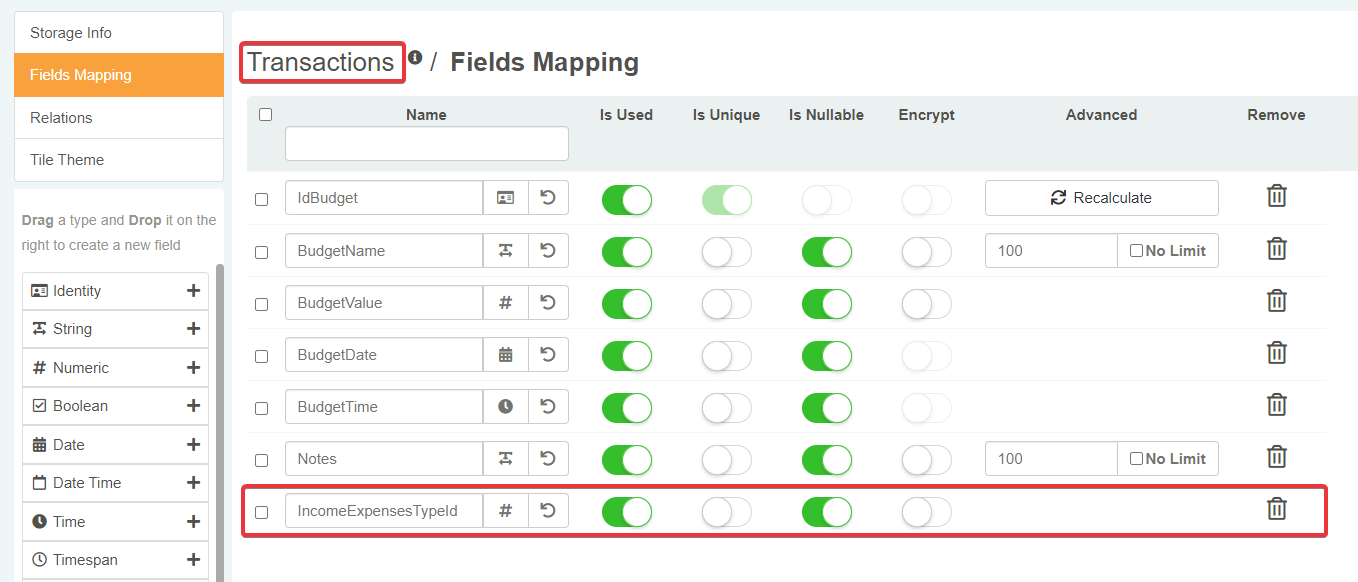
-
In the Storage editor of Transactions, click on the Relations sub-panel. The click on Add Relation button on the upper-right corner.

-
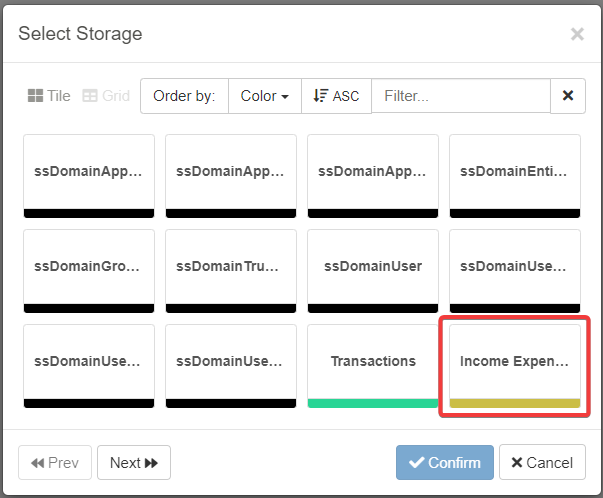
Choose the Income Expense Type Storage for the Relation.
-
In the window that appears, you must choose the fields to be related. Choose for Transactions the field
IncomeExpensesTypeId. The field for Income Expense Type Storage is already set on the Identity fieldIdIncomeExpensesType. Name the Relation asIncome_Expense_Type_Lookup.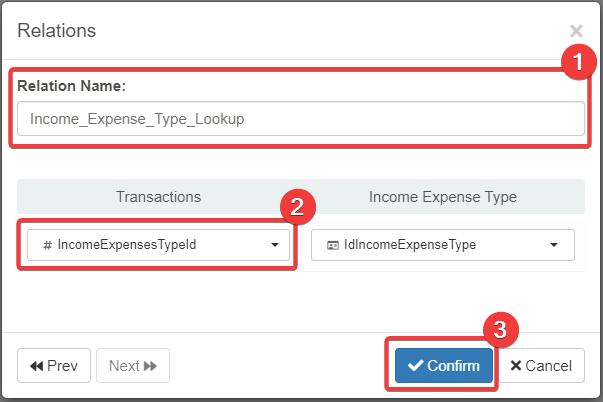
Introduction to a few concept that the later Rules for Relations and Lookups discusses. Understand the following key points before continuing with the tutorial.
- Relations are relationships between one field of a Storage and the field of another Storage.
- A Relation constituting a Lookup is a Lookup Relation.
- A Lookup Relation is a relation between a Numeric field and an Identity field.
- The Numeric field must be in the Storage of the application that will display the Lookup drop-down list. I.e. Transactions
- The Identity field is the Identity field of the Storage containing the options that must appear in the drop-down list. I.e. Income Expense Type
- In an application you can display the Relation as a list of fixed options to scroll and select in the Application: a Lookup.
Hint
Convention: The fields related in a Relation must have unique, clear, and unambiguous names. It's recommended to call the Numeric fields
FieldNameIdin a Lookup Relation. In this way, it's clear to what Identity fieldIdFieldNamethey relate in a Relation. Note: There are no mandatory rules to choose a field name. The suggestion above helps to identify fields and relations without confusion in Storages with multiple Lookup relations.Hint
You can establish a Relation with multiple sorts of field between two Storages. The most common is between a Numeric field type and Identity type field.
-
Click on the Confirm button () to create the Lookup Relation.
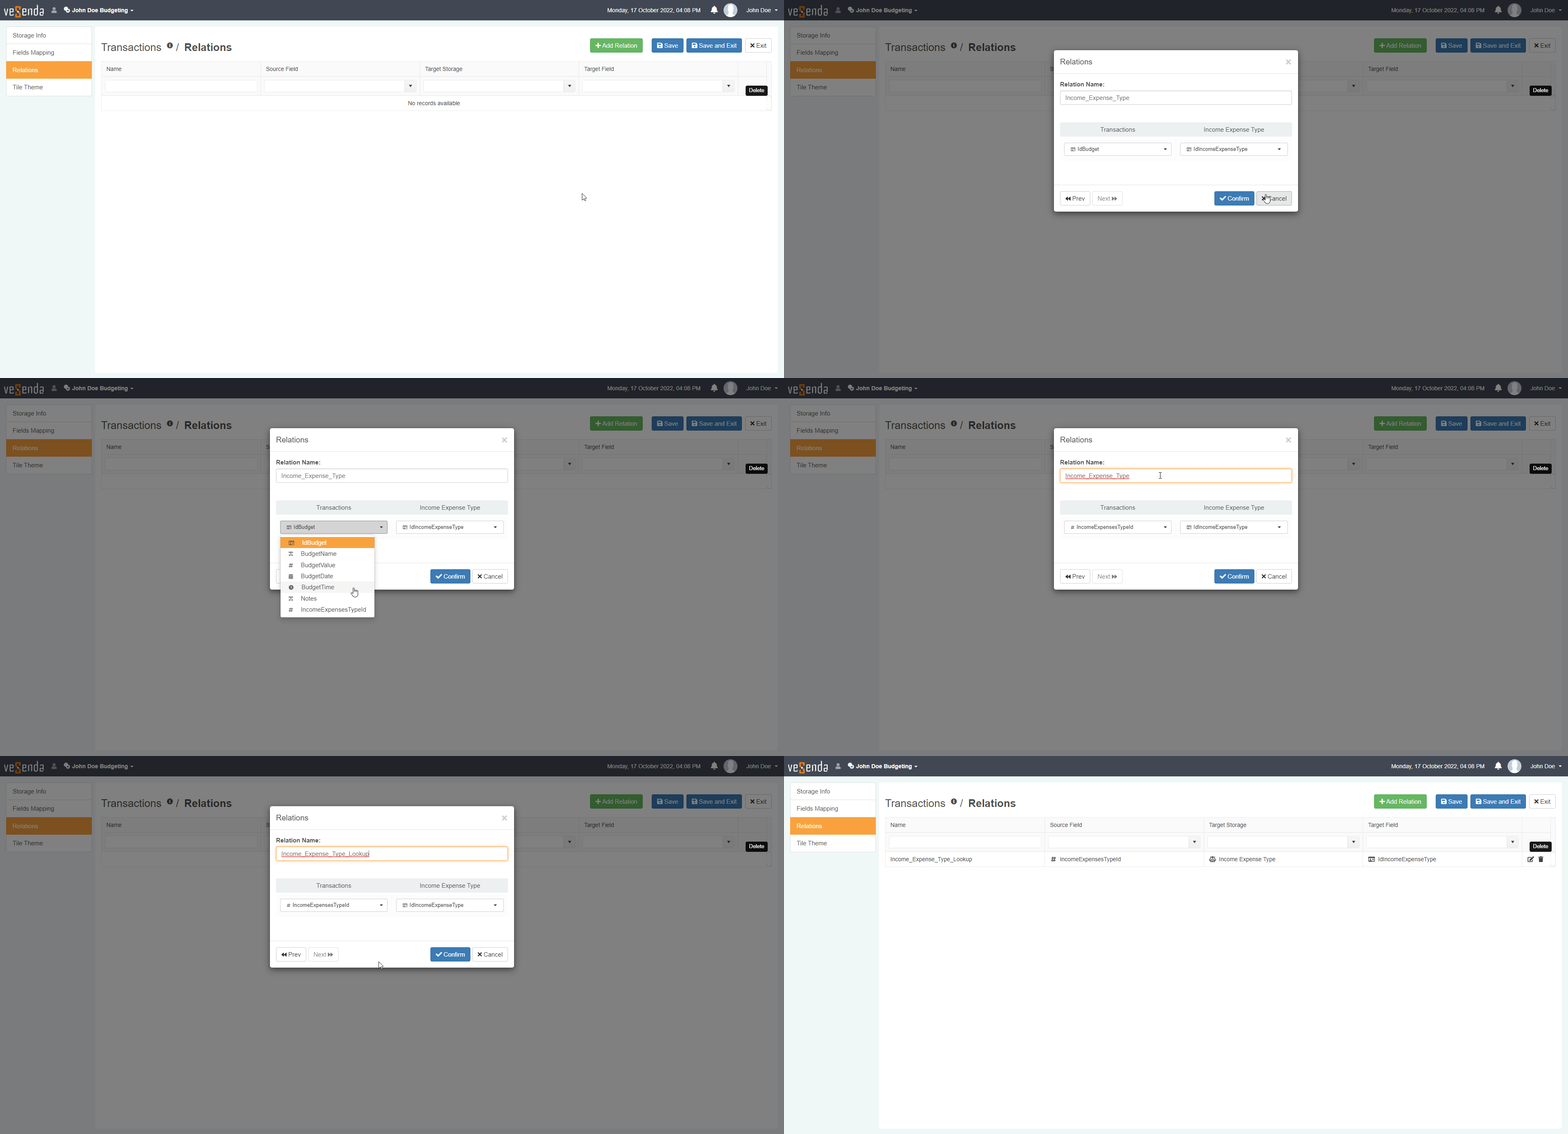
The tile of the relation will appear in the sub-panel Relations.

Enable the Lookup Relation on Personal Budget
You must now enable the Lookup Relation on Personal Budget.
-
Access Personal Budget's Design Mode and click on the Create the Lookup Relation button () corresponding to
IncomeExpensesTypeId.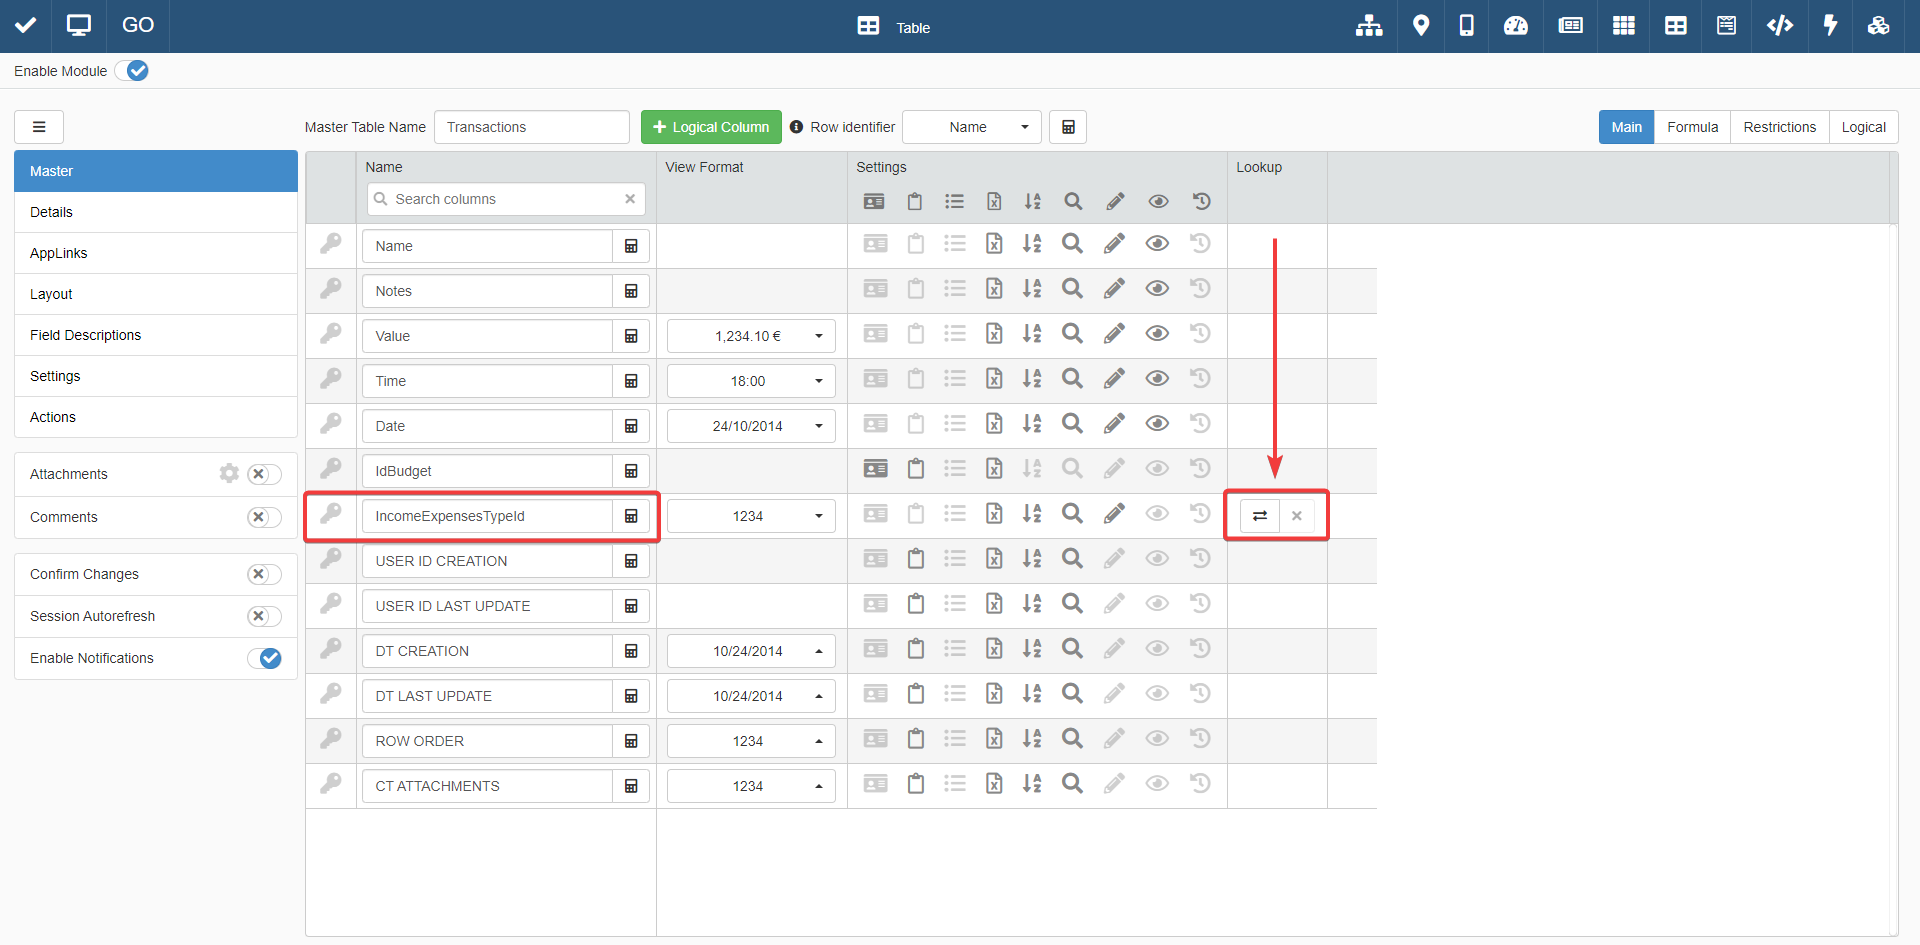
-
The Lookup Relation window will appear. (The window's settings with the
optionaltag are optional. They are not required for the Lookup to function.)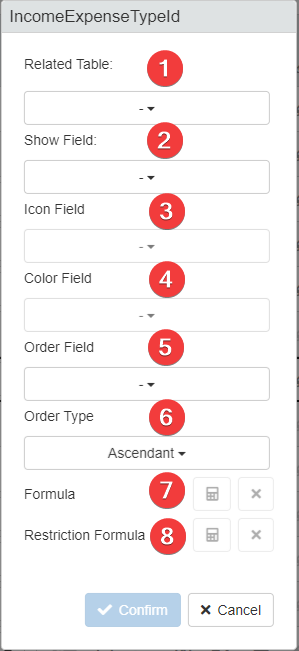
Property Description 1 Related Table The Relation to the table containing the options for the drop-down list. (The tables of Storages with a Relation established with the field will appear in this list.) 2 Show Field The field containing the names of the options for the drop-down list. 3 Icon Field optionalThe field containing the icons for the options.4 Color Field optionalThe field containing the colors assigned to each entry of the drop-down list.5 Order Field The field to use as reference to order the list of the options of the drop-down list. 6 Order Type Option to set Ascendant or Descendent order for the Order Field. 7 Formula optionalAdds a formula to set a behavior to the Lookup. (You will see its use in one of the following tutorials.)8 Restriction Formula optionalAdds a formula to display certain options of the list under certain conditions. (You will see its use in one of the following tutorials.)Choose the Lookup relation existing with Income Expense Type storage. Fill the rest of the settings with the Income Expense Type storage's fields.
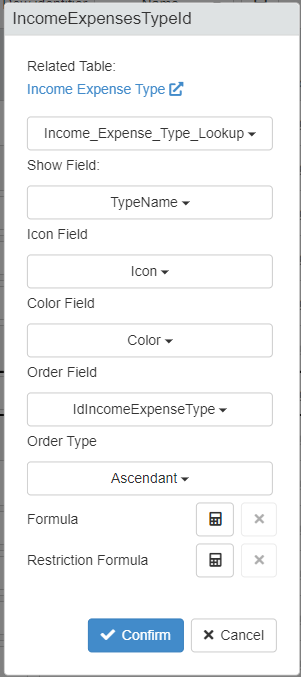
-
Click on the Confirm button to save the Lookup settings.
Configure the Column for the Lookup Relation
At this stage, you must configure the column of the Lookup in Personal Budget's Design Mode.
-
Makes the following changes in the Master sub-panel to the
IncomeExpensesTypeIdrow:- Change the Name from
IncomeExpensesTypeIdtoIncome/Expense. - Make the field Visible.

- Change the Name from
-
Go to Layout. Arrange
Income/Expensein the table as you prefer. -
Remove the Cell Bg Color formula you have setup in the previous tutorial Customizing the Application's Appearance. The formula is outdated since you have a Lookup and has no use anymore. The Lookup entry will highlight the same kind of information.

Click on the Cell Bg Color, then on the Clear Formula button. Close the Color Settings by clicking on the Confirm button.
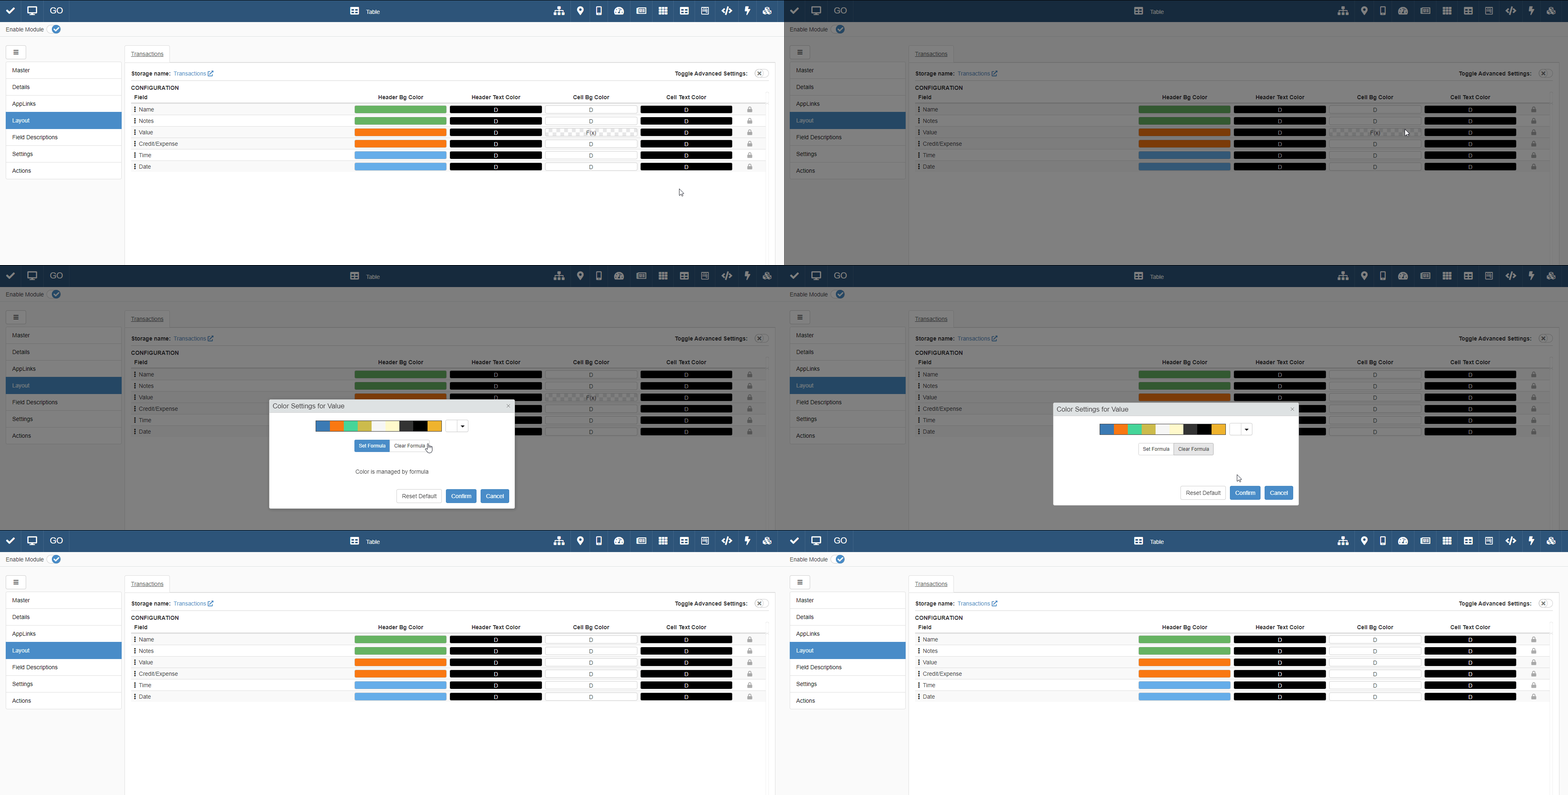
-
Remove from Field Descriptions the description of the Value column. You do not need to add the the minus symbol (
-) anymore for the expenses to the BudgetValue field. -
Save the changes in Personal Budget's Design Mode (Save ).
-
Remove the minus symbol (
-) from the Value column's cell (field BudgetValue). You do not need the symbol to classify an entry as an expense thanks to the Lookup.
You have finished to configure the Lookup Relation for Income/Expense.
Rules for Relations and Lookups
Before proceeding, you must understand the fundamentals behind Relations and Lookups. It is a lot of theory, but it is necessary to avoid issues and mistakes.
Warning
It is essential to understand the following key points. Spend as much time as needed to understand Relations and Lookups.
Key Points to Remember
- Relations are connections between the data of two Storages.
- Relations are independent from their representation in an eLegere Application. You can determine in an application different ways to represent the same Relation. (You will see another way in the next tutorial on Details)
- A Relation has two components:
- A source field that stores a reference pointing to an entry of the other storage
- A target field that constitutes the entry of the second storage that the source field references.
- You can create multiple relations having the same source field.
- Lookups are one way to represent a Relation as a drop-down list.
- When you represent a Relation as a Lookup, you have a Lookup Relation.
- Lookup Relations require a source field recording the pointer to the other Storage. Most of the time, a Numeric type field covers this role because Identity fields assign unique numbers as IDs.
In short, Relations are ways to connect entries on a Storage to entries of other Storages.
Why do you need Identity fields as target field?
When the source field in the Relation points to an entry in the other Storage, the source field stores one value of the target field.
To be sure that the reference field points to exactly that specific entry among many, you must choose as target field a field with unique and unambiguous data. Identity fields are perfect for this: each Identity field assigns a unique number to a Storage's entry automatically. You are sure that the target field value will be unambiguous. Using Identity avoids to have two identical entries since only one entry can have that ID value.
Attention
In theory, you could use as target field a field different from an Identity field. But using a field different from an Identity is not recommended (unless you know what you are doing).
Why? Consider the following cases.
Bad Case 1
| Source Field | Target Field |
|---|---|
| Numeric type | Numeric type |
Suppose that you establish a Relation like the Case 1. Also, imagine that there are multiple entries with the same value for the target field. You have two non-unique fields and the reference is ambiguous.
Income Expense Type
| ID | Name |
|---|---|
| 1 | Expense |
| 1 | Income |
Transactions
| Name | Value | Income/Expense |
|---|---|---|
| Car Fuel | 40 | 1 (income or expense?) |
| Shared Account | 5 | 1 (income or expense?) |
If multiple entries of target field have the same value, how the source field knows what value to record as reference? The Lookup breaks because it is not clear what entry and value the source field must point to and record.
Bad Case 2
Grounding a Relation between Fields with values that might change is not recommended.
| Source Field | Target Field |
|---|---|
| String type | String type |
Suppose that you establish a Relation between two String type fields. In this case, if one of the fields changes value, you lose the reference of either the source field or the target field.
Before ID value change
Income Expense Type
| ID | Name |
|---|---|
| out | Expense |
| in | Income |
Transactions
| Name | Value | Income/Expense |
|---|---|---|
| Car Fuel | 40 | out (expense) |
| Shared Account | 5 | in (income) |
After ID value change
Income Expense Type
| ID | Name |
|---|---|
| outcome | Expense |
| income | Income |
Transaction
| Name | Value | Income/Expense |
|---|---|---|
| Car Fuel | 40 | out (no reference) |
| Shared Account | 5 | in (no reference) |
It is not a good practice because any change causes a loss of the reference.
Bad Case 3
Another case to avoid is between two Identity fields (or generally two unique fields.)
| Source Field | Target field |
|---|---|
| Identity type | Identity type |
Bad Case 3 causes the opposite problem of Bad Case 1: there could be only one entry with that value. This happens because Identity fields generate unique numbers as IDs. When you have two unique fields, you cannot assign the same value to multiple entries.
Income Expense Type
| ID | Name |
|---|---|
| 1 | Expense |
| 2 | Income |
Transaction
| Name | Value | Income/Expense |
|---|---|---|
| Car Fuel | 40 | 1 |
| Lunch | 15 | 1 (not allowed: there is another row with value 1for the unique column Income/Expense) |
If Bad Case 3 occurs, you can assign that value of the Lookup only to one entry. eLegere will consider an error to assign the same Lookup value to another entry.
Good Case
| Source Field | Target field |
|---|---|
| Numeric type | Identity type |
Good Case is an example of a Relation built in a good way. You have a non-unique field that points to and references a unique field.
The Identity as target field will have only unique numbers as values to identify an entry.
Numeric type fields works perfectly as source fields because the values of the target field Identity are numbers.
The relation between a Numeric and an Identity field is always unique. So, a case like Bad Case 1 never happens. The Lookup will list all the options without issues because each entry is referenced without ambiguity.
Also, changes to the entry won't affect the reference: the source field points to a unique value that indexes that particular entry in the Storage. Any change won't affect the ID of the entry and the reference remains intact.
Table Income Expense Type
| ID | Name |
|---|---|
| 1 | Expense |
| 2 | Income |
Table Transaction
| Name | Value | Income/Expense |
|---|---|---|
| Shared Account | 5 | 1 (expense) |
| Car Fuel | 40 | 1 (expense) |
| Cash back | 20 | 2 (income) |
| Gym Subscription | 80 | 1 (expense) |
Table Transactions with Lookup
| Name | Value | Income/Expense |
|---|---|---|
| Shared Account | 5 | Expense |
| Car Fuel | 40 | Expense |
| Cash back | 20 | Income |
| Gym Subscription | 80 | Expense |
The Rules
A list of rules to avoid the issues described in the above section exist. Follow them whenever you can:
- Always build Relations between a Numeric type field as Source field and an Identity type field as Target field (unless there is a very good reason).
- In the Storage, always use the following convention to identify if the Relation is established for a Lookup or other kinds of representations:
Storage_Name_TypeOfRelation. For example, label a Relation that will become a Lookup Relation asProduct_List_Lookup. - Always establish a Relation between a unique and a non-unique field. Never establish a Relation between two unique fields or two non-unique fields.
Create a Lookup for a Payment Methods Column
Suppose that you need to specify the payment method besides the amount of money and the type of entry. To do so, you have to create a new Blank Storage and must establish a Lookup Relation to introduce a drop-down list with the payment methods' list.
Hint
Before proceeding, be sure to have understood what are Relations, Lookups, and how they work. Take your time and revise Rules for Relations and Lookups in case.
Note
You will do the same operations made for the Income/Expense Lookup, but for the payment methods.
You must create a Lookup Relation between the Storages Transactions and Payment Methods and configure the relation in Personal Budget.

A Lookup for Payment Methods in Personal Budget requires:
- A Storage
Payment Methodsto record the data of the payment methods. - An application of the same name (Payment Methods) to insert the payment methods in the Storage.
- A Relation between
TransactionsandPayment Methods. - The Lookup configured in
Personal Budgetwith the Payment Method options.
Create the Payment Methods Storage
You need at this stage to build a Storage containing the Payment Method options.
-
In the Storages sub-panel in Home, create a Storage called Payment Methods. (See Building Your First App: Personal Budget to know how to build Storages.)
-
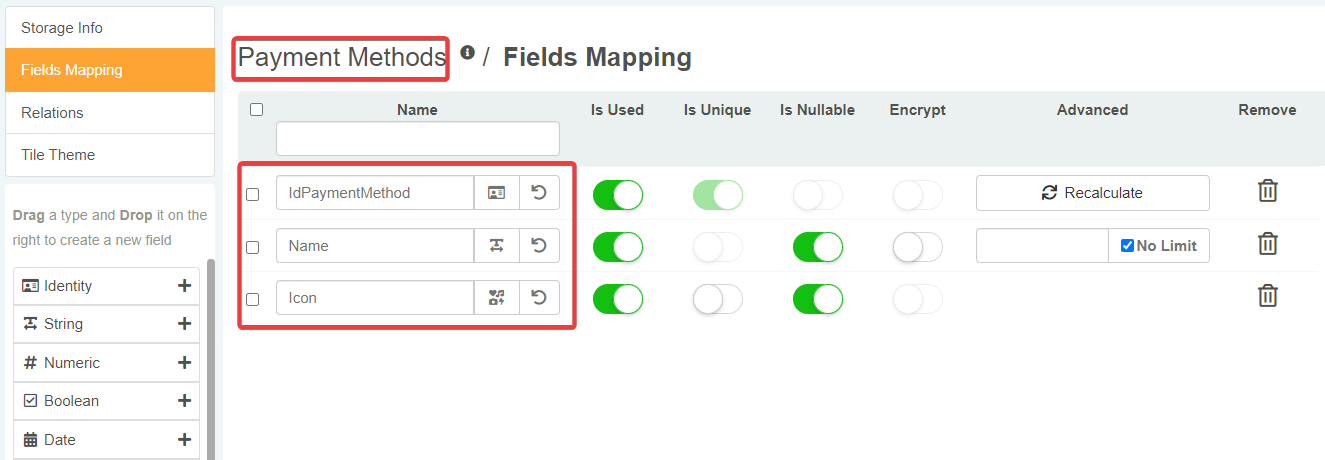
Set up the following Fields in Payment Methods:
IdPaymentMethodIdentity The Identity field for the entries of Payment Methods.NameString The name of the payment method.IconIcon The Icon field type for the icon associated to the payment method's entry.
-
If you like, customize the Payment Methods Storage's tile and save all the changes.
Create the Payment Methods Application
-
Go back to the Home, Applications sub-panel, and create an application Payment Methods based on the Storage
Payment Methods.
-
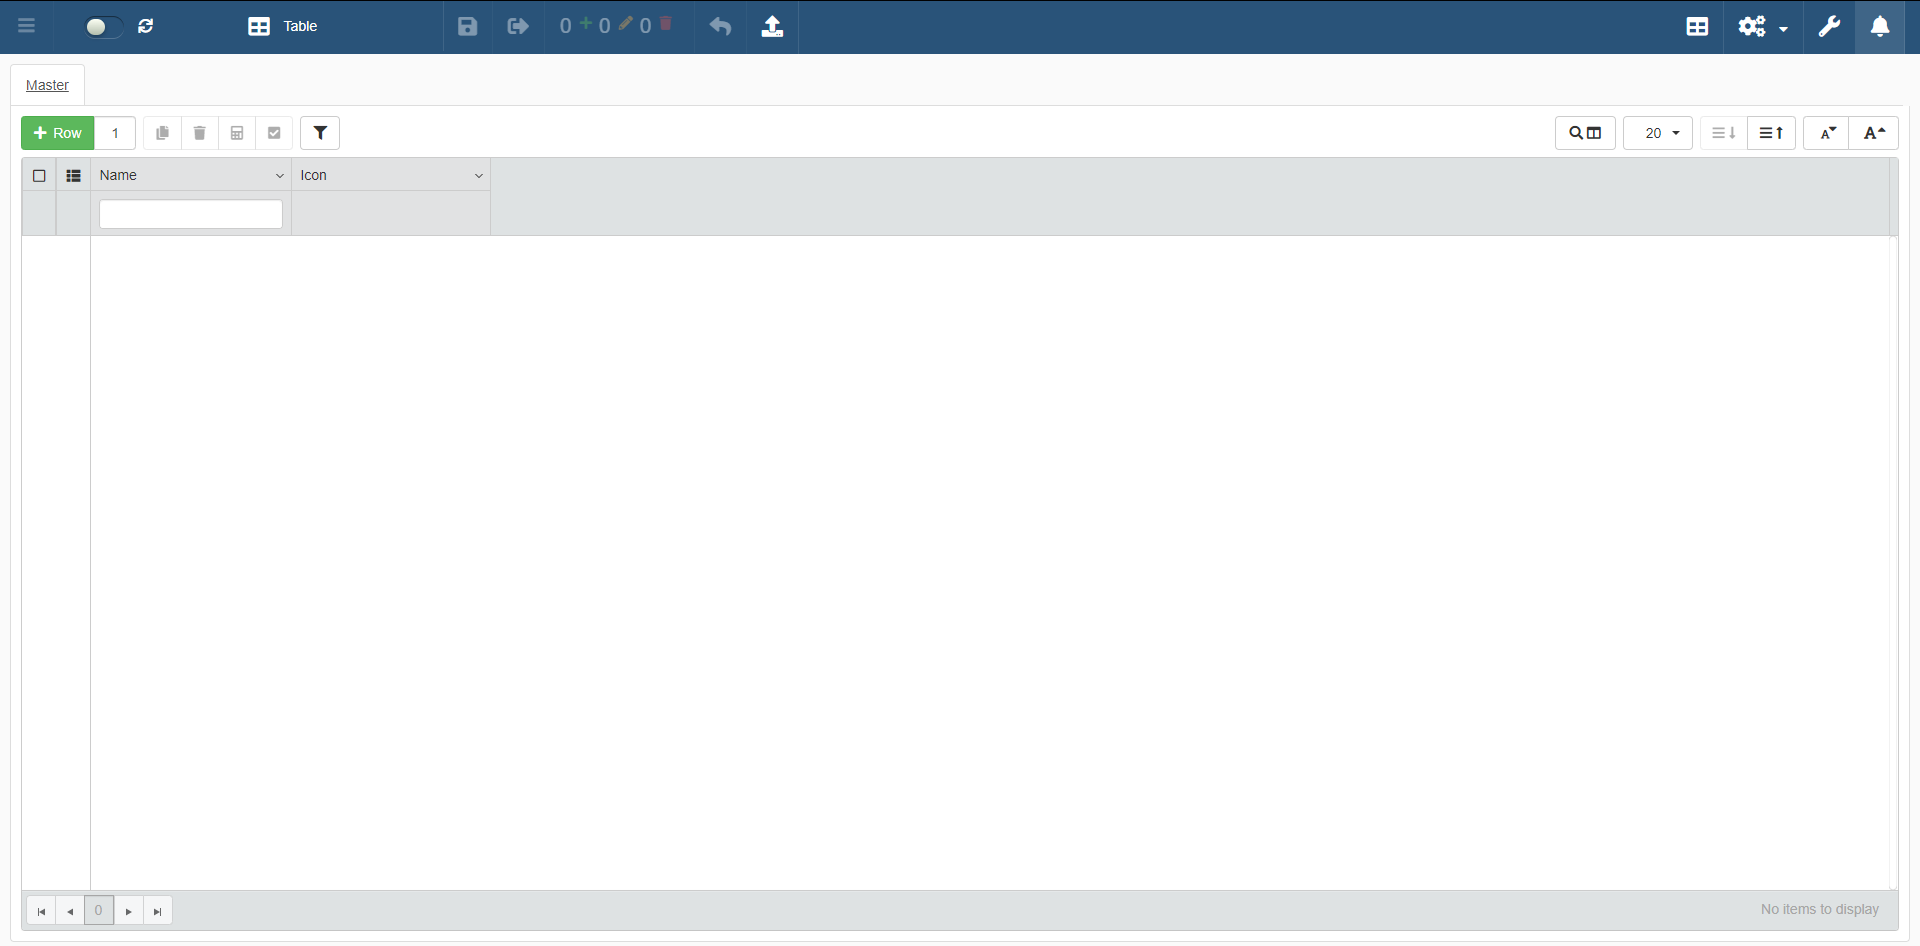
You do not need to customize the application. Payment Methods is ready to record the payment methods.
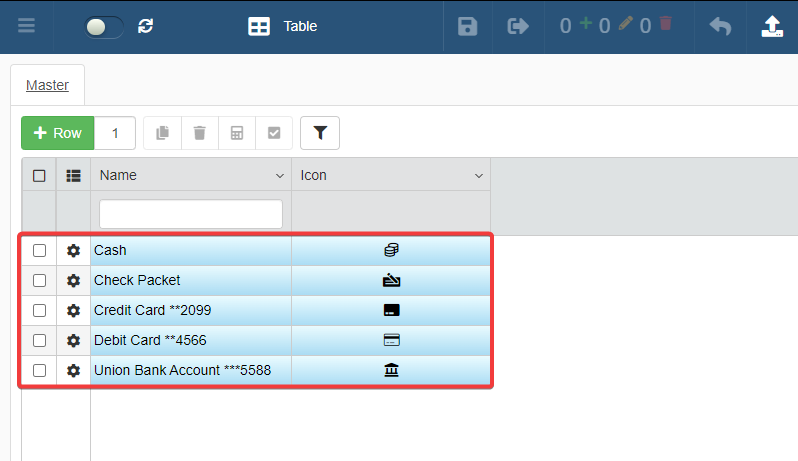
Add the payment methods that you could use in Personal Budget.
Create the Relation from Transactions to Payment Methods
You must now establish a relation between the two Storages. Afterwards, you will configure the relation as a Lookup Relation in the application.
-
Add to the Storage Transactions a new Numeric type field called
PaymentMethodId.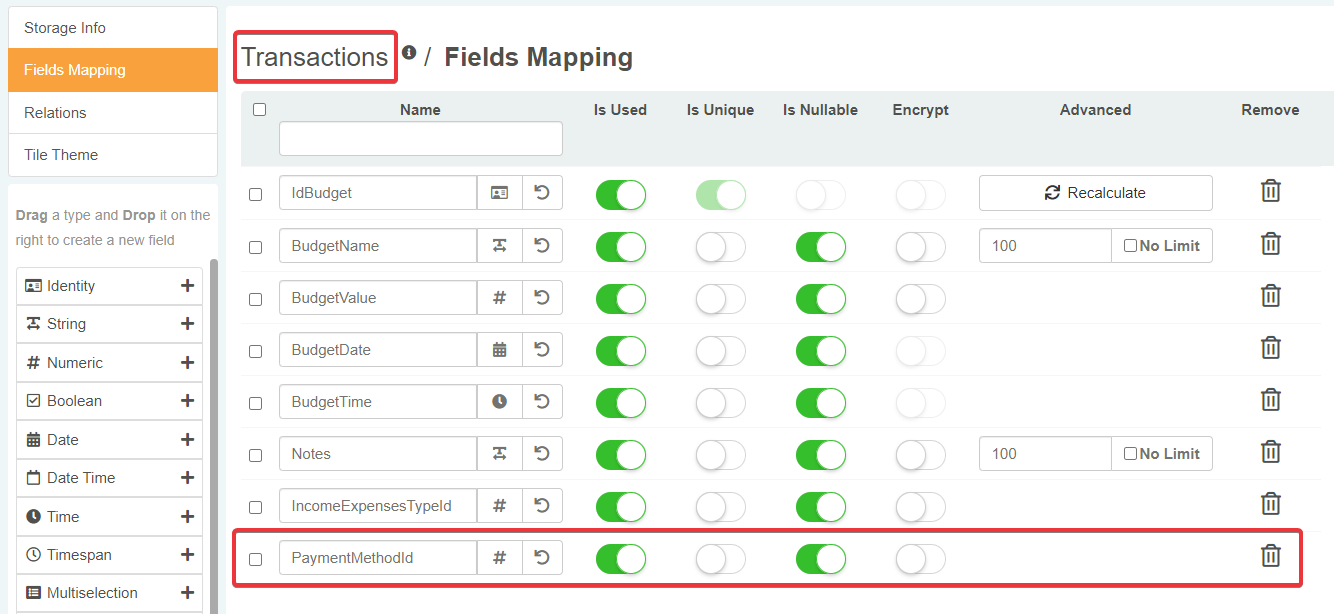
-
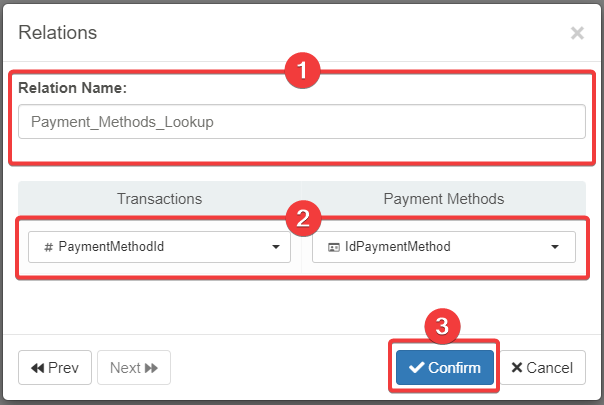
Establish a Relation between
PaymentMethodIdandIdPaymentMethodof the Payment Methods Storage. Call the relationPayment_Methods_Lookup.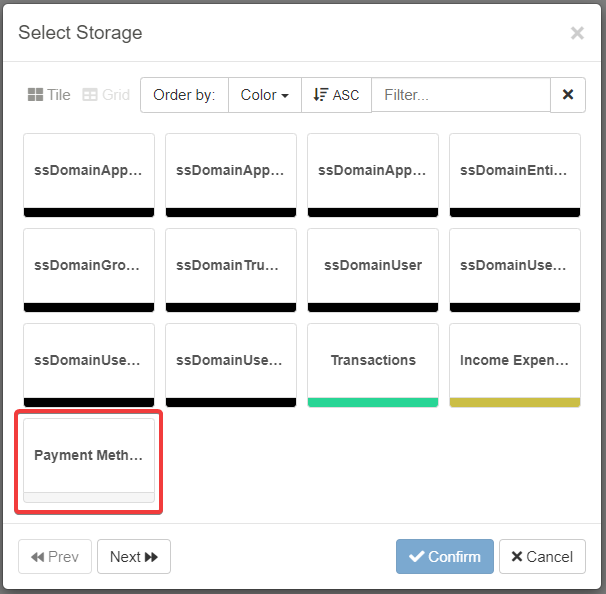
-
Save all the changes to the Transactions Storage and the new Relation.

Configure the Payment Methods Lookup
-
Enter the Design Mode of Personal Budget Application.
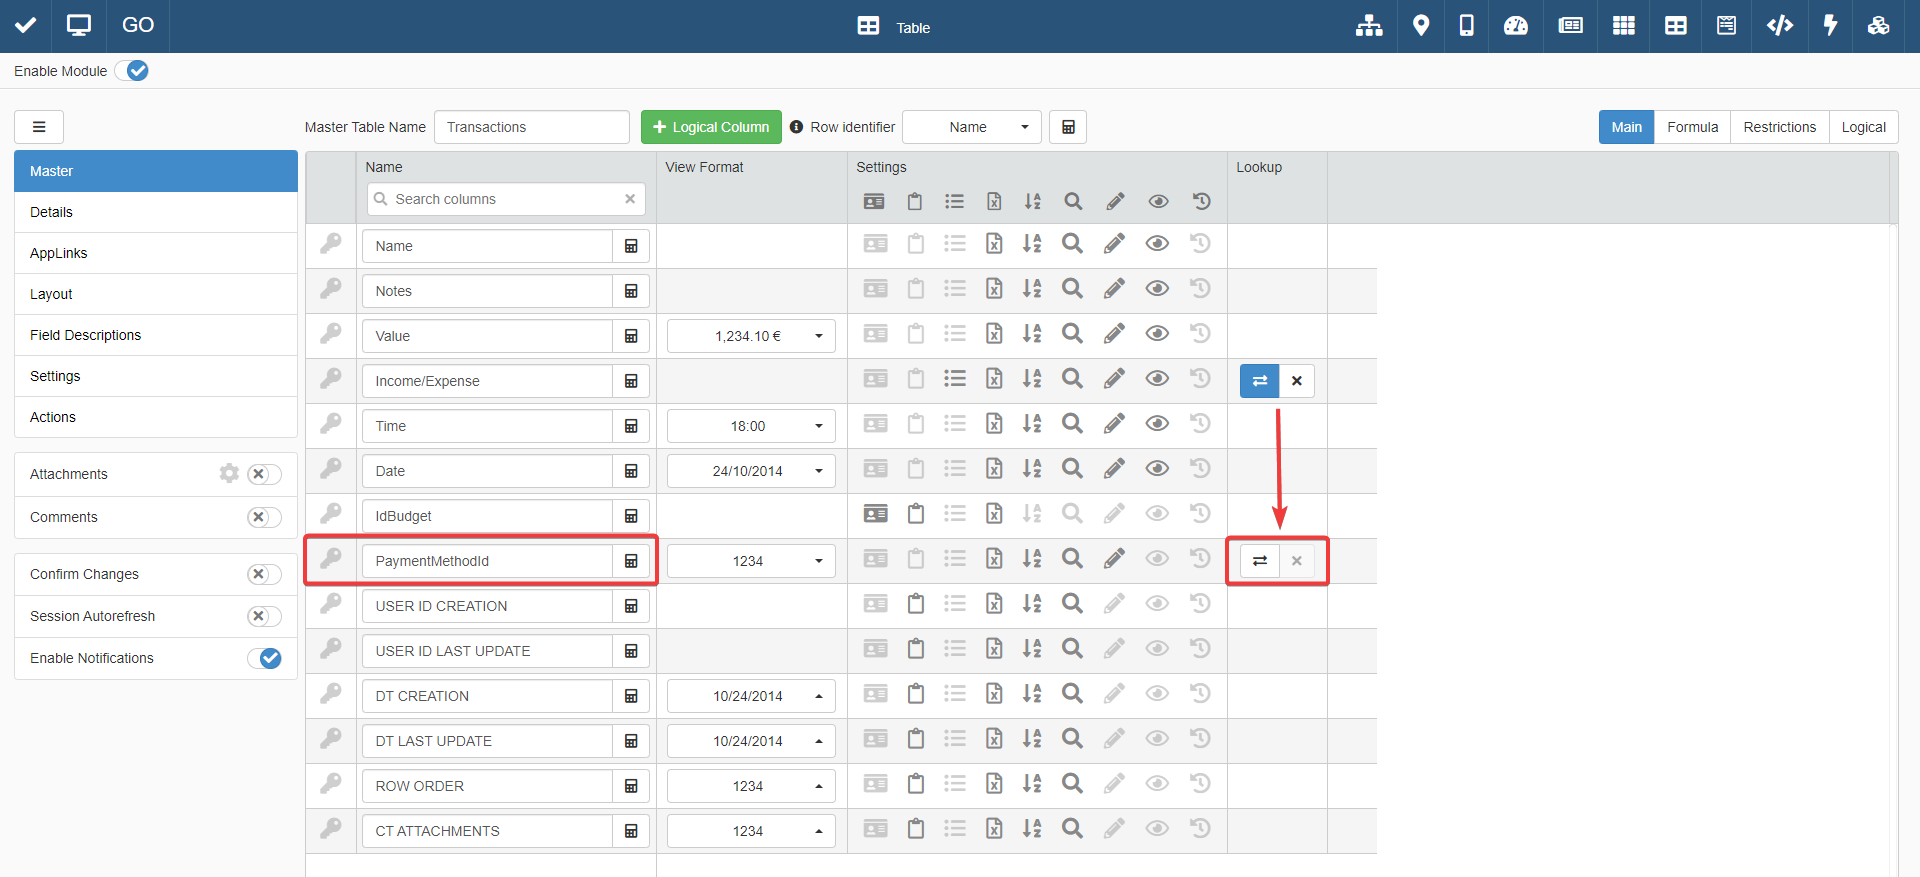
Configure the Lookup Relation of
PaymentMethodIdas follows: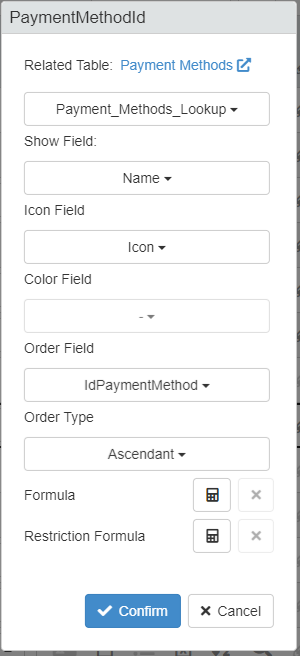
-
Make the field
PaymentMethodIdvisible and rename its header's label as Payment Method.
-
Arrange the Payment Method column's position and customize the appearance in the Layout sub-panel.

-
Save all the changes in Personal Budget's Design Mode (Save ).
You will be able to register the Payment Method for the entries of Personal Budget.

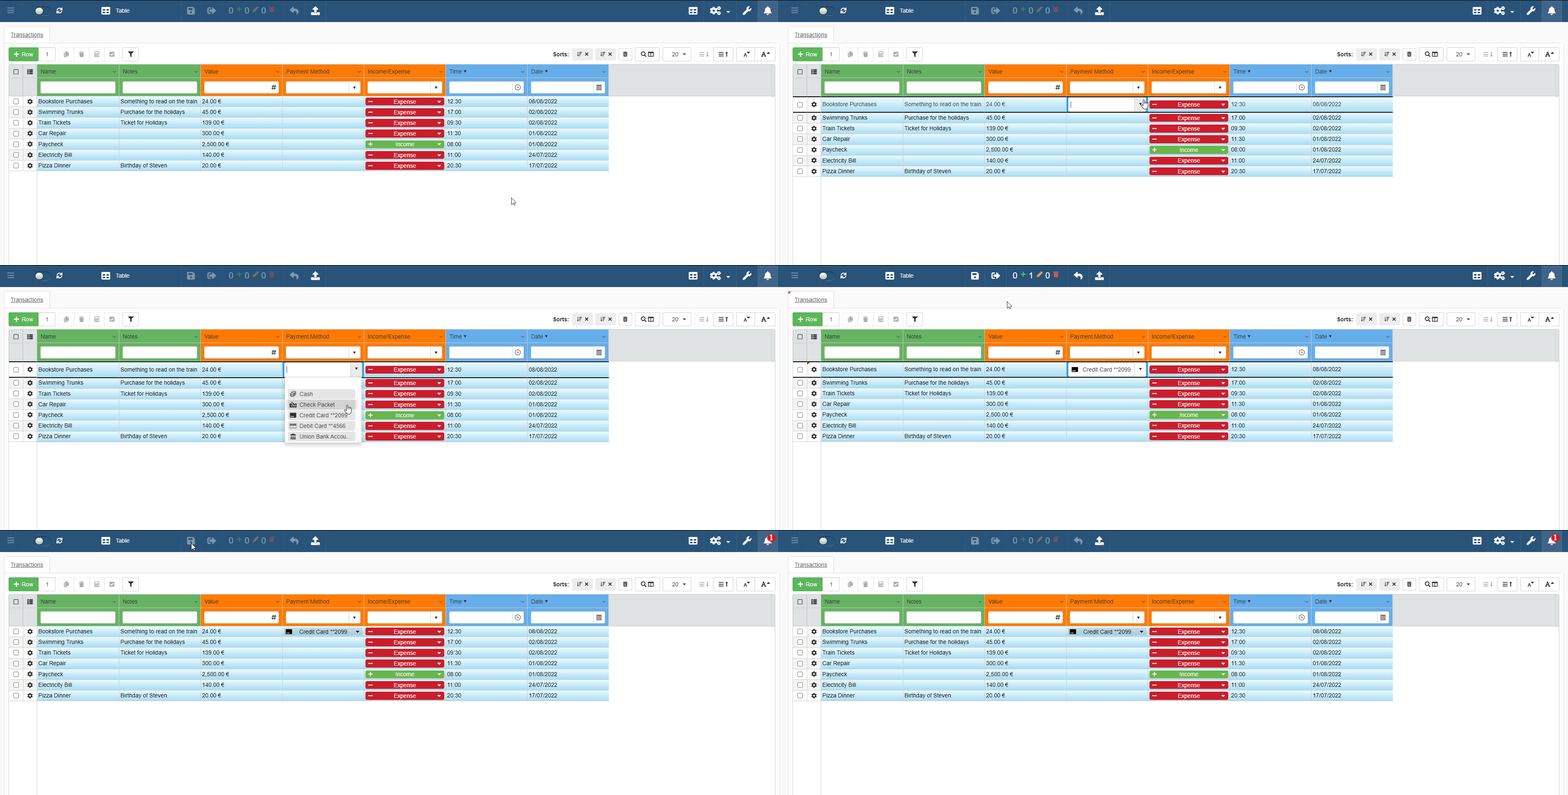
Extending Payment Methods: Add the Type to a Payment Method through a Lookup
At this point, introduce in Payment Methods a column that specifies the type of the payment method. For example: bank account, credit card, debit card, and so on.
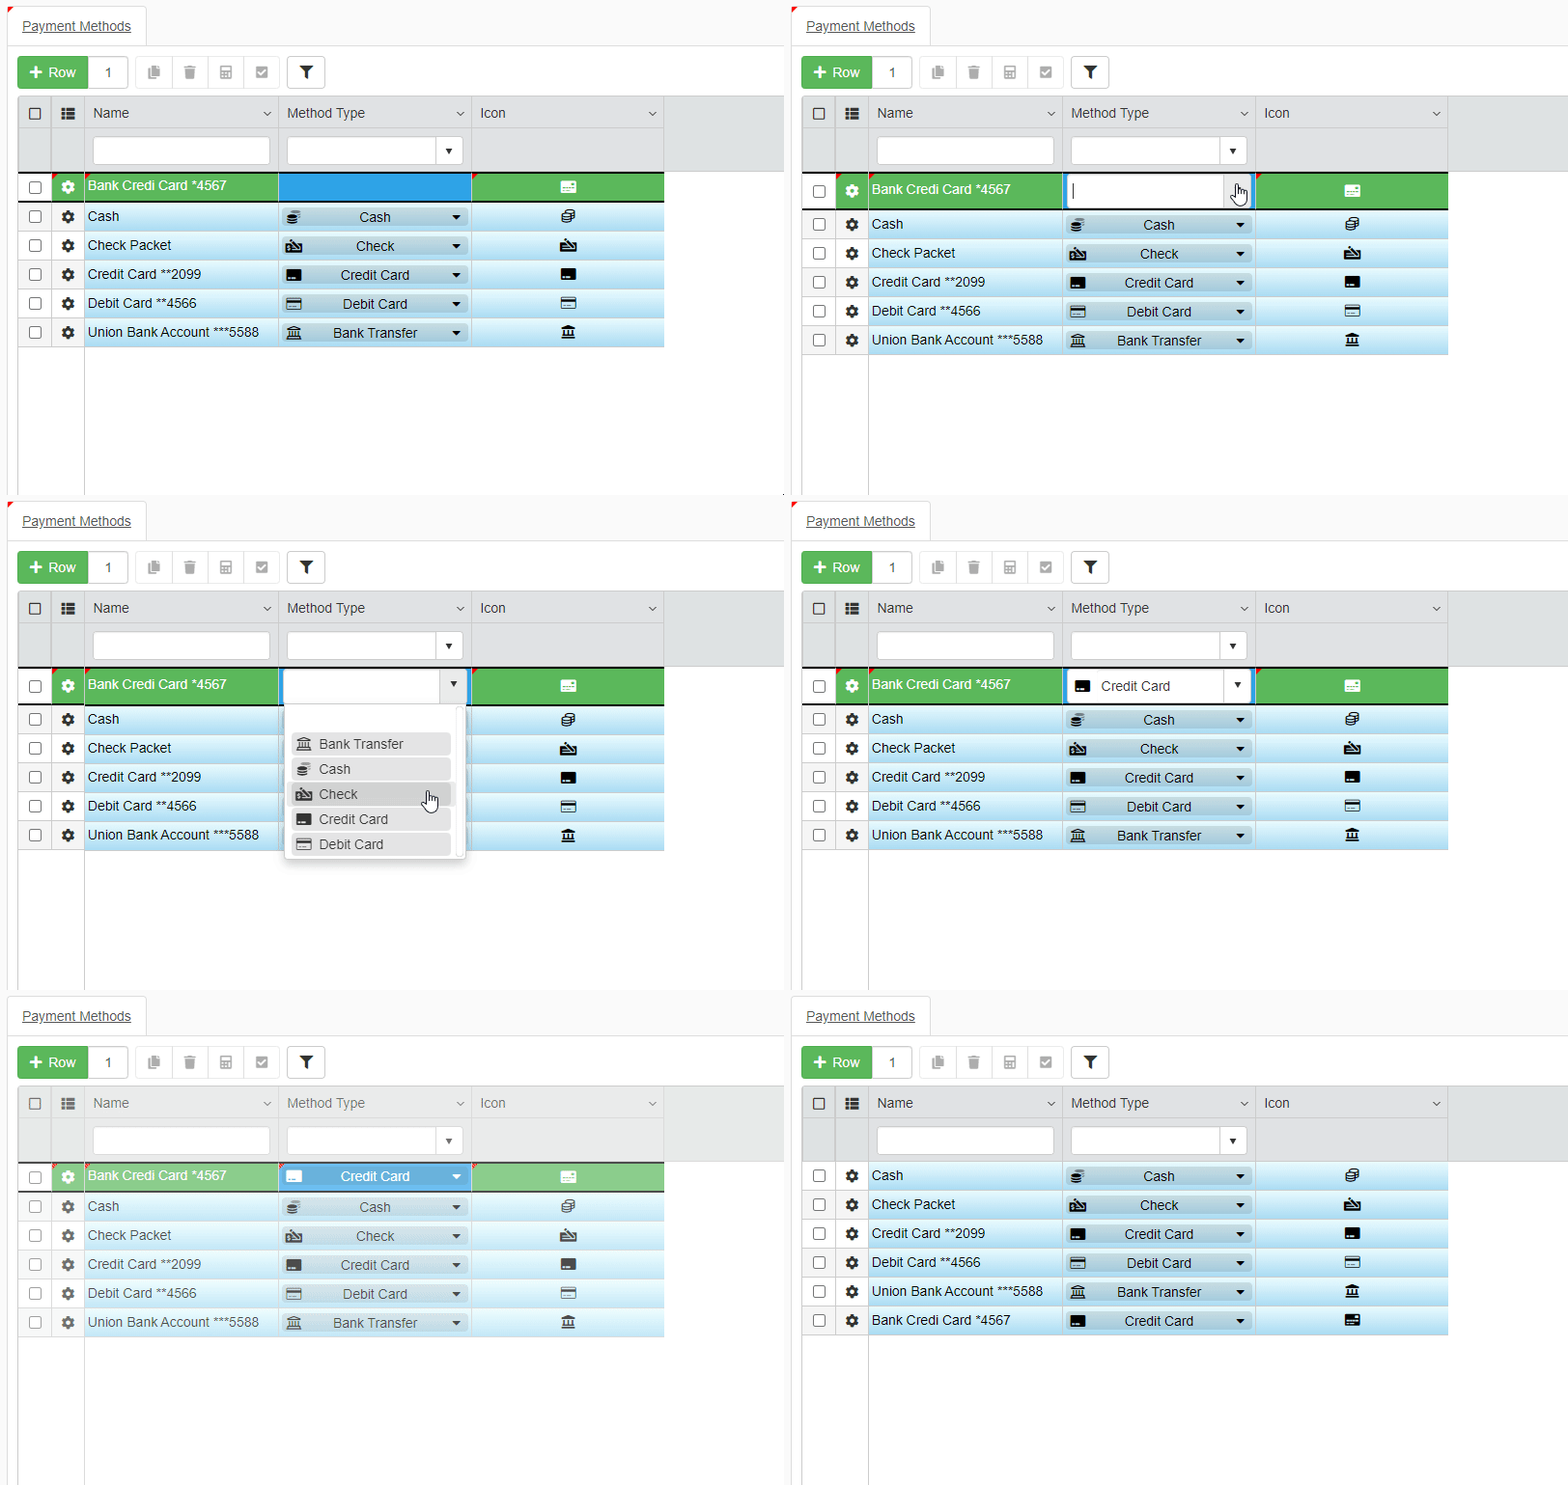
-
Create a new Blank Storage called
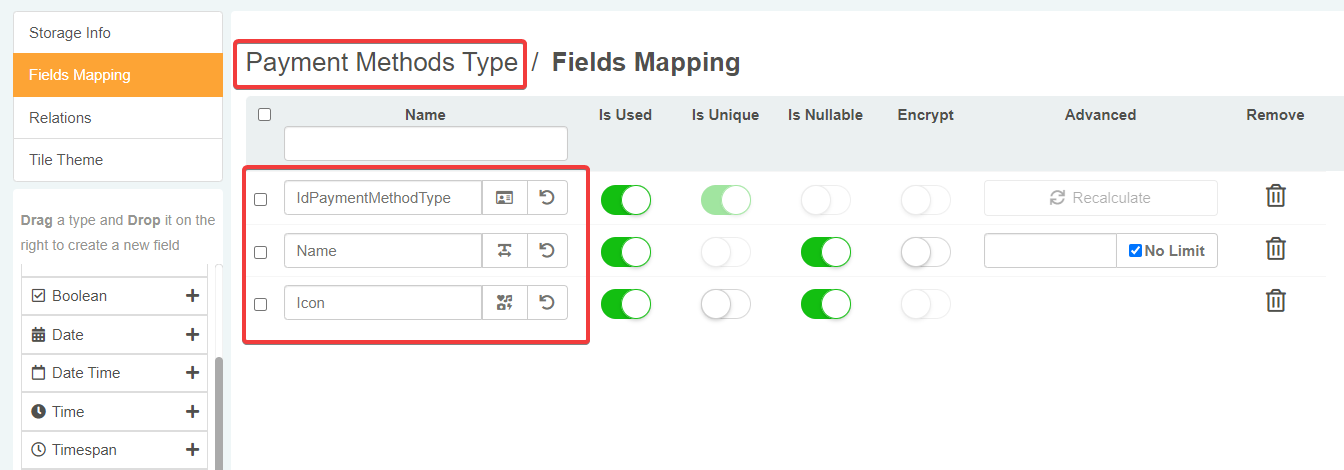
Payment Methods Typeand add the following fields.IdPaymentMethodTypeIdentity The Identity field for the entries of Payment Methods Type.NameString The name of the category of payment method. (e.g. bank transfer, cash, credit card, debit card)IconIcon The Icon field type for the icon associated to the payment method category.
-
If you like, customize the Payment Methods Type Storage's tile and save all the changes. The situation will be like the picture below.
-
Go back to the Storage editor of Payment Methods.
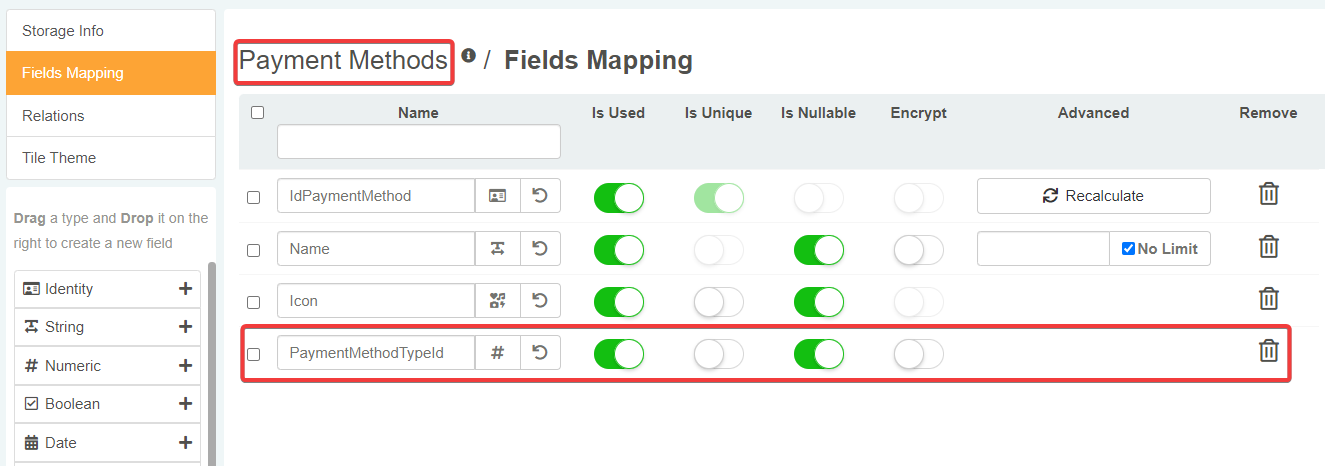
- Add a Numeric type field
PaymentMethodTypeId. - Create the relation
Payment_Methods_Type_Lookupbetween the fieldPaymentMethodTypeIdandIdPaymentMethodTypefrom Payment Methods Type.

- Add a Numeric type field
-
Save all the changes on the Payment Methods Storage.
-
Create an application called Payment Methods Type based on the Storage Payment Methods Type.
-
Add the following Payment Methods Type in the application and choose an icon:
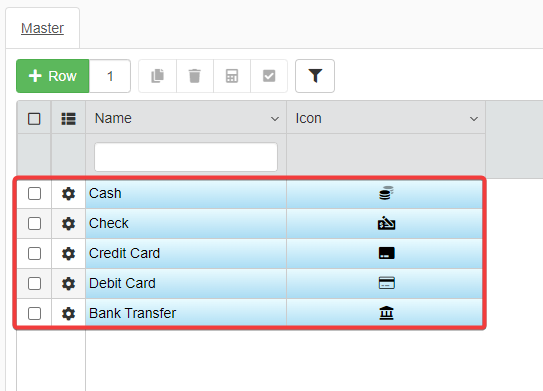
- Cash
- Check
- Credit Card
- Debit Card
- Bank Transfer
-
Save all the entries in the Payment Methods Type application.
-
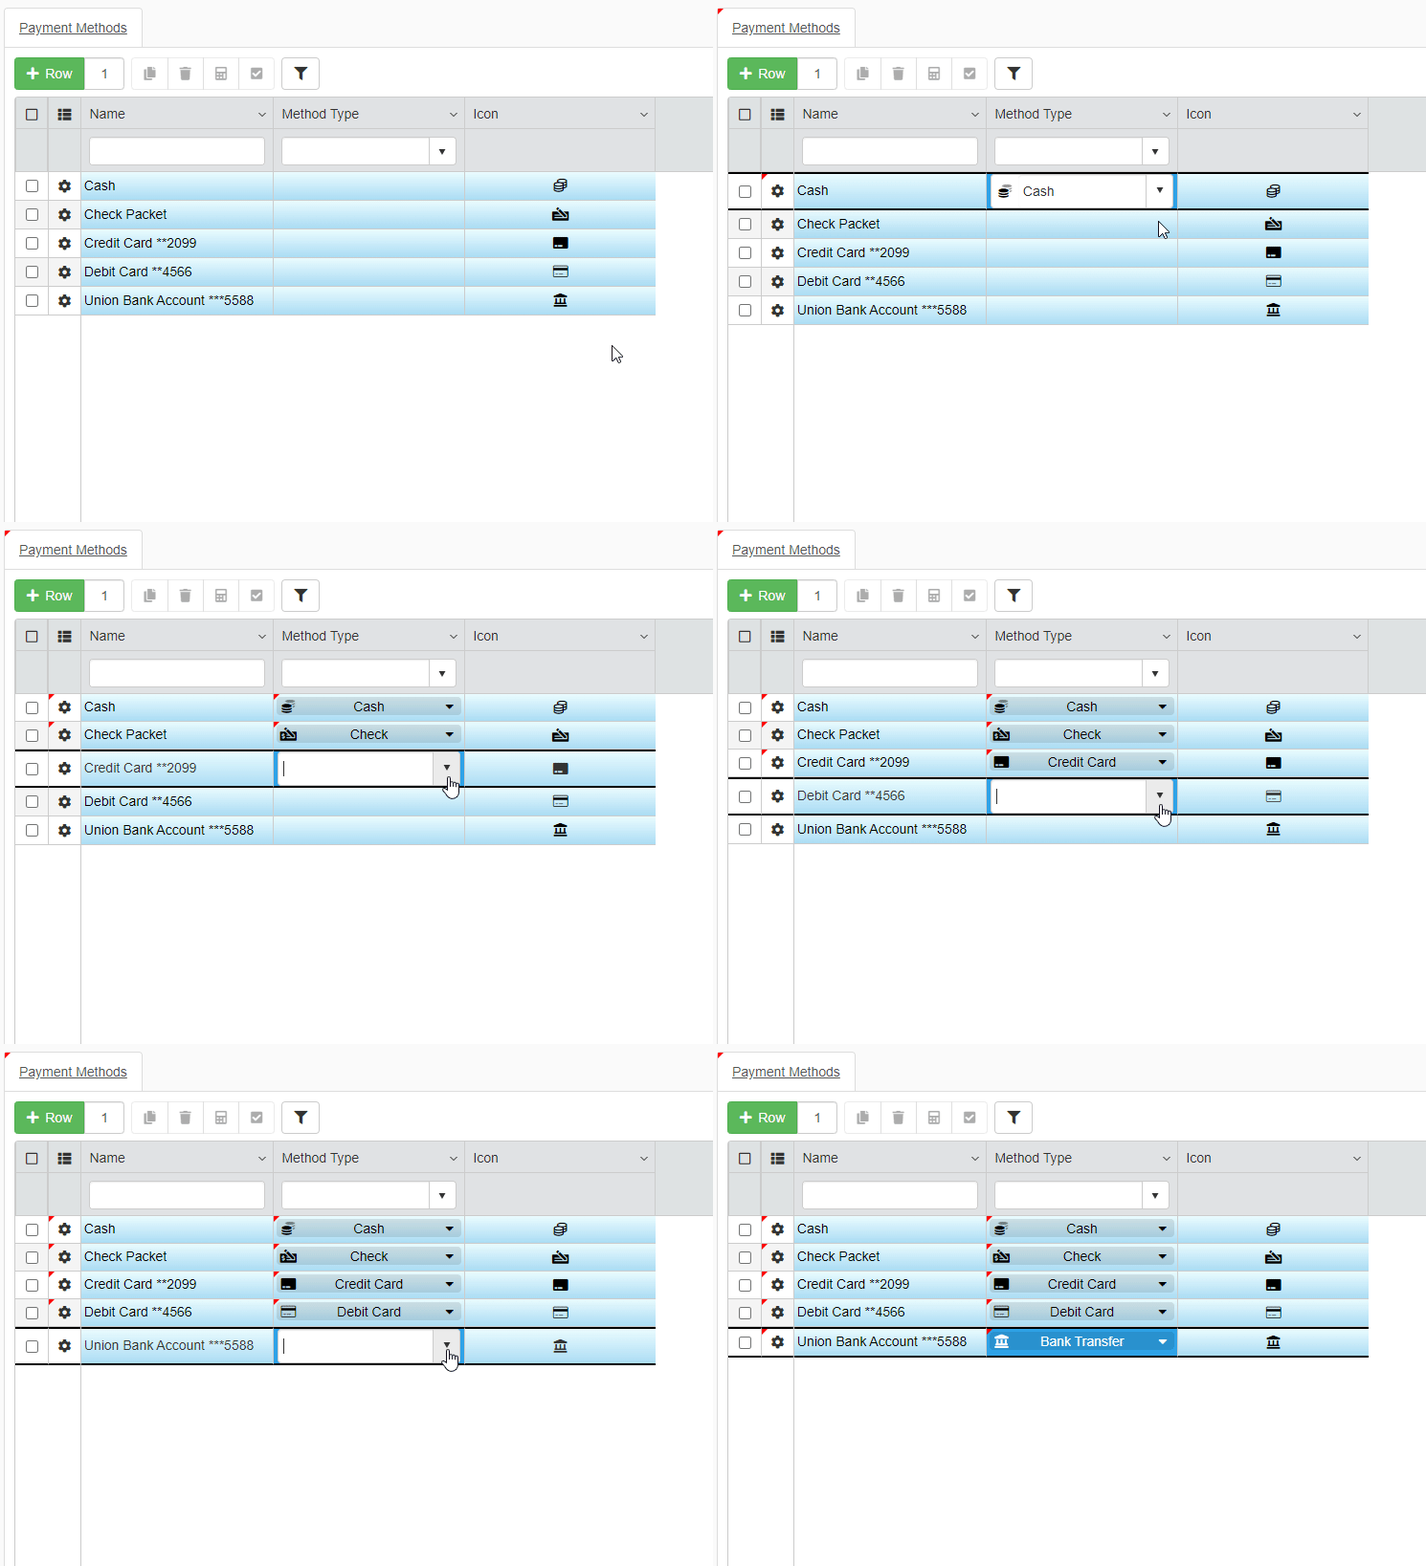
In Payment Methods' Design Mode, configure as follows the Lookup Relation corresponding to
PaymentMethodTypeId.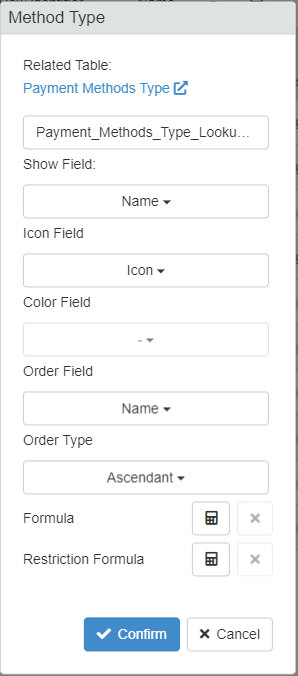
The result will be like the picture below.
-
Change the header's name of the field
PaymentMethodTypeIdinMethod Type, make the column visible, and customize the column in Layout if you like. -
Save all the changes in Payment Methods' Design Mode (Save ) and enter the application.
Now, the Lookup between Payment Methods and Payment Methods Type will work. You have obtained a more functional application to manage your payment methods by using Lookups.
Exercise: Create a Lookup with a Products and Services Category List for Personal Budget
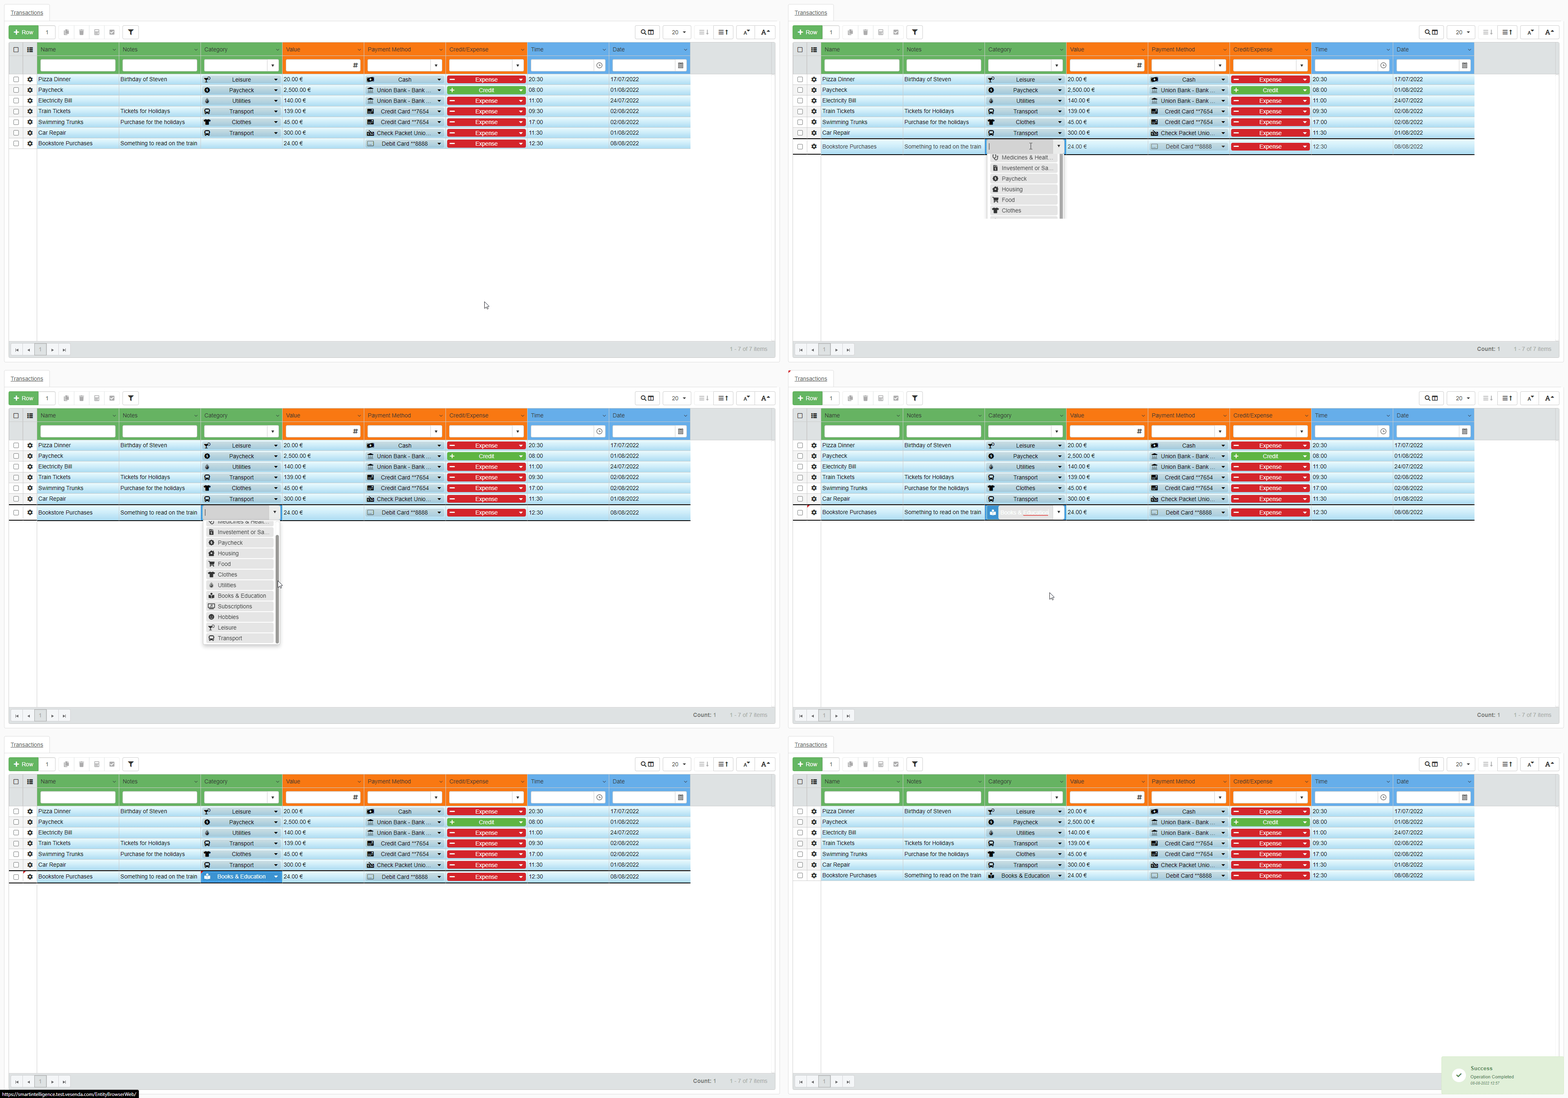
Try by yourself to add a Lookup for the different sorts of products and services paid or received. (Here you find the solution.)
At the end of this tutorial, the map of the Lookups should correspond to the picture below.
Further Study: Default Value for Lookups
Note
This step is optional.
The majority of the entries in Personal Budget will be expenses. It would be useful to set up "Expense" as default value for the Lookup Income/Expense.
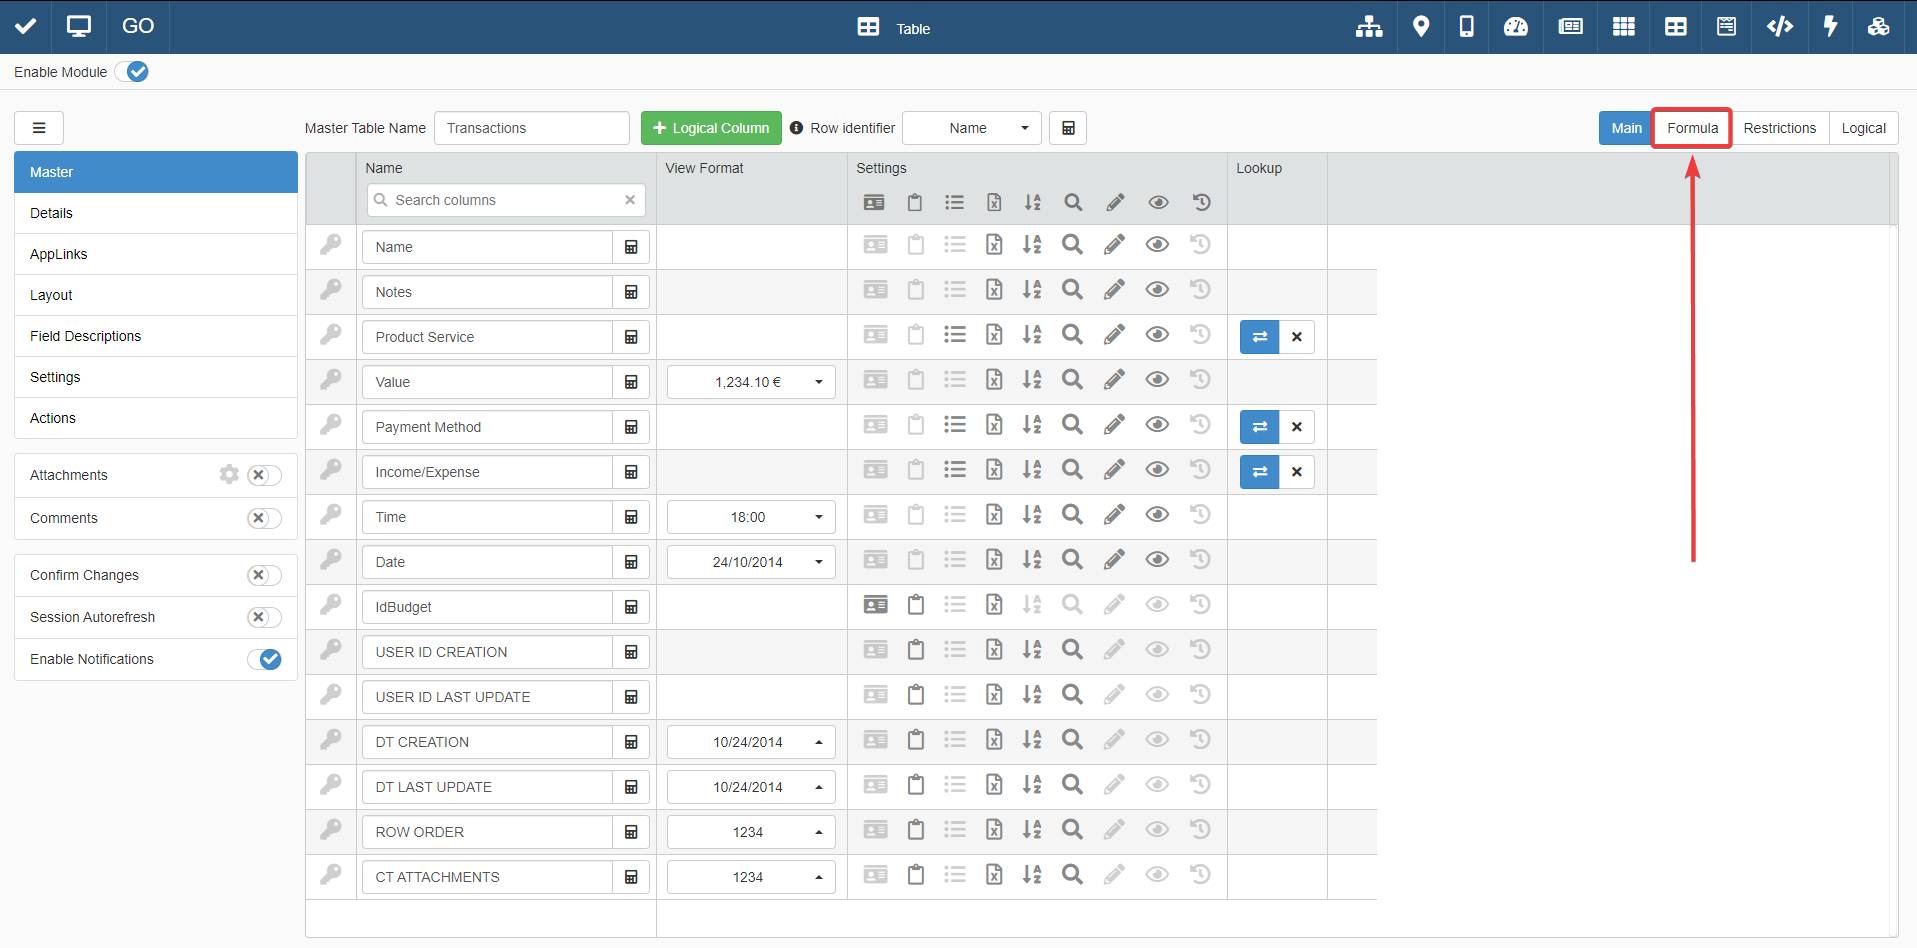
You can use the Default Value column in the Formula sub-panel of Design Mode.
- Access the Design Mode of the Personal Budget application.
-
Click on Formula sub-panel button on the upper-right corner of the Master sub-panel.
-
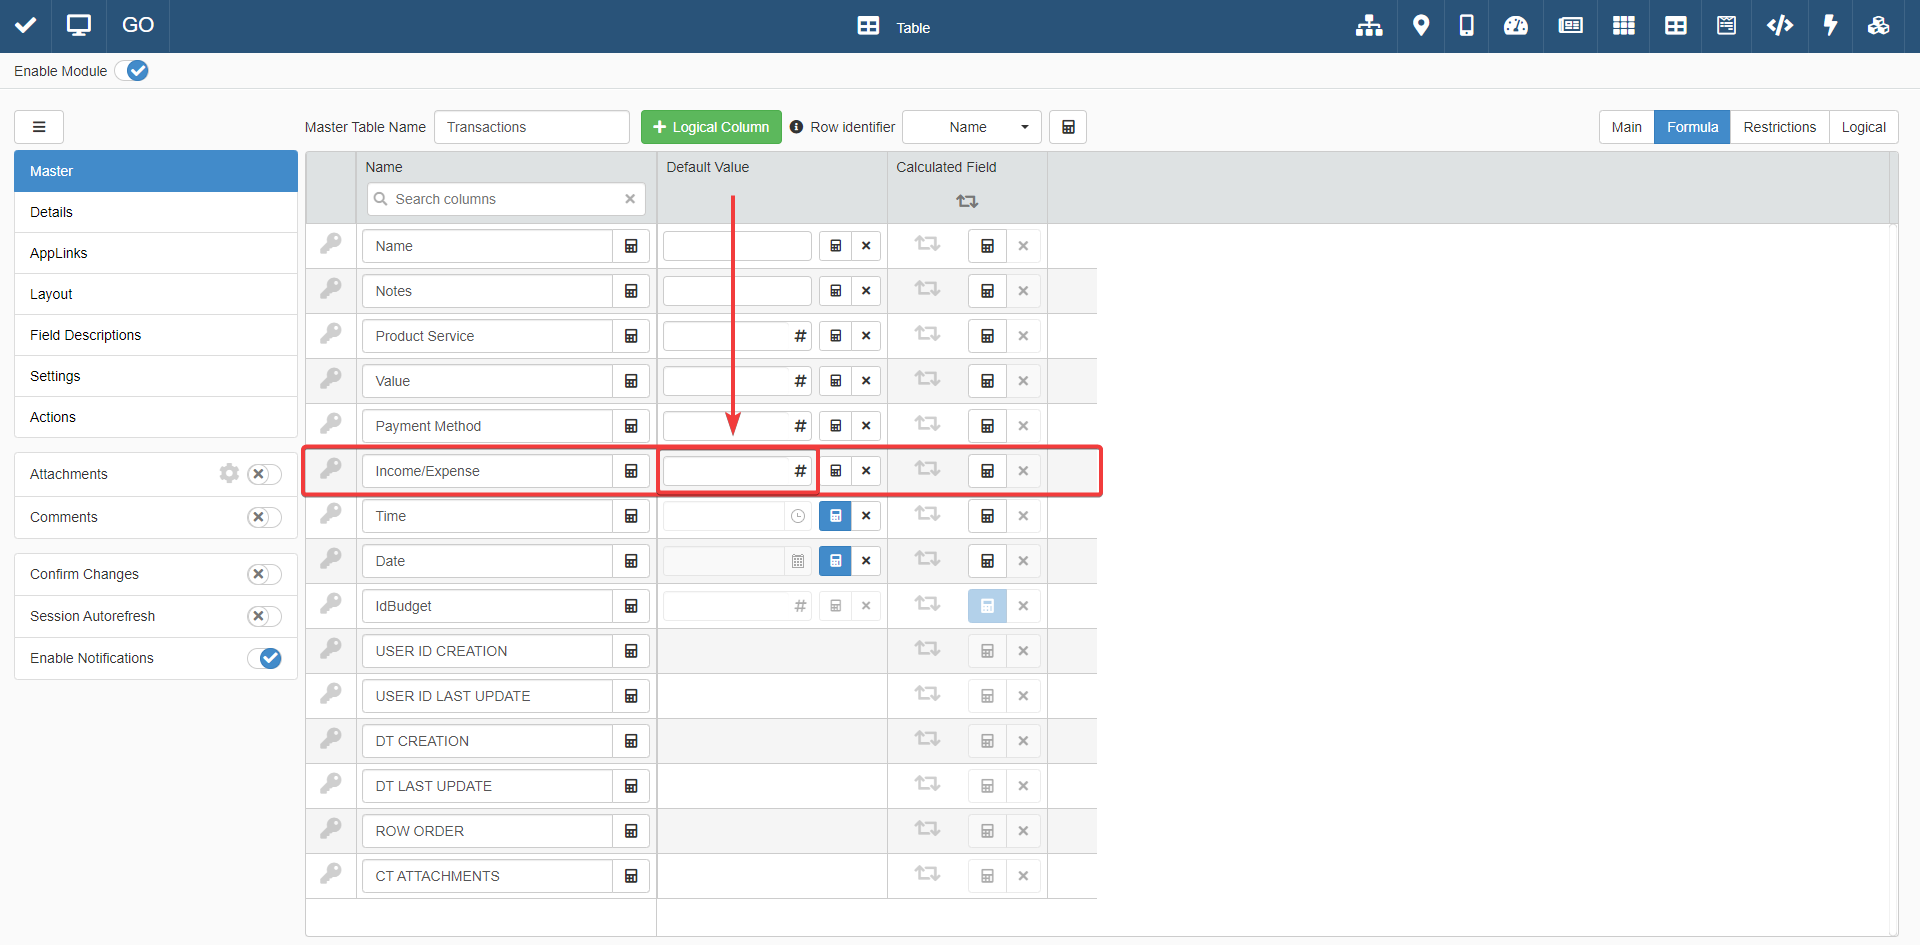
Click on the textbox under the Default Value column corresponding to Income/Expense.
-
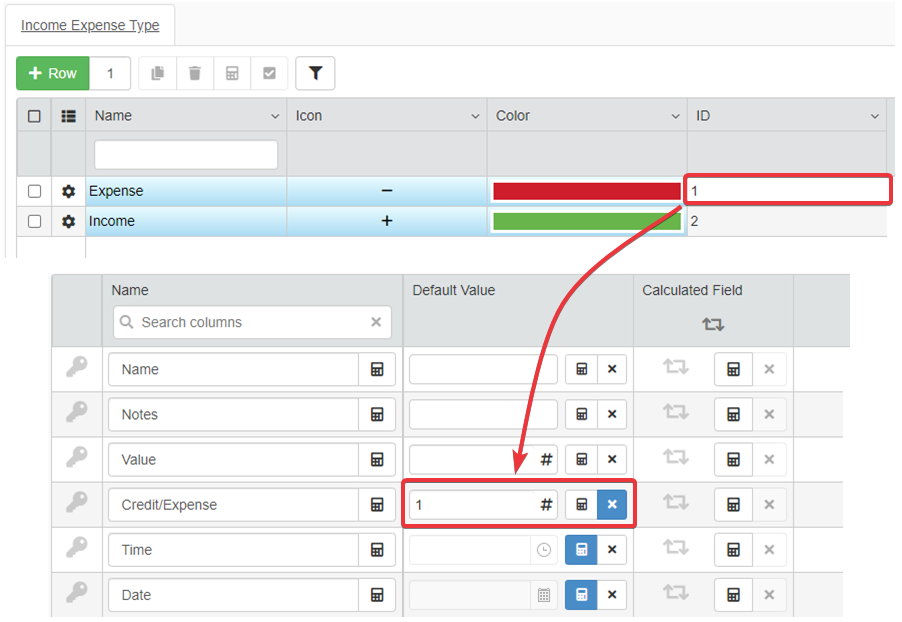
Insert the value 1 in the textbox. The ID of the entry corresponding to the "Expense" option in
Income Expense TypeStorage is 1.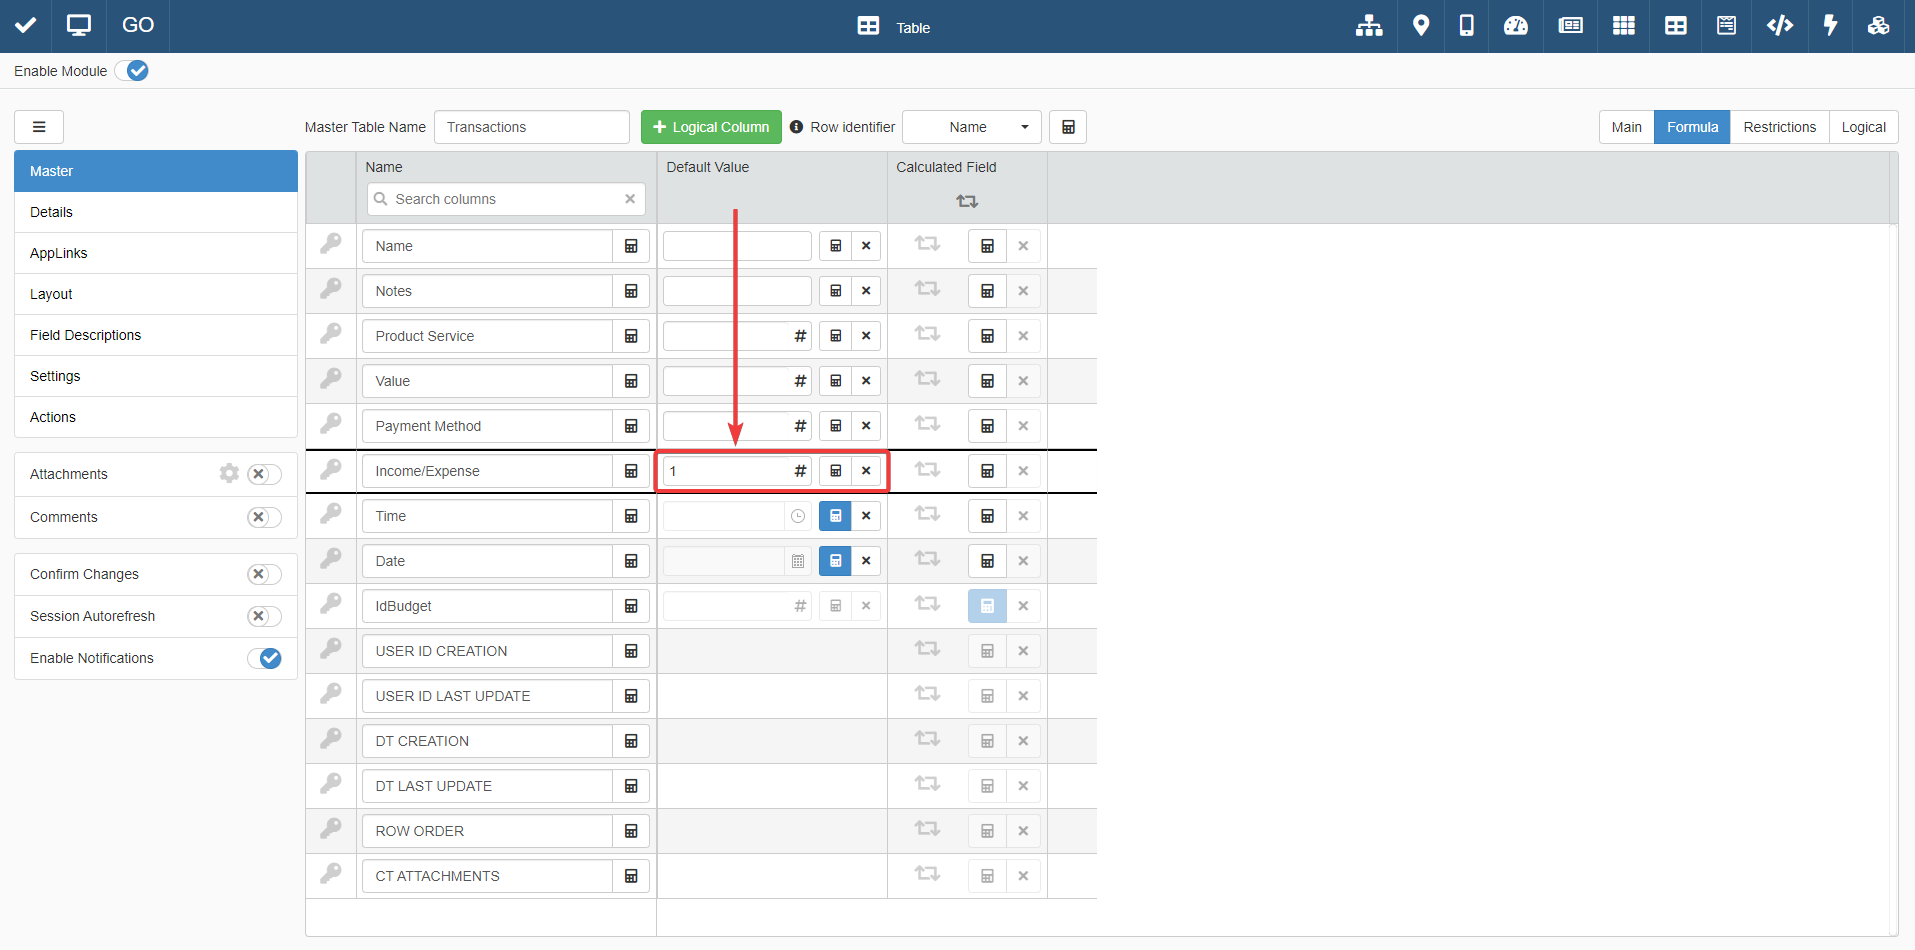
-
Save all the changes in Design Mode (Save ).
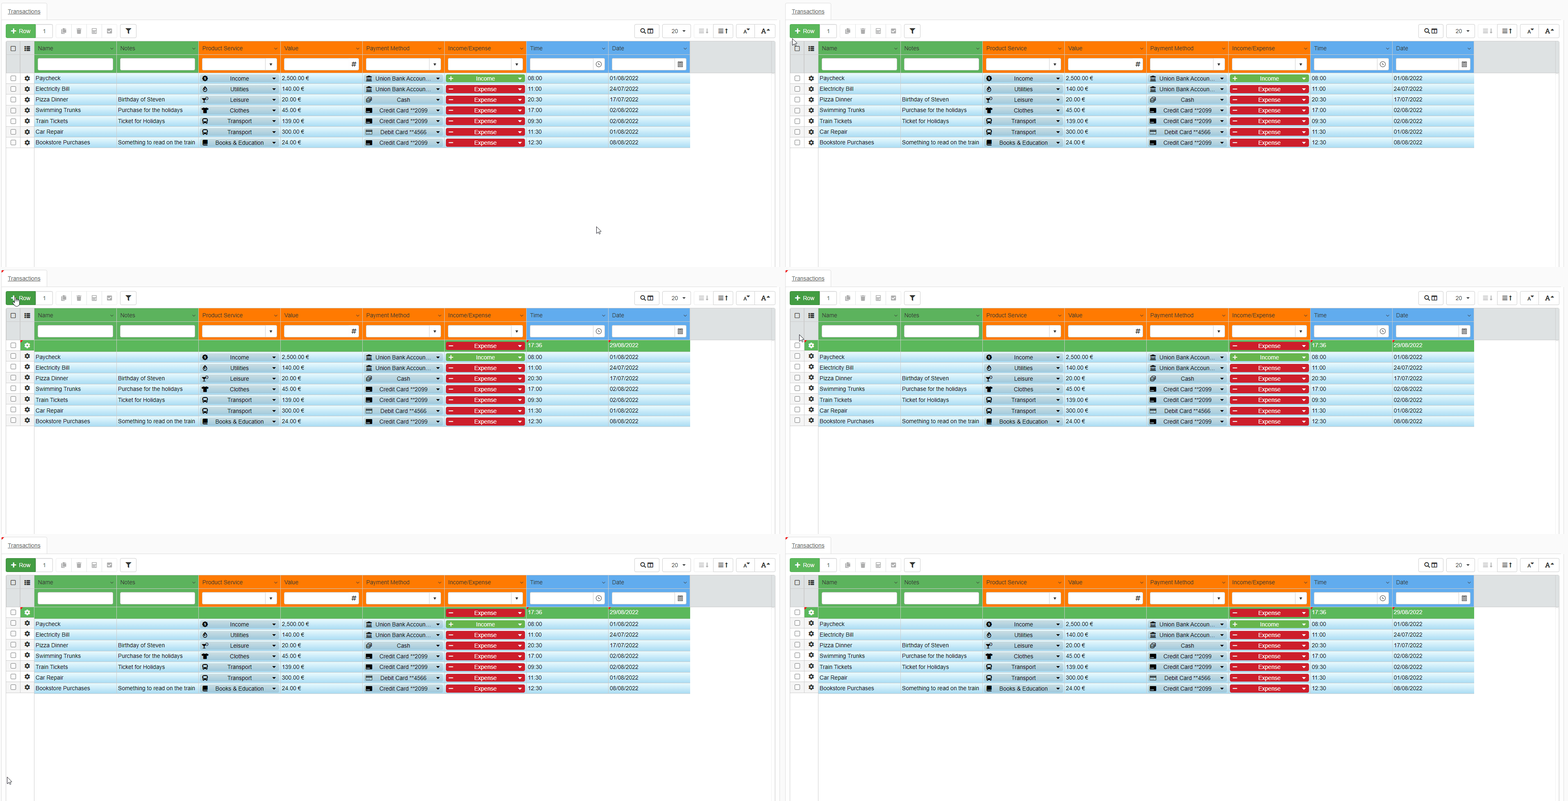
By default, the Personal Budget application will fill the Income/Expense Lookup with the "Expense" option automatically since the option has the ID 1 in Income Expense Type Storage.
Congratulations, you have learnt about Lookups and how they work.
Success
The next step is the section Details: showing secondary data related to the row. You will learn what Details are, how do you create them, and how you can apply data editing restrictions on them.