Application's Restrictions for Users and Groups
Note
If you skipped the previous tutorials, you want to restore something after having tinkered around or you want to sync with what you see in the screenshots, here the .eap file with the result of this tutorial. Learn about resetting by using .eap files. If you don't use the .eap, what you see might differ slightly from the screenshots.
This tutorial teaches you to employ User Groups and formulas to restrict data editing and visualization in applications. Also, you will learn new tools to share your data with other users within the Domain.
Now, you must improve Family Budget (i.e. Personal Budget renamed and ready to be extended). In particular, you will add to Family Budget the following functionalities through the Design Mode:
- A Lookup filling the cell automatically with the family member who has made a transaction.
- The possibility to restrict who can select a payment method while filling an entry.
- A button to share an entry through a link.
- An email notification only to the
Budget ManagerUser Group informing about an expense.
Note
The tutorial gives for granted all the notions of Your First Application. In particular, the tutorial Lookups: Cells with a List of Options to Choose a Value from. Revise them in case you need to refresh your memory.
Help
If you see the top bar orange instead of black color, you can't edit the application. Check the reason here. 
The tutorial requires the creation of a new application and the extension of the existing applications and storages as follows:
-
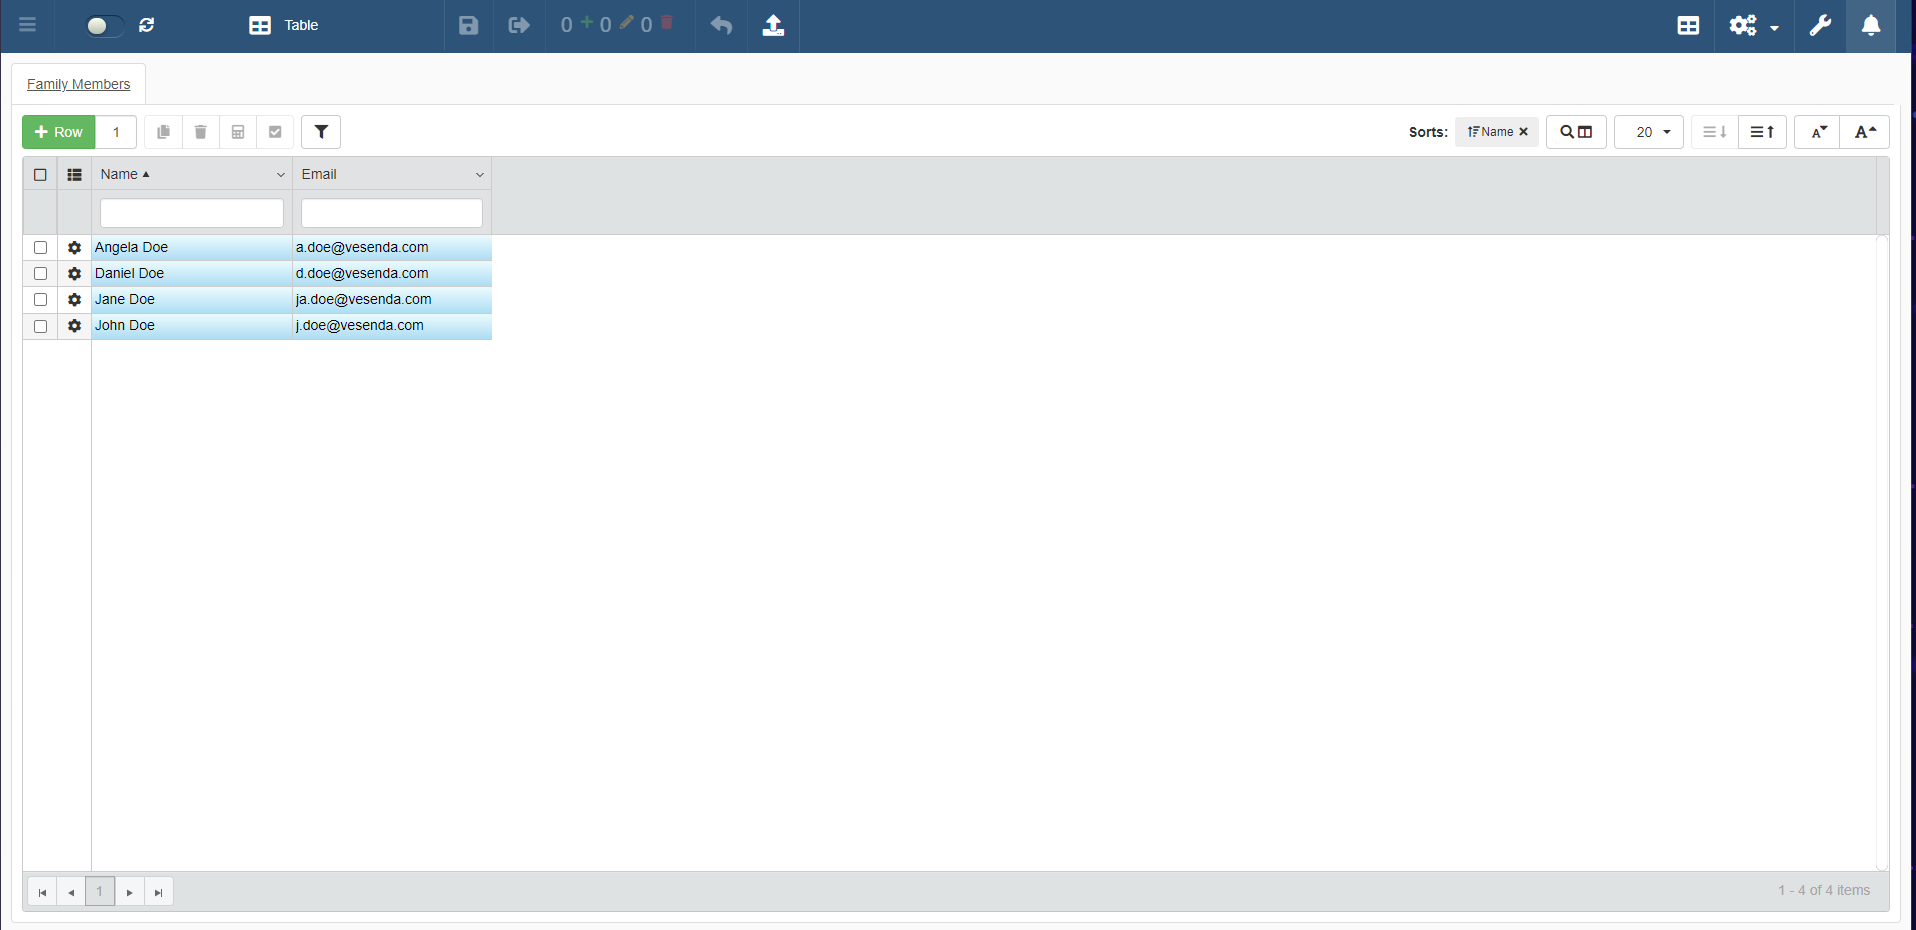
An application to record the Family Members using the application.
-
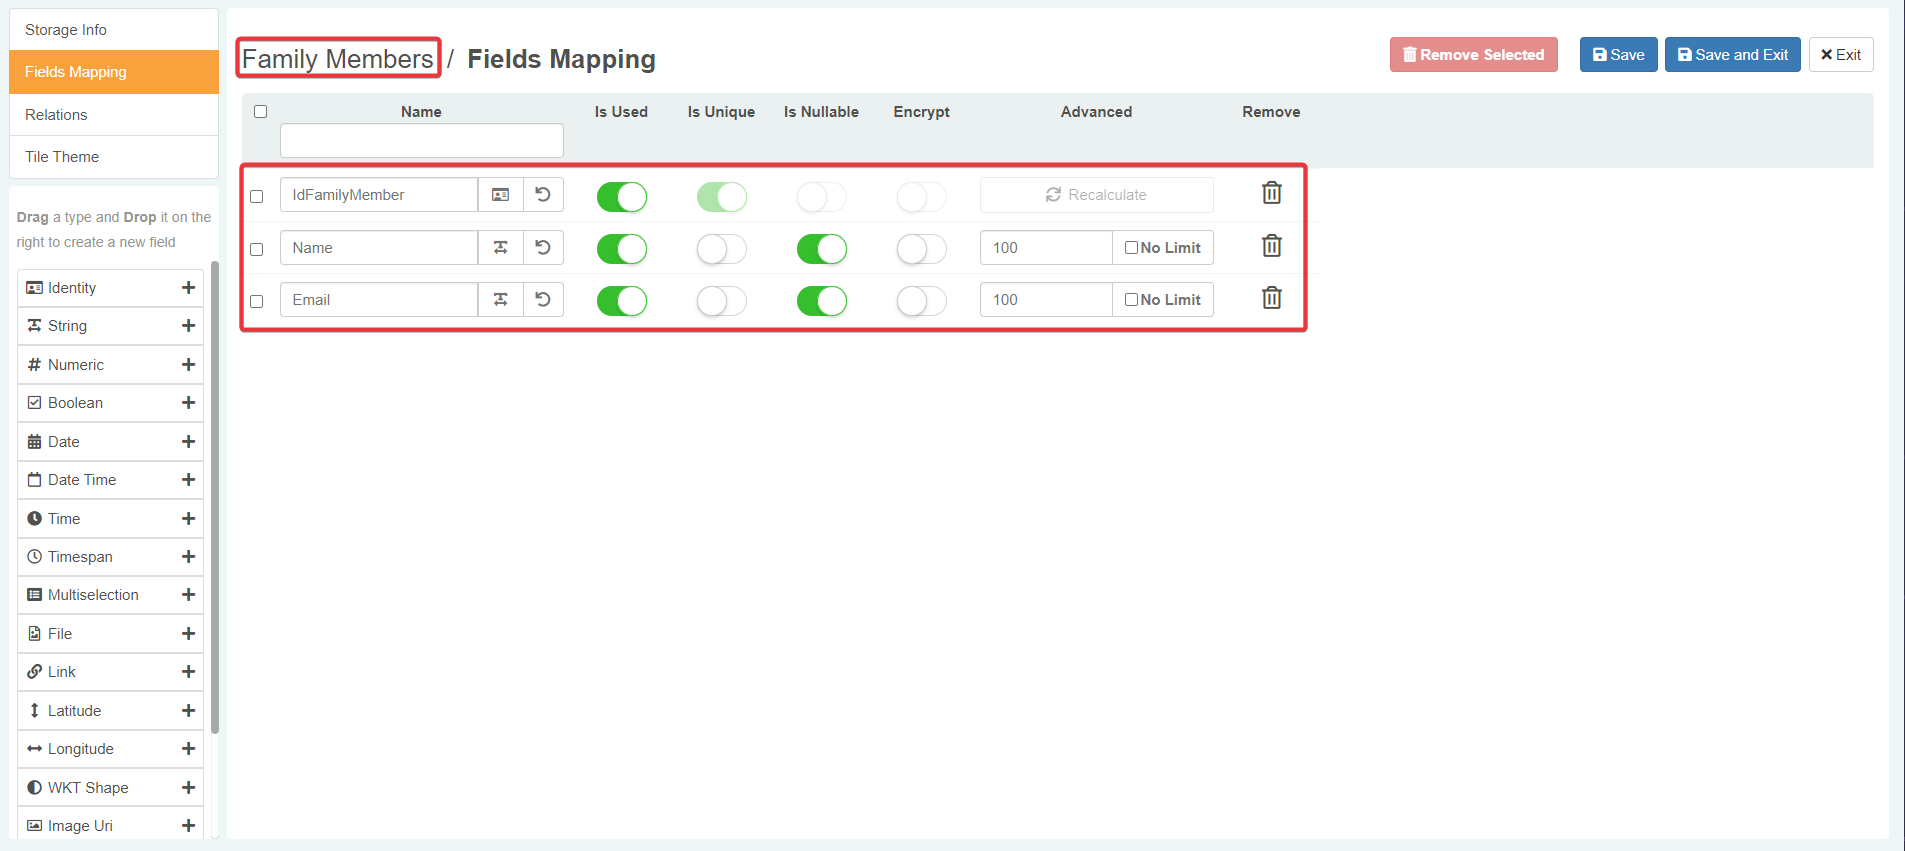
The creation of the Family Members Storage. (Revise in Building Your First App: Personal Budget how to create Storages.)
-
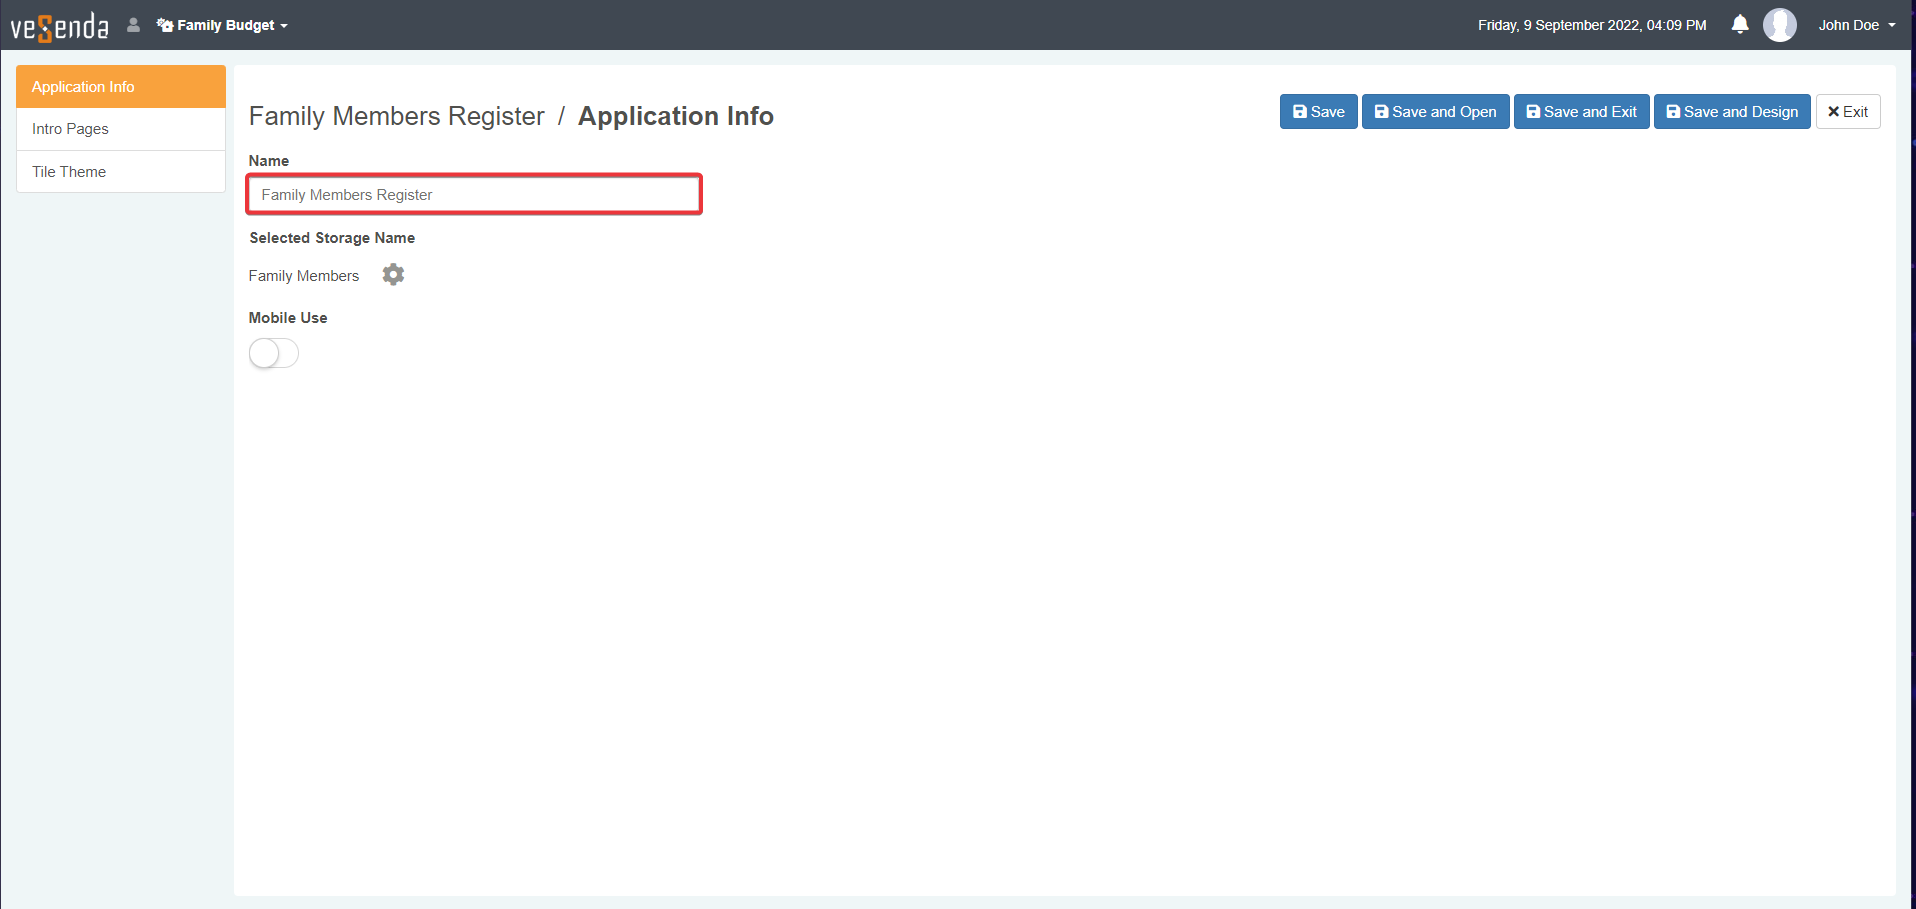
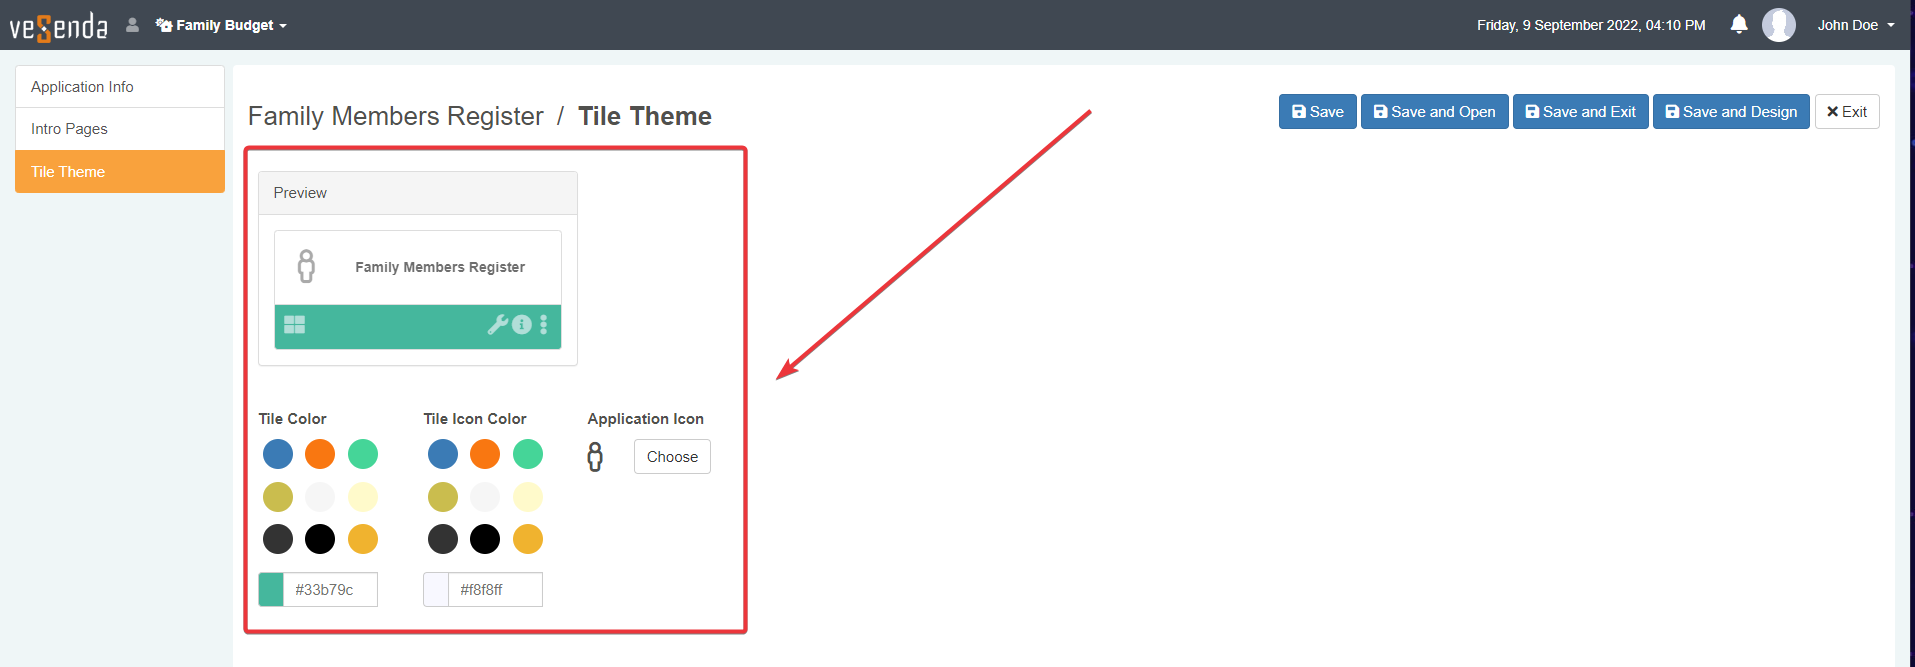
The creation of the Family Members Register Application to record Name and Email of the family members. (Revise in Building Your First App: Personal Budget how to create applications.)
Add the permission to access the application Family Members Register only to the
ParentsandBudget Managergroups. (See the previous tutorial to know how to do it.) -
-
Access the Transactions' Storage Editor to create a Lookup for the Family Members:
-
Add a
FamilyMemberIdNumeric field type to the Transactions Storage.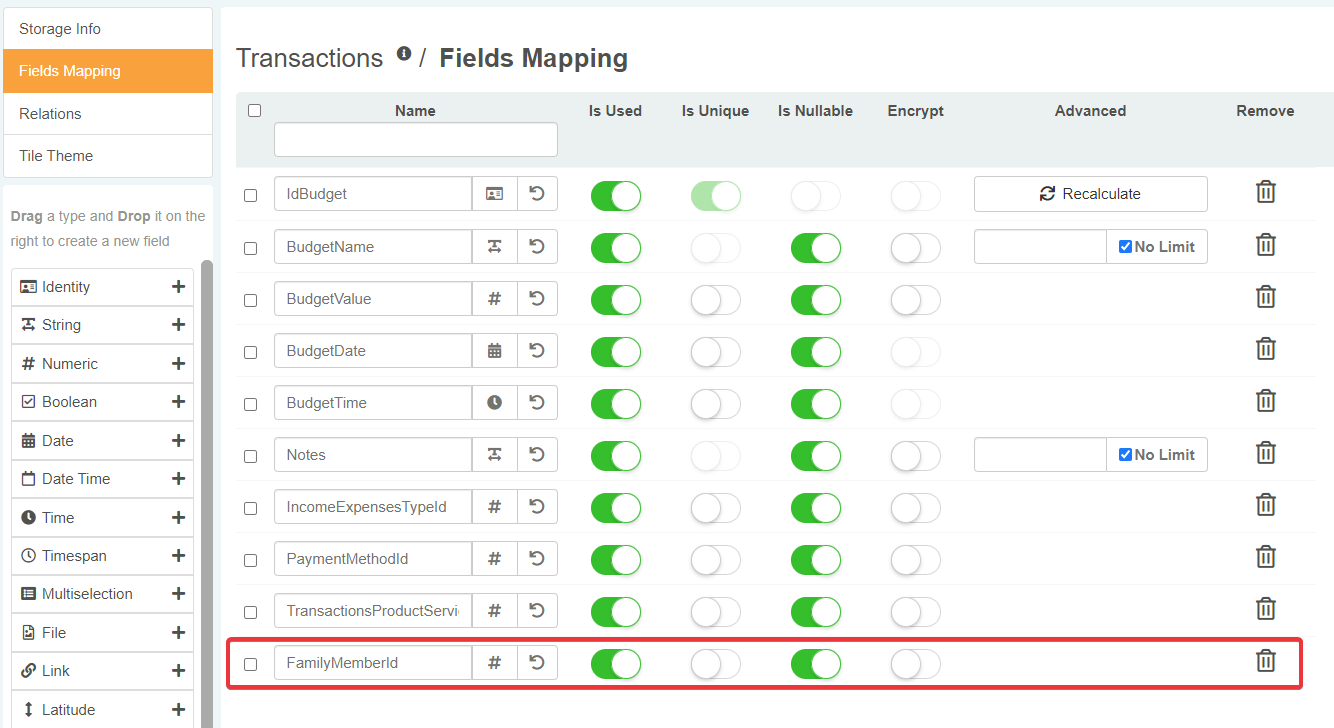
-
Create a Lookup relation between
FamilyMemberIdandIdFamilyMemberidentity field on the Family Members Storage. Name the relationFamily_Members_Lookup.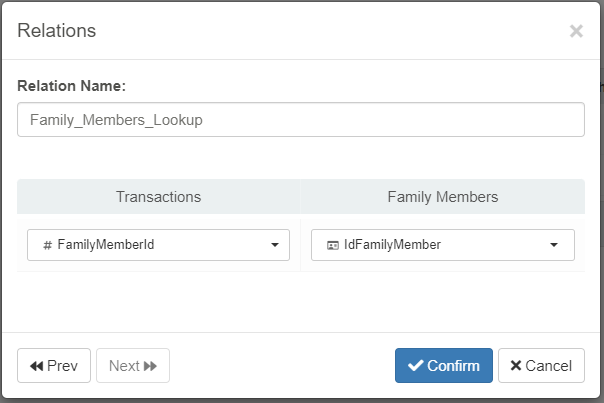
-
-
Access the Payment Methods Storage Editor. Make the following changes to create a Multiselection to select family members who can use a payment method:
- (1) Add a
AuthorizationMultiselection field type to the Payment_Methods Storage.
Info
Multiselections are a field type that can store multiple values. They work like Lookups, but they can record one or more options as lists. When you create a Multiselection in the Storage Editor, the Field Mapping panel requires a Storage with the options to be displayed. You don't have to create the Relation manually like Lookups or Details.
-
(2) From the Advanced column of the Multiselection's row, choose the Storage Family Members and the field
IdFamilyMember. The Storage editor establishes a Relation between the two fields automatically.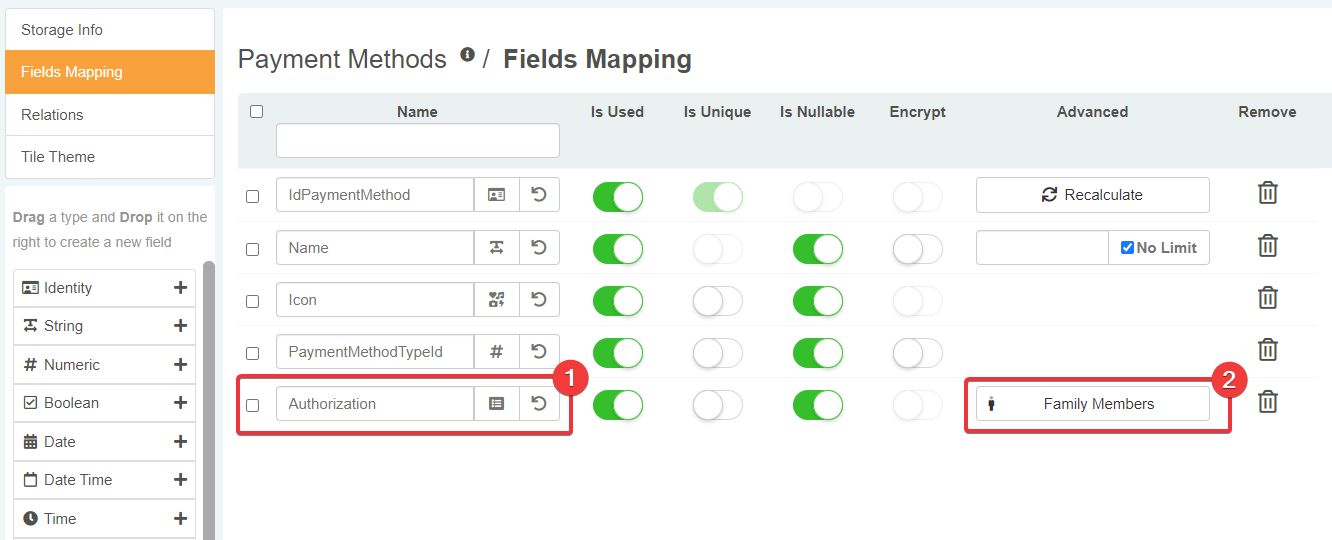
- (1) Add a
Restrictions for Transactions by Person and Group
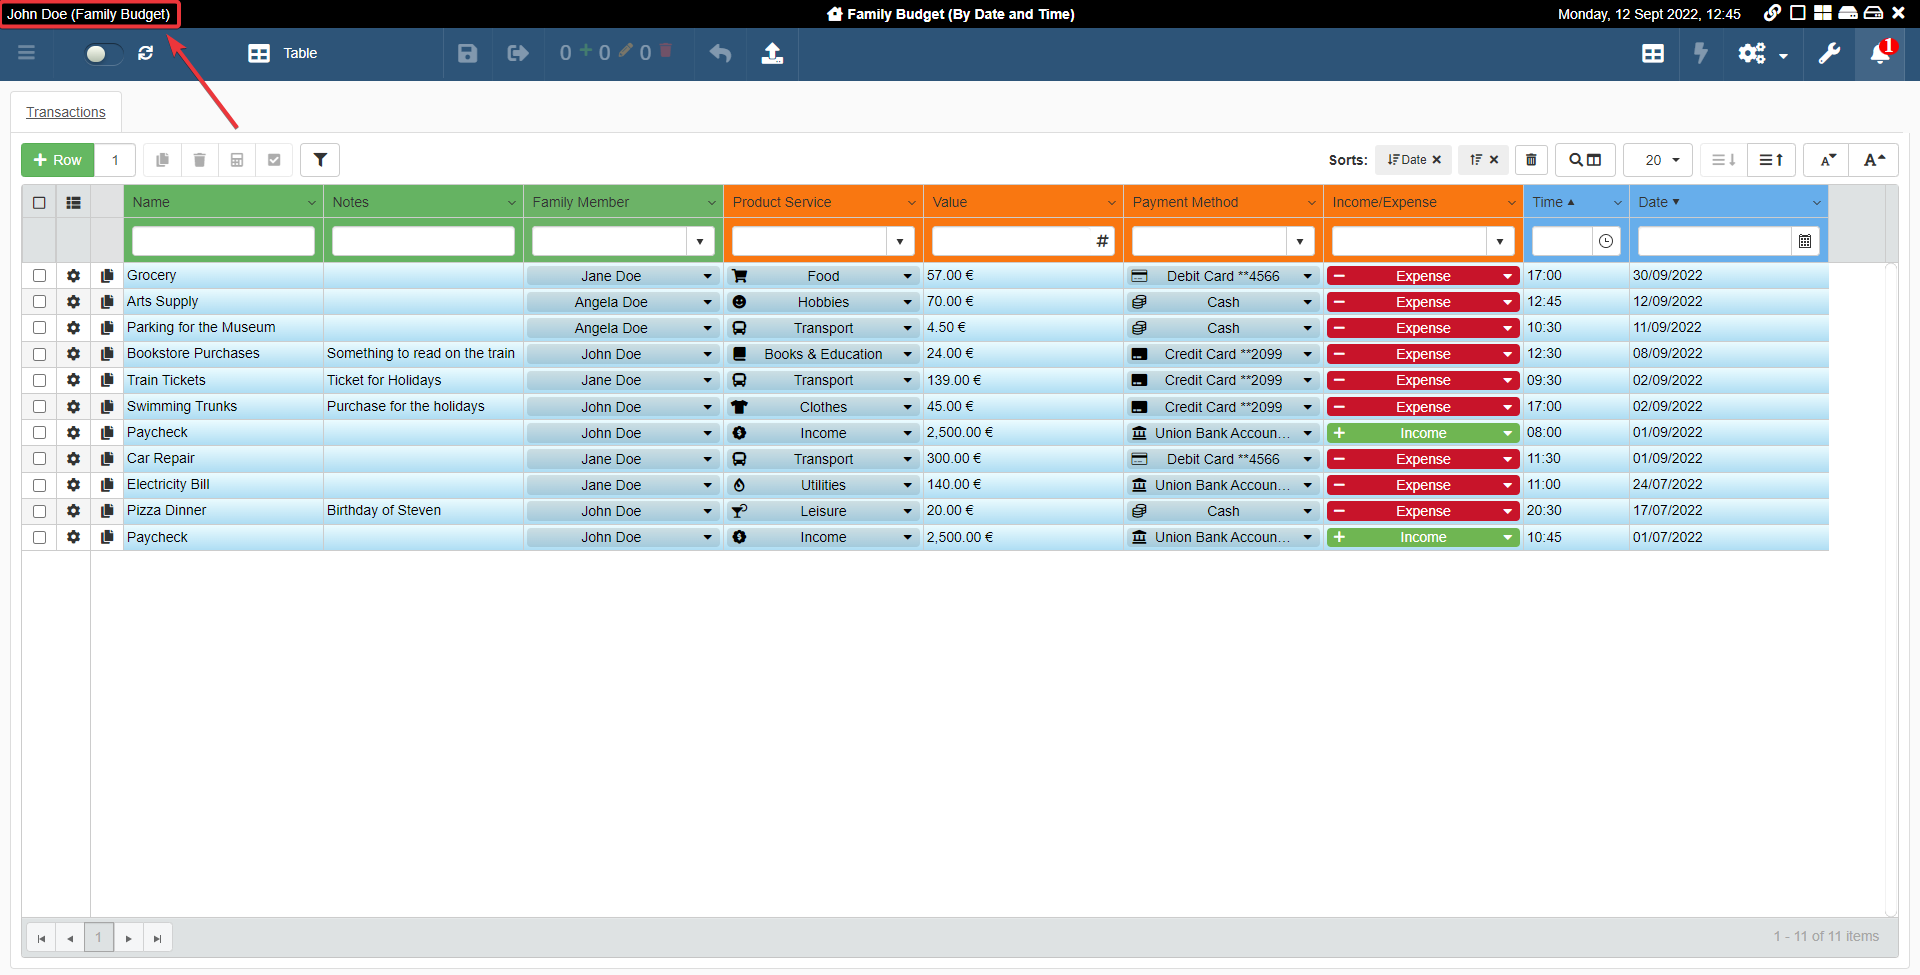
Personal Budget was an application designed for one person. Now, suppose that the whole Doe family and you have to employ it to manage the family budget. The requirements of the application are changed:
-
You will need a way to track who has made an expense. In this case, you need a Lookup with all the family members to pick up who has made the entry.
-
Only the members of
Parents(i.e Jane Doe) must make edits to income or expenses made already. -
To avoid confusion, the family members can see only their expenses. Exception made for the
ParentsandBudget ManagerUser Groups. -
All the Family Budget application management must fall under John Doe's control. John is member of
Budget Manager.
In this tutorial you are going to embed the changes above to the Family Budget application from the original application Personal Budget.
Setup the Family Member Lookup
Configure the Lookup to record in the entry who has made the transaction or received money.
In the following sections, you will apply the formulas for the restriction to this Lookup.
- Access again the Design Mode of Family Budget application.
-
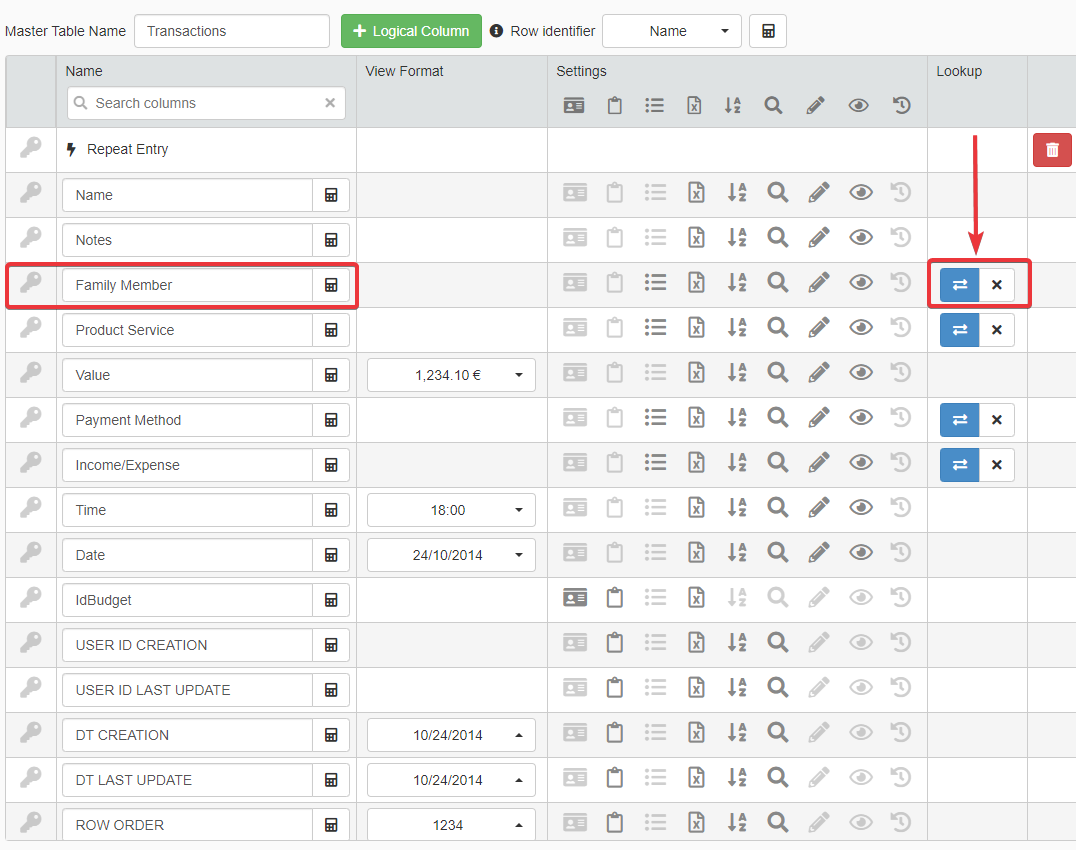
In the Master sub-panel, rename the Lookup column from FamilyMemberId to
Family Member.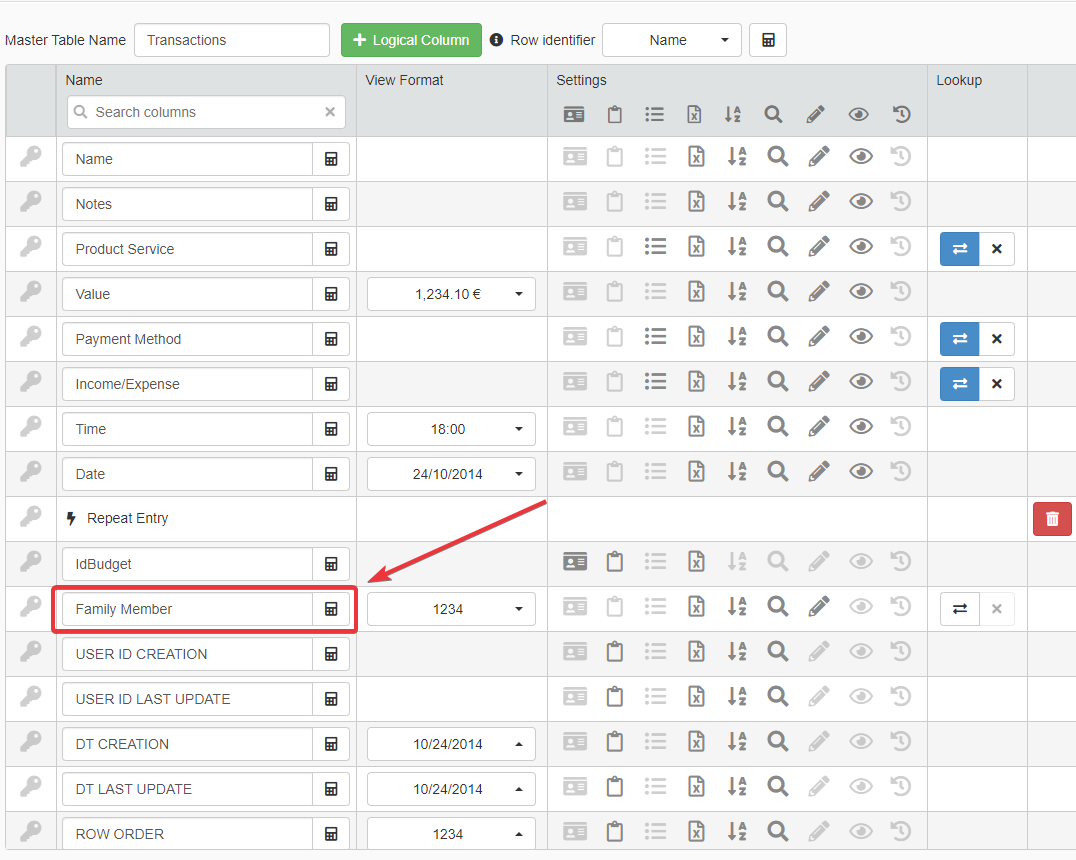
-
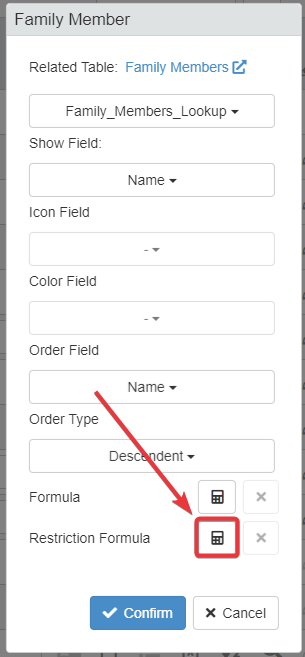
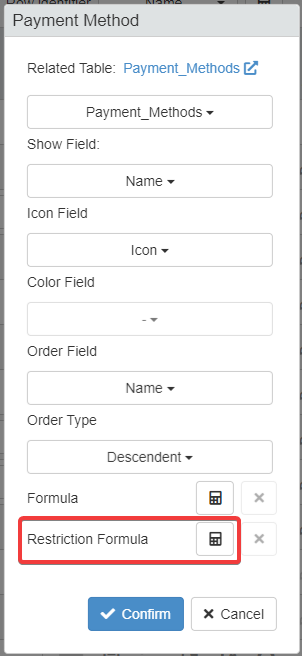
Configure the Lookup of the column Family Member as follows:
- Related Table: Family_Members_Lookup
- Show Field: Name
- Icon Field: - (Empty)
- Color Field: - (Empty)
- Order Field: Name
-
Order Type: Descendent
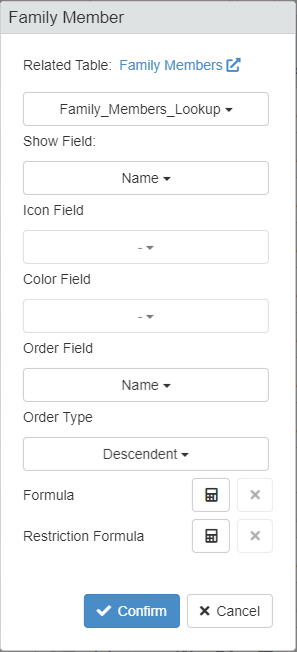
In this way, the Lookup Family Member will show the list of family members by name and alphabetical order from A to Z.
Click on the Confirm button to end the configuration.
-
Click the Visible in the Grid () button to make the Family Member Lookup Column visible.

-
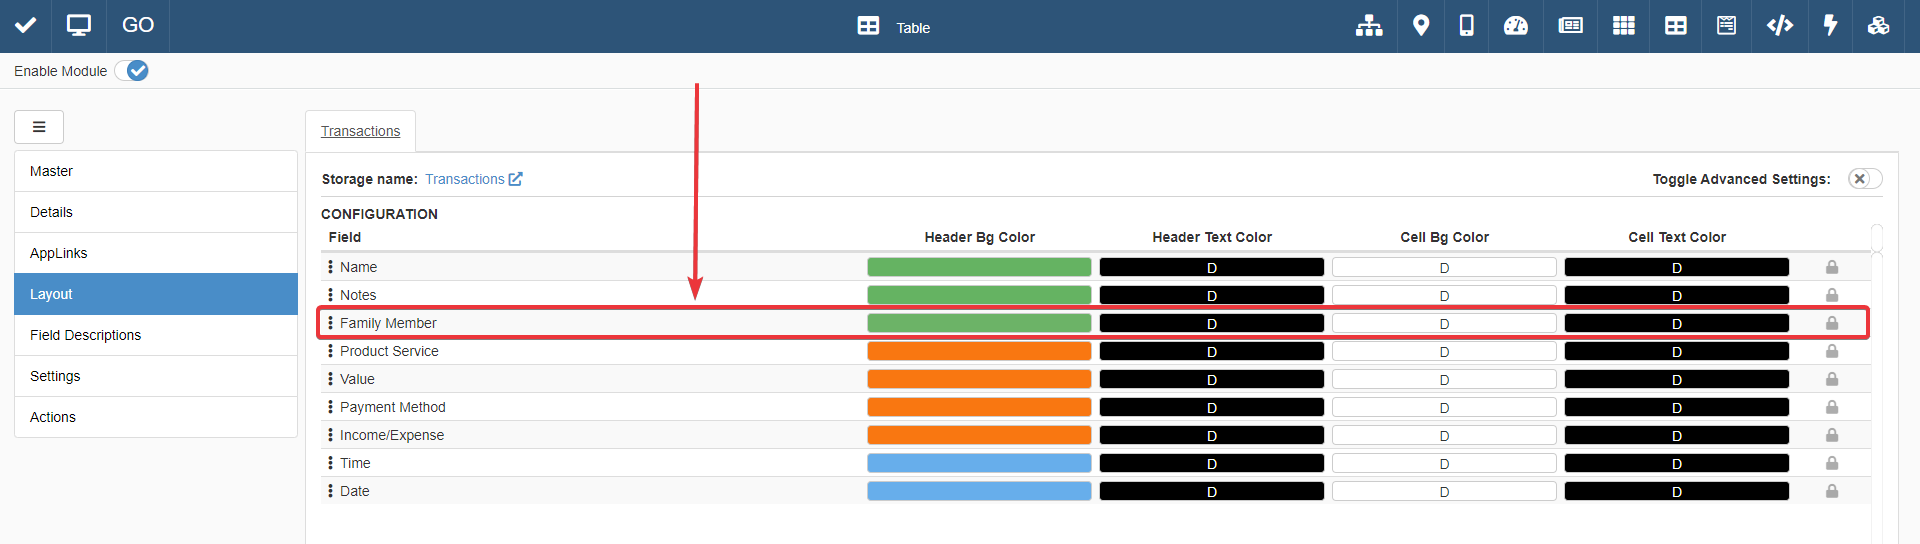
Customize the appearance of the Family Member Lookup column in the Layout sub-panel.
-
Save all the changes in Family Budget's Design Mode.
You have created a Lookup to choose the name of who has inserted the expense or the paycheck.
Restriction for Editing
You can enable only certain members of a group to modify any row of the application. You can do that by using Formulas to restrict what a user can edit.
Suppose that the Group Family Members can insert new entries, but they can choose for the Family Member Lookup only their name. Instead, users of Budget Manager and Parents can insert and modify any data.
The goal is the following:
| Group | Create | Edit | Choose only their name in Family Member Lookup | Choose any name in Family Member Lookup |
|---|---|---|---|---|
| Family Members | X | X | ||
| Parents | X | X | X | |
| Budget Manager | X | X | X |
-
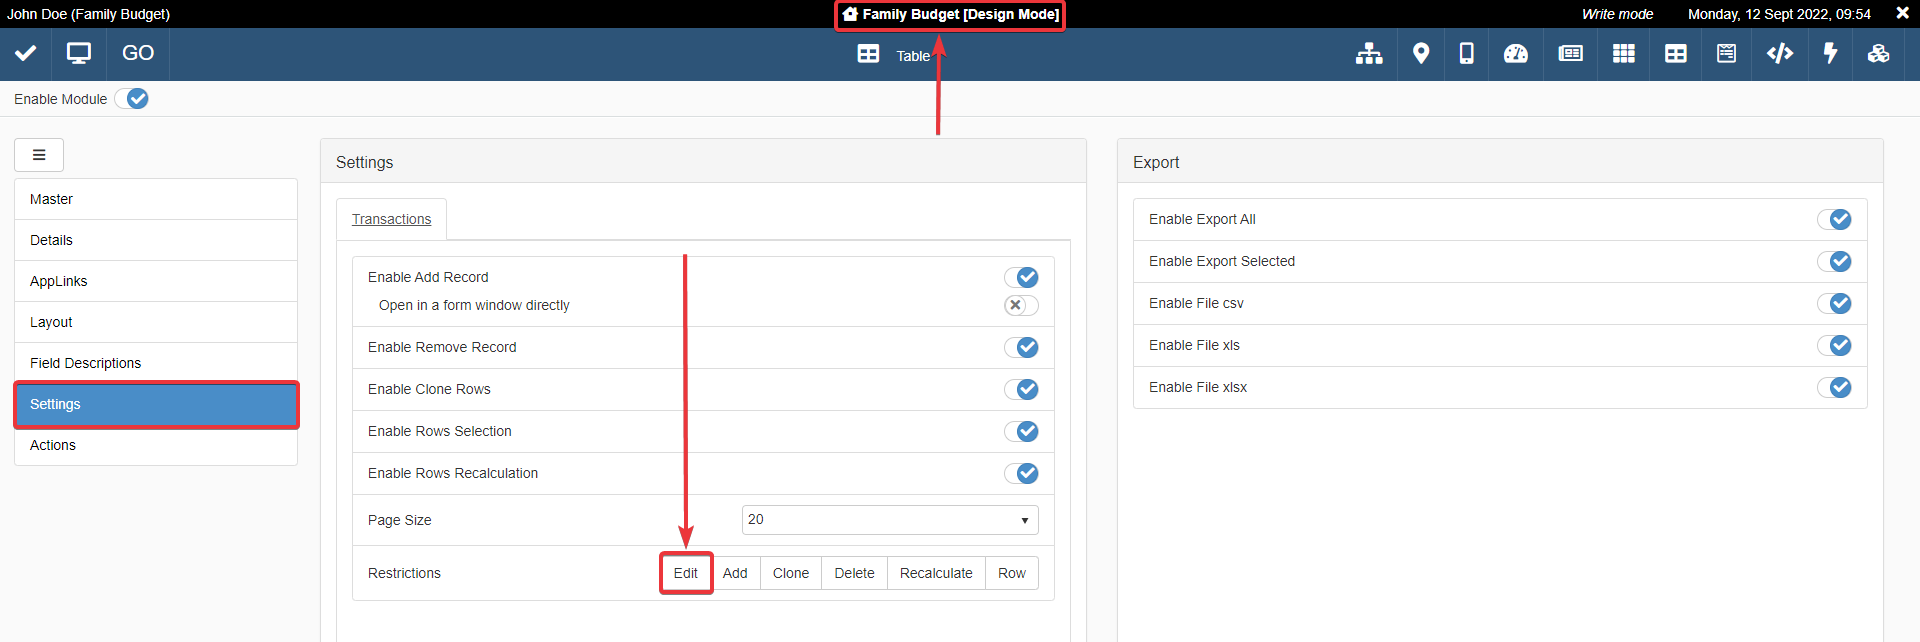
In Design Mode of Family Budget click on Settings.
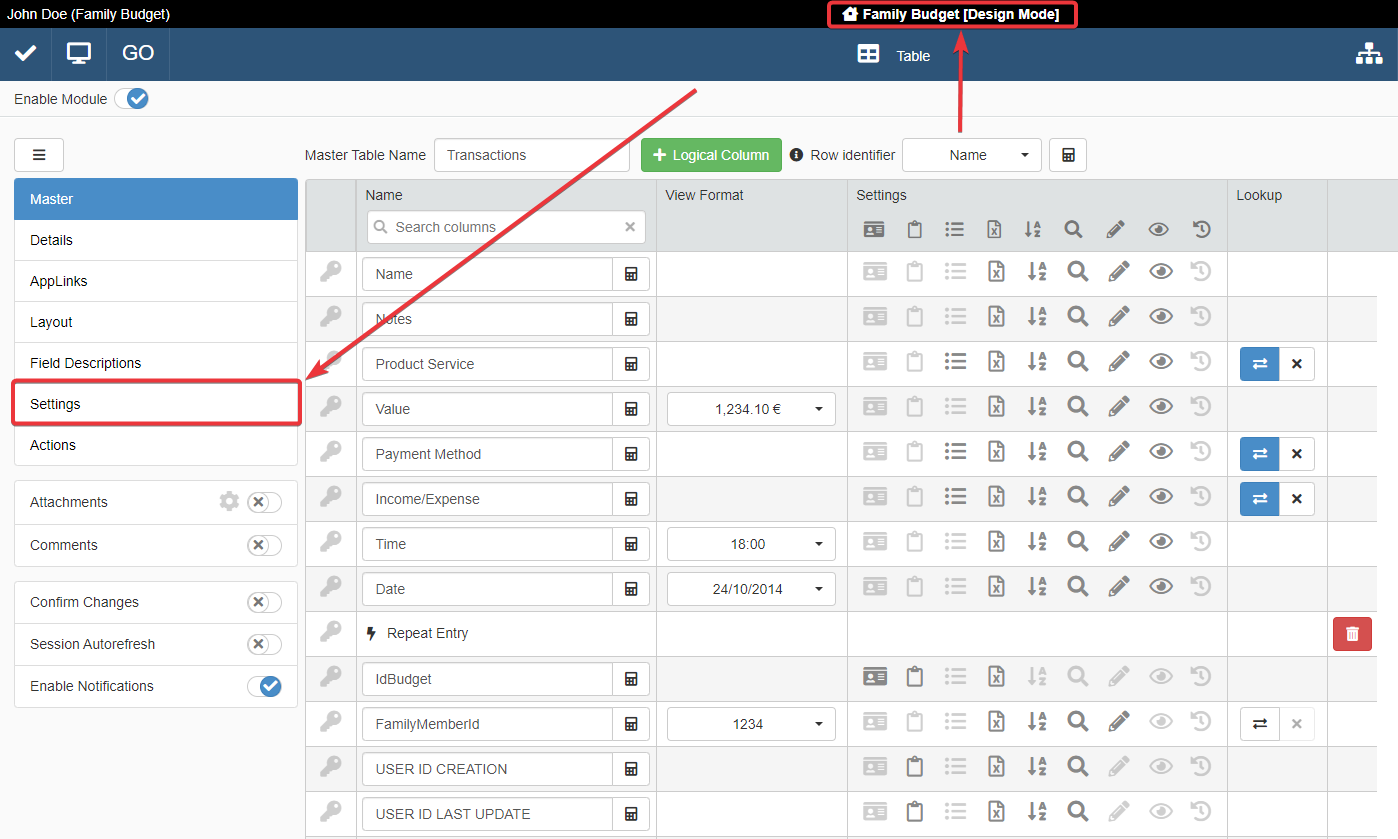
-
In the Master sub-panel, click on the Create the Lookup Relation button of the already configured Family Member Lookup.
-
Click on Restriction Formula button.
-
Copy & paste or type the following formula.
 1
 2
 3
 4
 5
 6
 7
 8
 9
10
11
12
13
14
15
16
17
18
19
=IF(
    =CONTAINS($CURRENTUSER.GROUPNAMES; "Family Members");
    =LOOKUPLIST(
        #Family Members;
        #Family Members.IdFamilyMember;
        =EQ(
            #Family Members.Email;
            $CURRENTUSER.EMAIL
        )
    );
    =IF(
        =OR(
            =CONTAINS($CURRENTUSER.GROUPNAMES; "Parents");
            =CONTAINS($CURRENTUSER.GROUPNAMES; "Budget Manager")
            );
        =ALLITEMS();
        =NOITEMS()
        )
)
A brief explanation of the formula above.
=IF()sets what happens when a condition is either true or false.-
The condition is the
=CONTAINS(): the user's group list that the variable$CURRENTUSER.GROUPNAMESrepresents must contain "Family Members".- If the list contains "Family Members", then
=LOOKUPLIST()activates. =LOOKUPLIST()searches for elements that have the same email of the current user. The list will contain only one element since each family member is unique.
- If the list contains "Family Members", then
-
When the group list doesn't contain "Family Members", the
=IF()executes another=IF()as nested function.- The condition is the
=OR(): the user's group lists should contain either "Parents" or "Budget Manager". - If the list satisfies the
=OR(), the formula shows all the elements of the Lookup. - If the list doesn't satisfy the
=OR(), the formula won't show any element.
- The condition is the
The formula shows all the family members of the storage if you belong to
ParentsorBudget Manager. If you belong to the groupFamily Members, you can pick up only your name in the Lookup. -
-
Click on the Confirm button to confirm the configuration.
-
In Settings, click on Edit under Restrictions.
-
The Formula Editor will appear. Insert the following formula:
1
2
3
4
=CONTAINSLIST( $CURRENTUSER.GROUPNAMES; =LIST("Parents"; "Budget Manager") )=CONTAINSLIST()function compares two lists to check if one or more elements of the first list contains elements of the second list. The=CONTAINSLIST()above has two parameters:$CURRENTUSER.GROUPNAMEStakes from the user logged the list of the groups they belong to.=LIST("Parents"; "Budget Manager")is the list of groups to check in the user's group list.
-
Save all the changes in Family Budget's Design Mode.
In this way:
-
Members of
Family Memberscan insert only their names in the Lookup. -
Only members of
Budget ManagerandParentscan modify any entry after being saved.
Default Value for the Family Members Lookup
However, when the Budget Manager or the family member create a new entry, the application doesn't pick up the user's name for the Family Member Lookup automatically. The Lookup should have the current user's name as default option when the family member adds the entry to the application.
You can configure the application to insert the current family member's name by default in Design Mode.
-
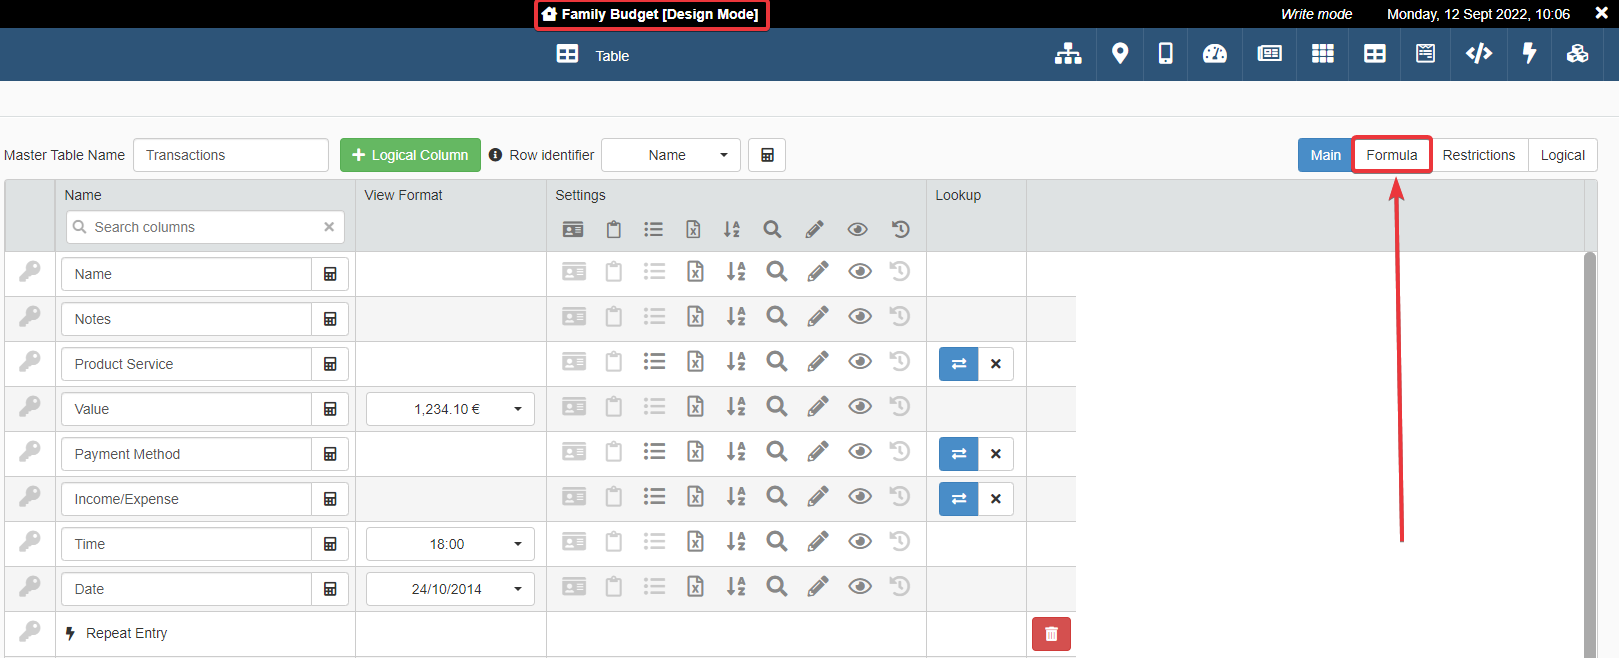
From the Master sub-panel, click on Formula on the upper-right corner of the sub-panel.
-
Click on the Default Value button () for the row of the column Family Member. The action will open the formula editor to calculate the default value of the column cell.
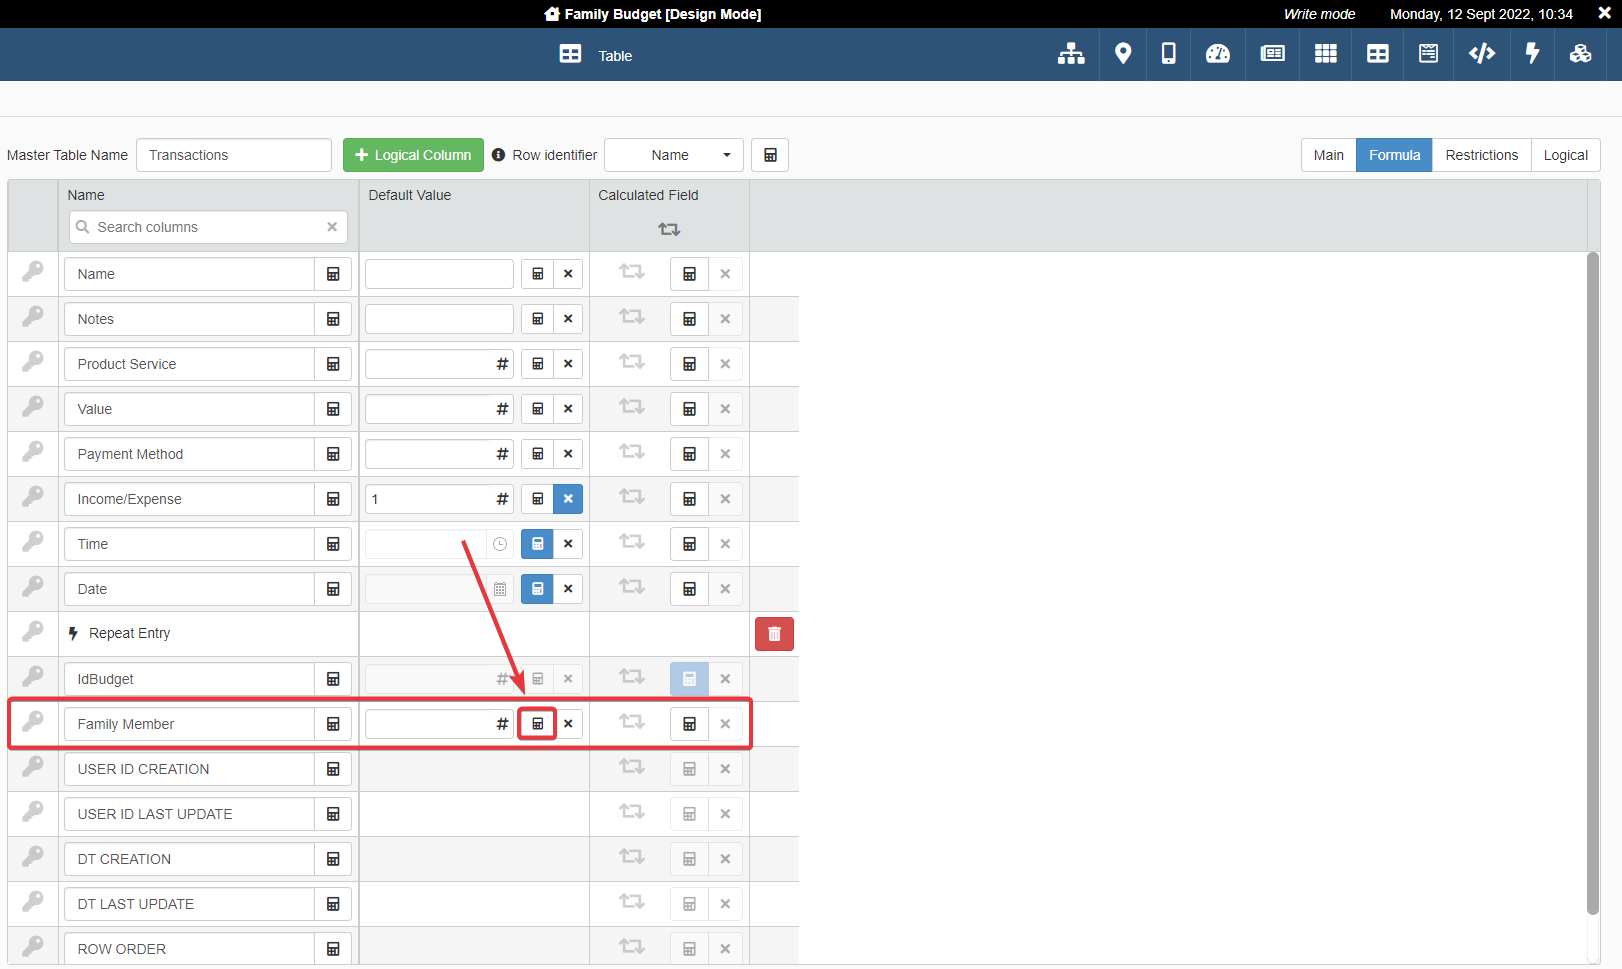
-
Insert the following formula in the formula editor and click on the Confirm button.
The formula picks up the first entry of1 2 3 4 5 6 7 8
=LOOKUP( #Family Members; #Family Members.IdFamilyMember; =EQ( #Family Members.Email; $CURRENTUSER.EMAIL ) )Family_Membersstorage with the same email of the current user. If the email addresses coincide, the application registers in FamilyMember the name of the current user who has created the row. -
Save all the changes in Design Mode.
Now, when the user will create a row, the application fills the Family Member Lookup cell with the current family member's name.
You are going to introduce advanced settings for the Master table and the Family Member Lookup in the next sections.
Restriction for Viewing
Suppose that each user of Family Members should see only their entries while members of Parents and Budget Manager can view all the rows.
You can use Formulas to restrict what rows a user can view.
-
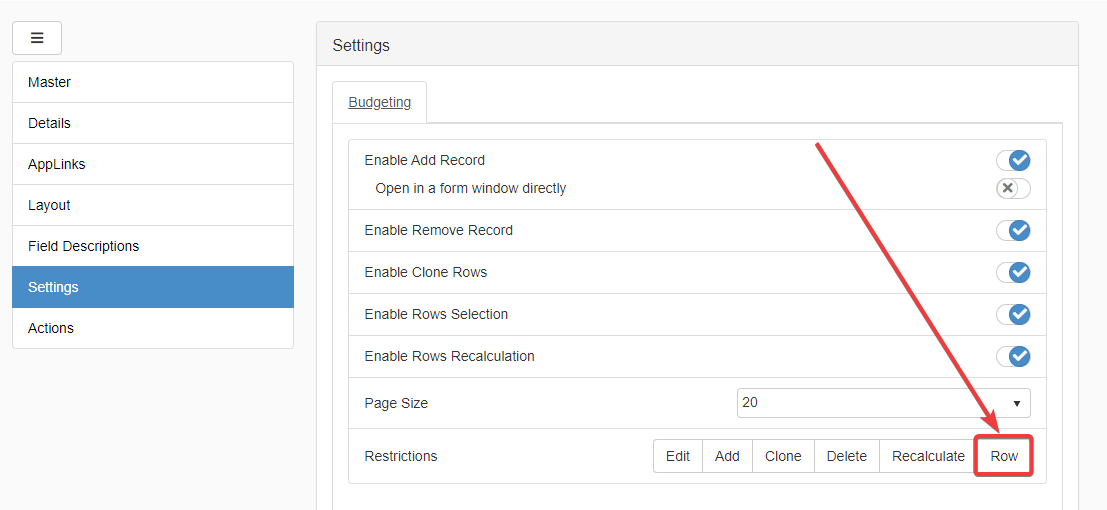
In Family Budget Design Mode, go to Settings > Restrictions and click on Row.
-
The Formula Editor will appear. Insert the following formula:
1 2 3 4 5 6 7 8 9 10 11 12 13 14 15
=OR(
    =CONTAINS($CURRENTUSER.GROUPNAMES; "Budget Manager");
    =CONTAINS($CURRENTUSER.GROUPNAMES; "Parents");
    =AND(
        =CONTAINS($CURRENTUSER.GROUPNAMES; "Family Members");
        =EQ(
            $CURRENTSTORAGE.FamilyMemberId;
            =LOOKUP(
                #Family Members;
                #Family Members.IdFamilyMember;
                =EQ(#Family Members.Email; $CURRENTUSER.EMAIL)
            )
        )
    )
)
A brief explanation of the Formula:
The function
=OR()contains multiple conditions that can occur at the same time.=CONTAINS()verify when a list contains the specified element. If the User's group list containsBudget Manager, the user can see all the entries.=CONTAINS()verify when a list contains the specified element. If the User's group list containsParents, the user can see all the entries.=AND()checks two conditions that must be true at the same time:- If the User's group contains
Family Members. - If
$CURRENTSTORAGE.FamilyMemberIdhas the same value of the current User Id. Also, the formula picks up the user on the Family Members storage who has the same email of the current user.
- If the User's group contains
The formula shows to the user only the rows satisfying the formula.
-
Save the Formula by clicking on Confirm button.
- Save all the changes in Design Mode.
The inserted formula changes what each user and User Group can see.
Users from Family Members will see only their rows. In addition, they can't edit rows they have created and saved anymore.
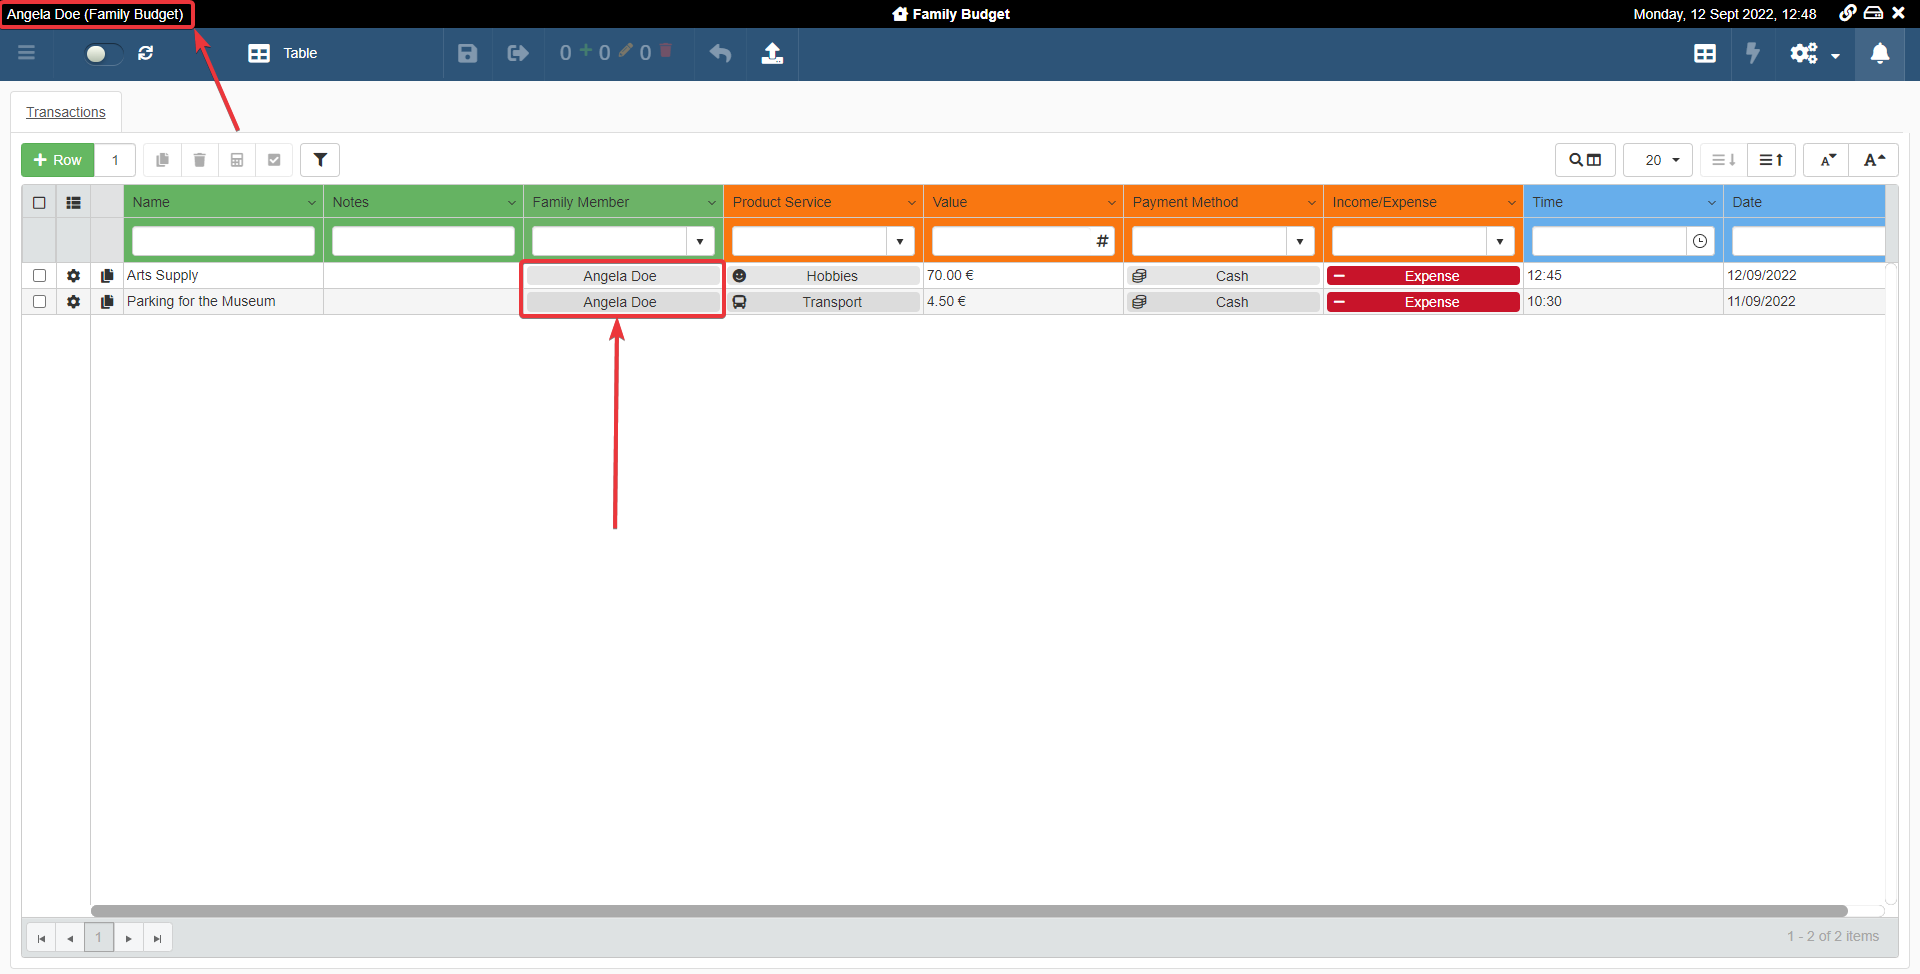
Members of Parents or Budget Manager will see all the rows and can edit them. (If you have followed the previous tutorial Users and Permissions in the Domain, John Doe belongs to Budget Manager User Group.)
Multiselection to Restrict a Payment Method for Different Family Members
At this point, you have a Lookup for the person who has inserted the entry in Family Budget application. The table fills the Family Member cell with the name of the current family member who is using the application.
The next step is configuring the Payment Method Lookup to display only the payment methods available to a family member.
You will use Formulas to restrict what payment method a user can view.
Family Budget Application: Restriction Formula for the Payment Methods Lookup
In this stage, you configure the Payment Methods Lookup on Family Budget application before making changes to the Payment Methods application.
You must configure Family Budget as follows:
- Members of
Family MembersandParentsgroups should see only their assigned payment methods in the Payment Methods application when clicking the Payment Method Lookup. -
Members of
Budget Managerscan see all the payment methods inserted in Payment Methods application. -
In Family Budget Design Mode, click on the Lookup button on Payment Methods column.
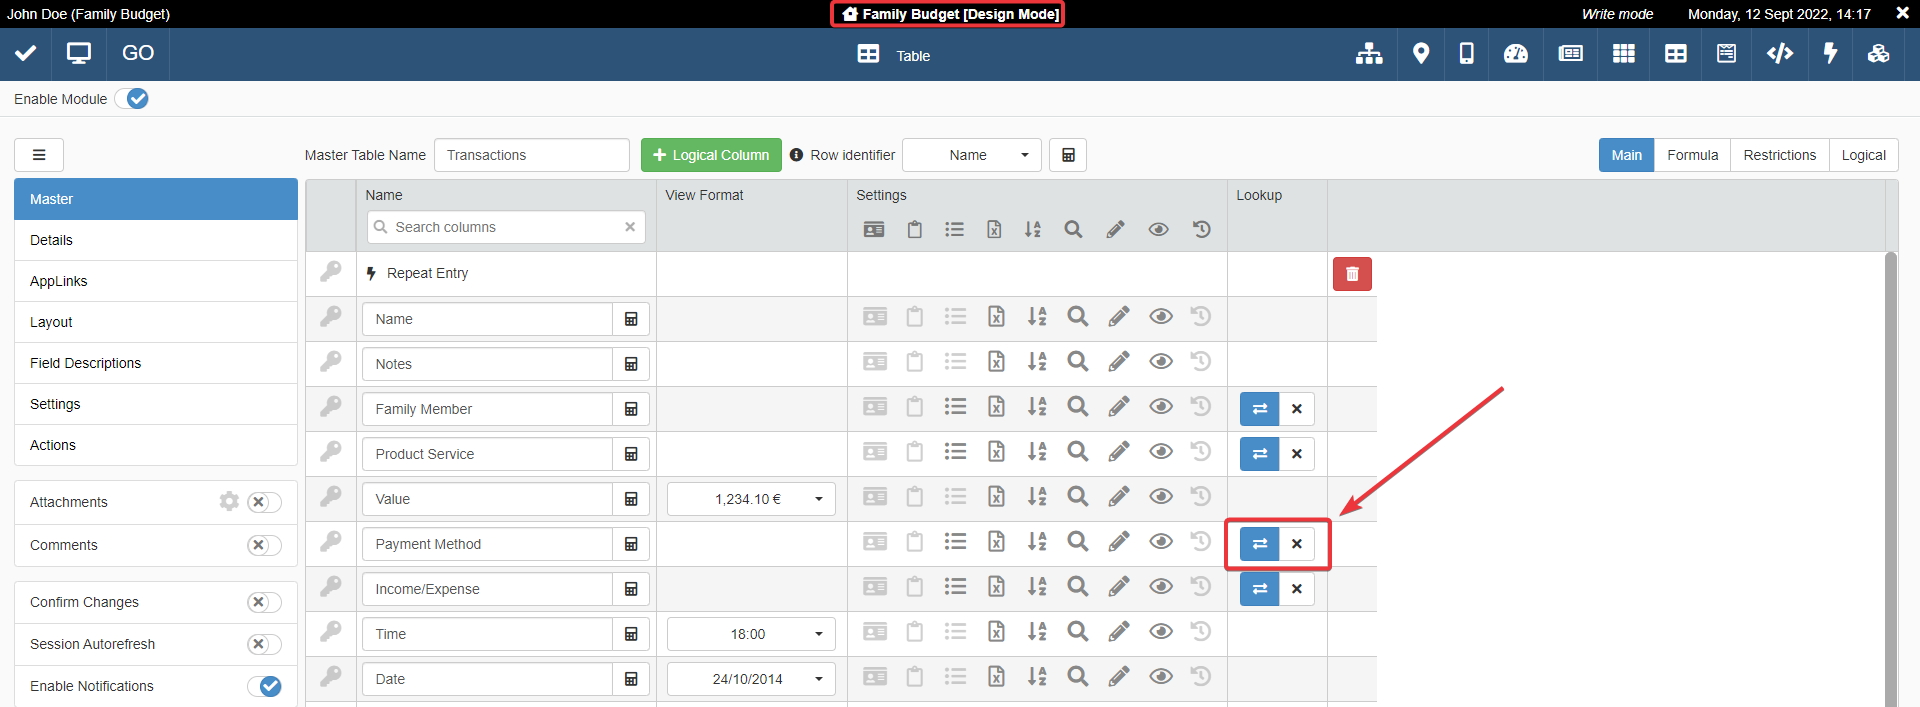
-
Click on Restriction Formula's :fa-calculator: icon.
-
Insert in the Formula editor the following formula:
1
2
3
4
5
6
7
8
=LOOKUPLIST( #Payment Methods; #Payment Methods.IdPaymentMethod; =CONTAINS( #Payment Methods.Authorization; =LIST($CURRENTSTORAGE.FamilyMemberId) ) )=LOOKUPLIST()function filters the values of the Lookup that satisfy the condition as third parameter.- The first and second parameter
#Payment_Methodsand#Payment_Methods.ID_payment_methodpoint the Storage for the Lookup relation. =CONTAINS()function checks if the Multiselection#Payment_Methods.Authorizationin Payment Methods contains any element of the value list of$CURRENTSTORAGE.FamilyMemberIdfield in Family Budget.
- The first and second parameter
-
Click on the Confirm button to save the changes.
- Save all the changes in Family Budget's Design Mode.
The formula restricts the payment methods available to the family member inserted in the Lookup Family Member in Family Budget.
In the next section, you will prepare the Payment Methods application with all the settings that the Family Budget at the other side requires.
Payment Methods Application: Multiselection to authorize family members.
The restriction formula in Family Budget Application: Restriction Formula for the Payment Methods Lookup works when you add a person to the Multiselection field Authorization in Payment Methods.

Add the following family members to the payment methods below in the Authorization Multiselection field.
| Cash | Check | Bank Transfer | Credit Card | Debit Card | |
|---|---|---|---|---|---|
| Angela Doe | X | ||||
| Daniel Doe | X | X | |||
| Jane Doe | X | X | X | X | |
| John Doe | X | X | X | X | X |
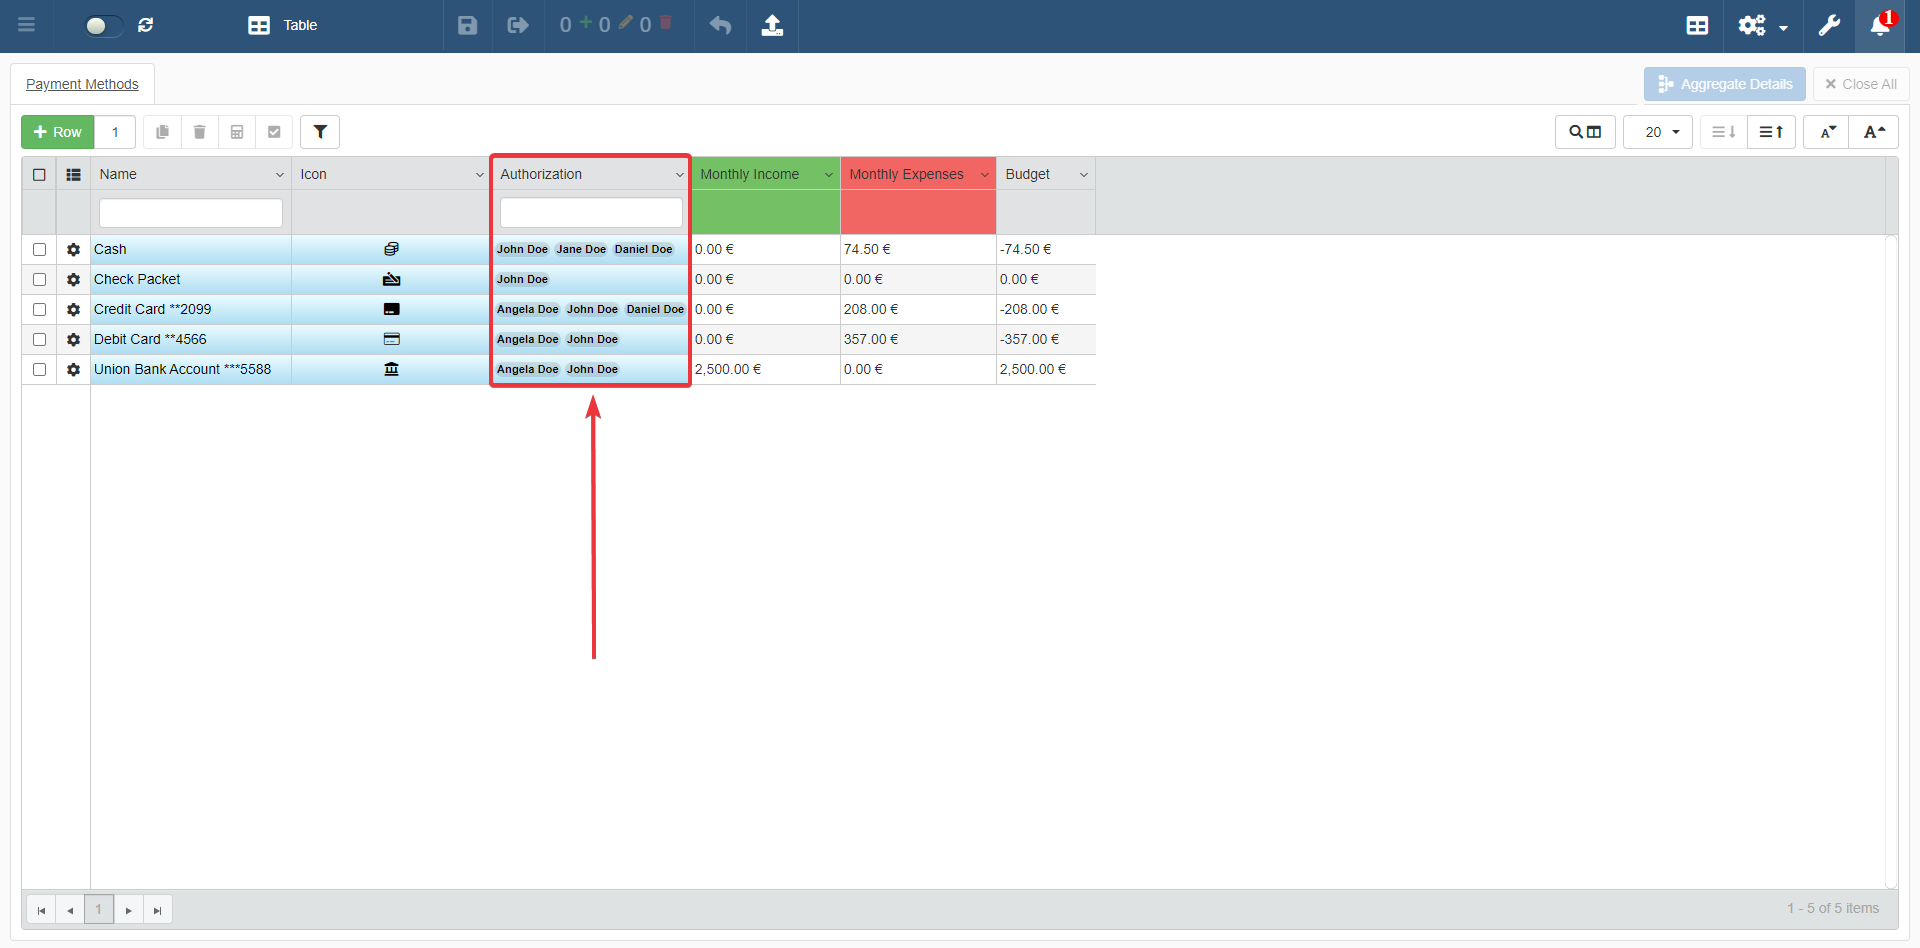
In Family Budget, the Lookup Payment Methods will display only the methods available for the person chosen from the Family Member Lookup list.
For instance, Daniel Doe will have access only to Cash and Credit Card payment methods.
Congrats! You have configured the payment methods for the family members.
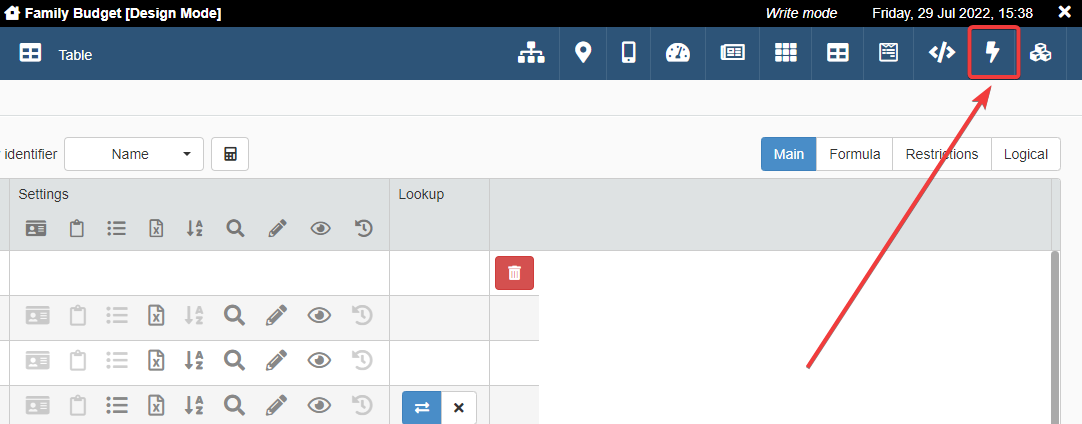
Share with Another Family Member Your Transactions
You can configure a Custom Action and a connected Logical Column to share the link to an entry on Family Budget.
-
In Family Budget Design Mode, click on the Custom Actions menu.
-
Create a Share Row custom action in Custom Actions.
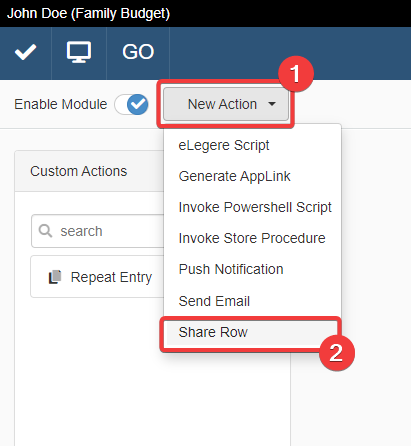
-
Name the Share Row custom action as "Share Entry" and choose an icon (for example, search
sharein the drop-down menu).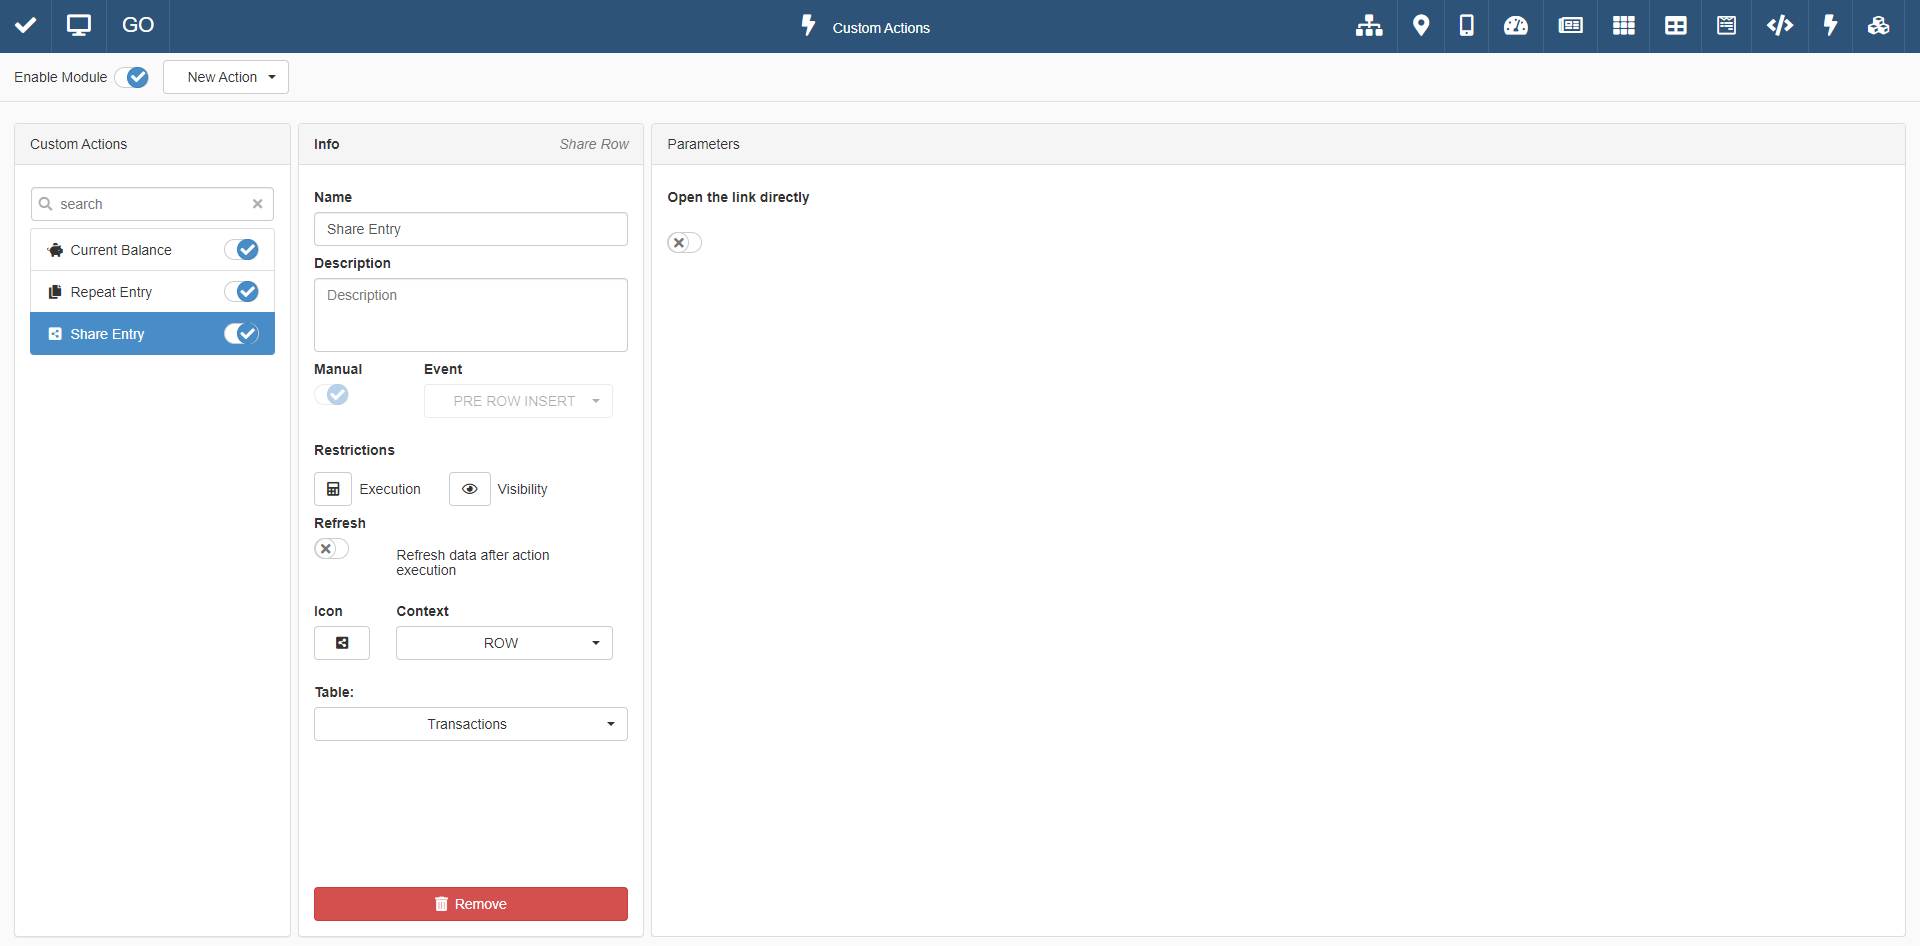
-
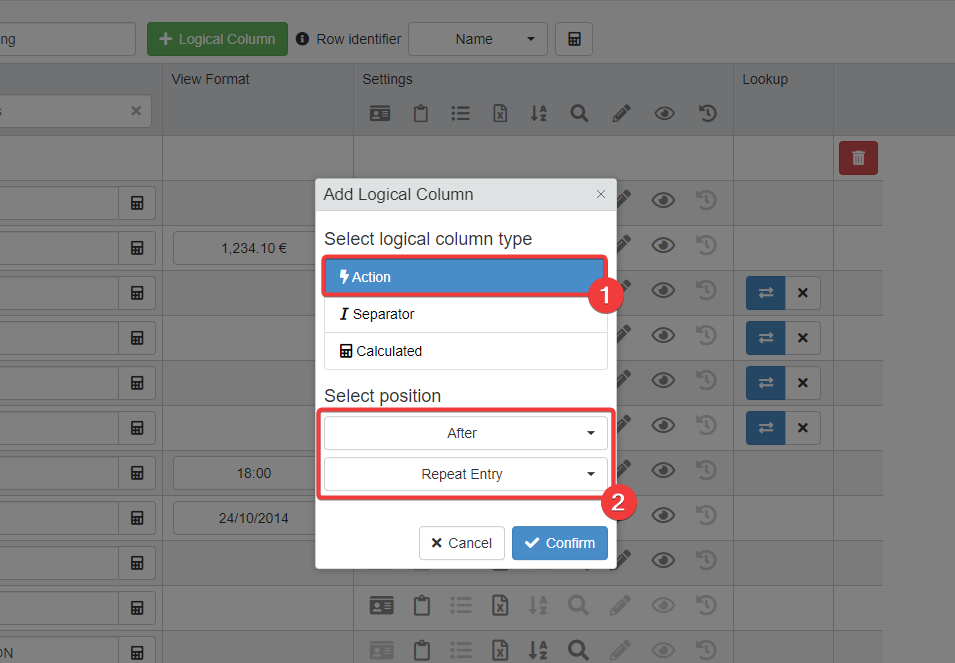
Go back to the Table menu in Design Mode. Add a new Logical Column after the Repeat Entry custom action by clicking +Logical Column button. Choose Action as option.
-
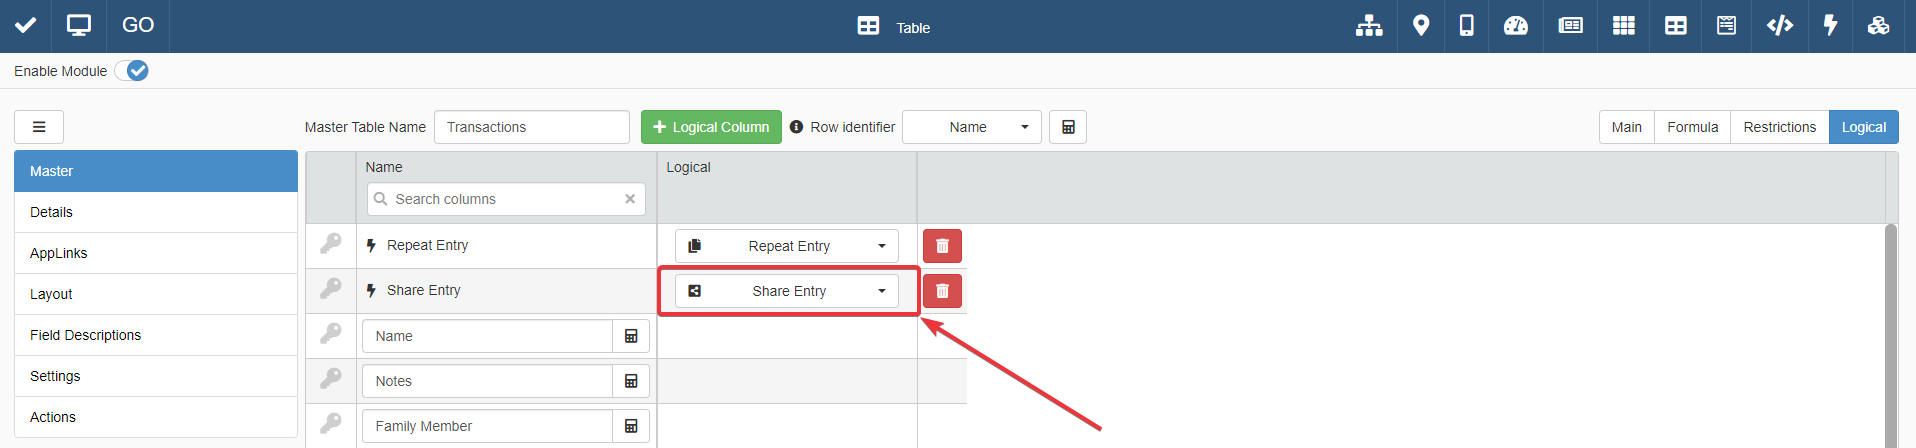
In the Logical sub-panel, choose "Share Entry" as custom action for the new logical column.
-
Click on the Is Primary Key button () next to the IdBudget hidden Identity field.
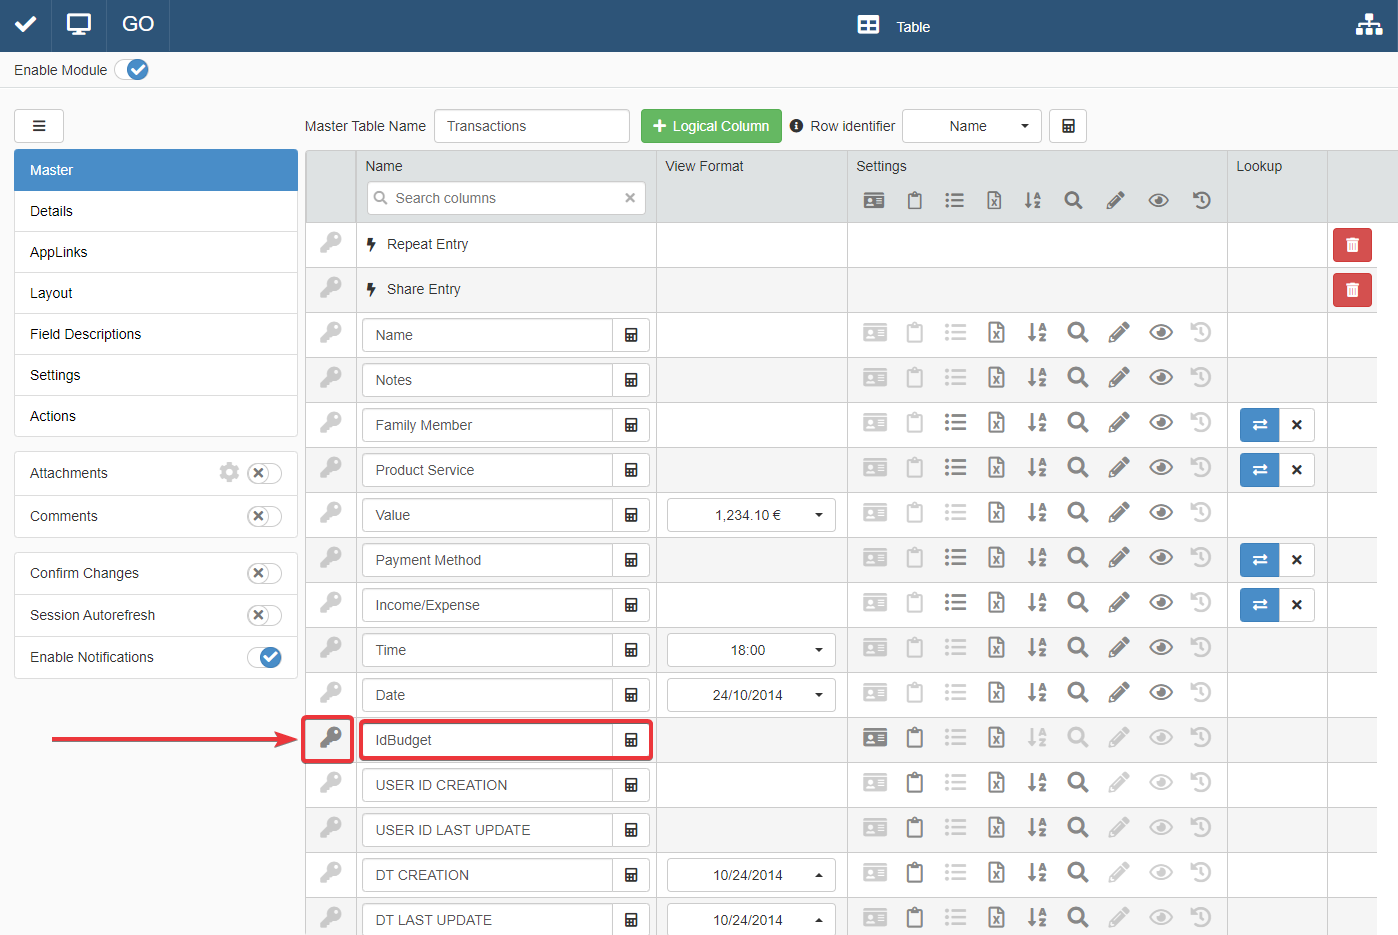
The action makes IdBudget the Primary Key: the value used to yield the link to the Family Budget's entry.
-
Save all the changes in Family Budget's Design Mode.
The new custom action enables you to copy a link to the entry on the Master table. Whoever clicks on the link, they will access the application and see the entry.
Notification to the Budget Manager about the Payments
You can set up a notification to warn the owner that a user has added a new expense to Family Budget.
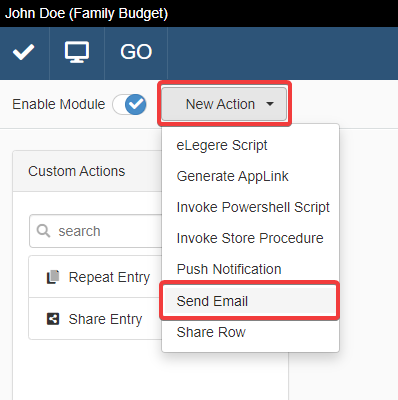
-
In Custom Actions, create a new Send Email custom action.
-
Configure the Send Email Custom Action as follows:
-
(1) Non-Manual Event: Post Row Insert.
Info
Multiple automatic triggers for the Custom Actions exist. Post Row Insert runs the Custom Action when you insert a row. There are more triggers available:
-
Pre Row Insert: Runs the Custom Action before adding a row.
-
Post Row Insert: Runs the Custom Action after adding a row.
-
Pre Row Update: Runs the Custom Action before updating a row with changes.
-
Post Row Update: Runs the Custom Action after updating a row with changes.
-
Pre Row Delete: Runs the Custom Action before deleting a row.
-
Post Row Delete: Runs the Custom Action after having deleted a row.
-
Pre Attachment Insert: Runs the Custom Action before inserting a new attachment.
-
Post Attachment Insert: Runs the Custom Action after having inserted a new attachment.
-
Pre Attachment Delete: Runs the Custom Action before deleting an attachment.
-
Post Attachment Delete: Runs the Custom Action after having deleted an attachment.
For the tutorial, remember Post Row Insert only. It represents the option you use most of the time.
-
-
(2)
elegere@vesenda.comas email server and sender address. -
(3) Insert the formula below in the To: field using the Formula Editor. The formula retrieves the email addresses of each member of
Budget Managerand sends them the email.1=GROUPUSEREMAILS("Budget Manager") -
(4) Insert the formula below in the Subject. The formula inserts the current date formatted as "Day-Month-Year Hour:Minutes" automatically when eLegere sends the email.
You must insert eLegere formulas between squared brackets (1Family Budget - New Expense Added [=FORMATDATE($CURRENTDATE; "dd-MM-yyyy hh:mm")][ ]) when you type them in either the Subject or the Body of emails. Squared brackets ([ ]) points to eLegere that the text is a formula to execute and print, not a piece of the Subject or the Body. -
(5) Insert as Body the following text:
1Someone has added a new expense to the Family Budget Application.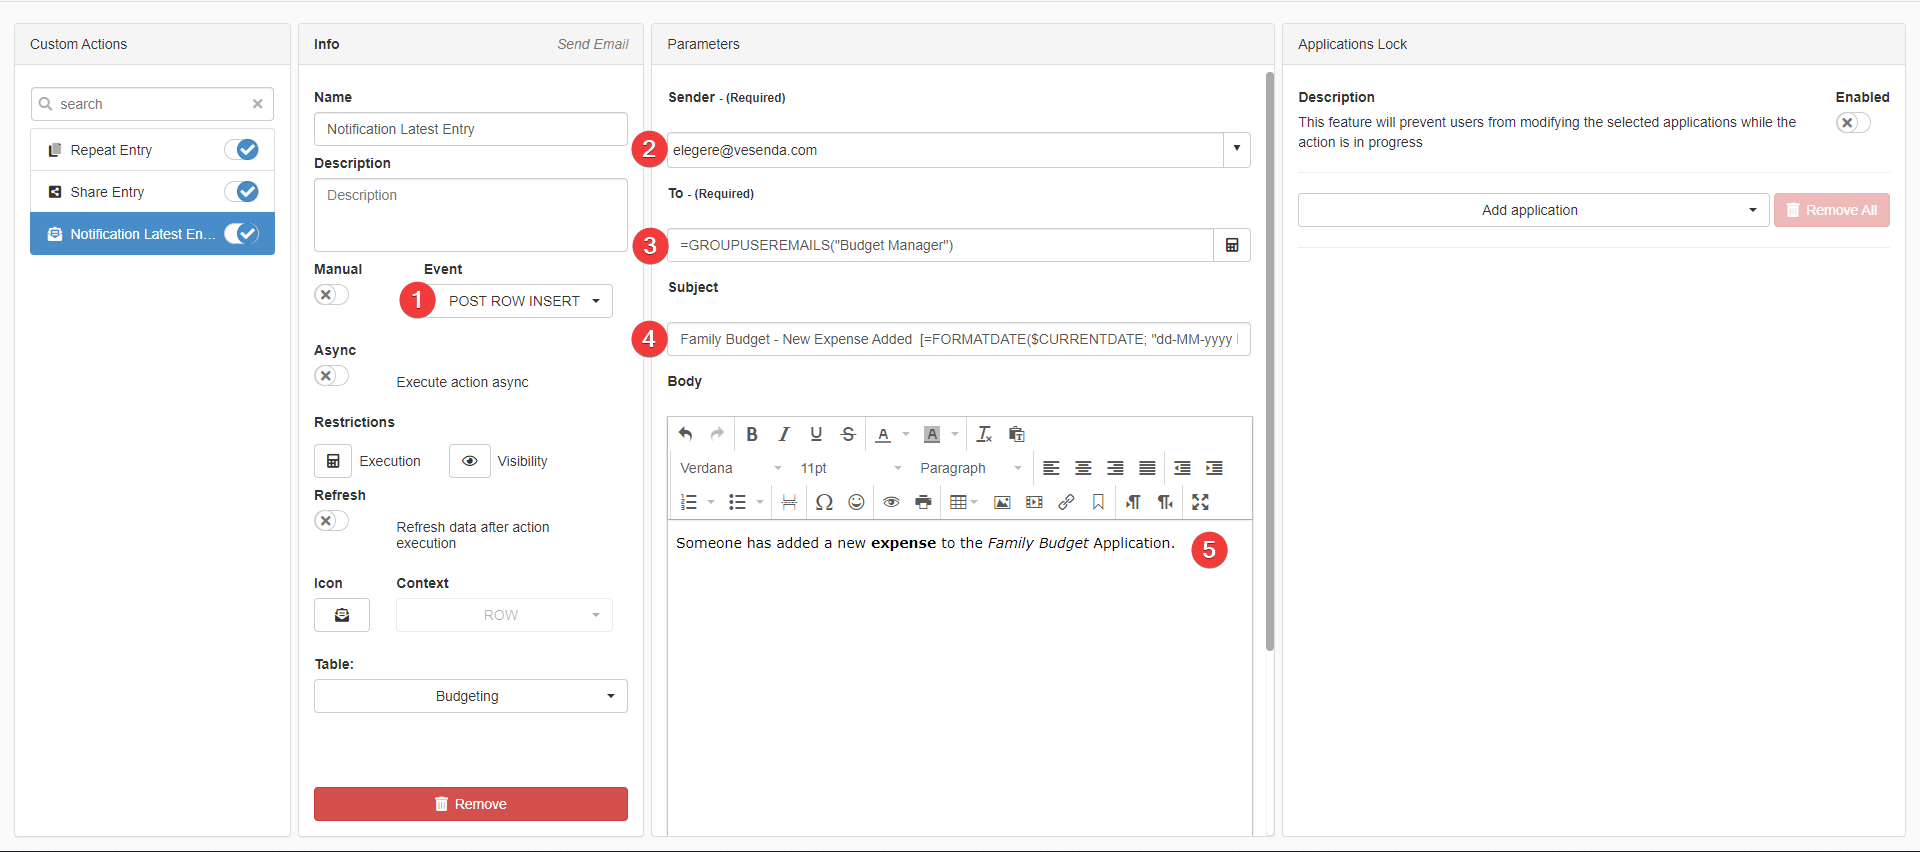
-
-
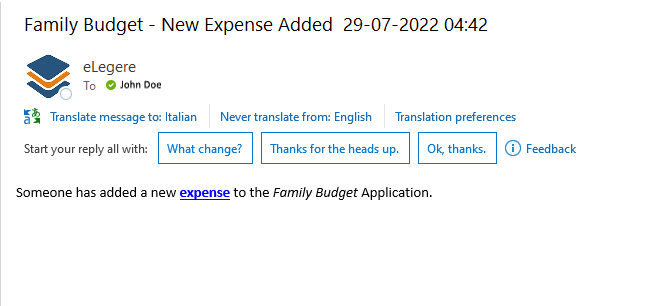
Select with the mouse "expense" in the email body. Click on Insert/Edit Link and add the following formula in the URL field:
The formula generates the link to the latest entry of1[=GENERATEROWLINK(#Transactions)]TransactionsStorage. Anyone clicking on the link will view the entry in the application.
-
Save all the changes in Family Budget Design Mode.
Every time a user adds a new expense to Family Budget, the application sends an email with the link. John Doe belongs to Budget Manager and receives an email notification with the link.
Further Study: Improve the Email Notification with more information
The notification above reports to the Budget Manager group that an user has recorded an expense. But the notification does not provide any information about neither the user nor the money amount.
You can provide such information by adding two formulas to the email's body:
- One formula to specify the user who has added the entry.
- One formula to specify the amount spent or received.
The following formula picks up the user who has recorded the entry in the application:
1 | |
The =LOOKUP() formula picks up the first value of the column satisfying the condition of the third parameter. The formula takes the first entry of the Family_Members storage which IdFamilyMember value coincides with the FamilyMemberId value in Transactions. Then the formula displays the value of the Name field of the entry.
The following formula specifies the amount recorded in the entry:
1 | |
The =LOOKUP() formula picks up the entry which Id corresponds to the entry just recorded. In addition, the =LOOKUP() is embedded in a =FORMATNUMBER() formula. =FORMATNUMBER() displays the value with two decimals and the Euro (€) symbol.
You can copy & paste or type the formulas above in the email notification's body as you see in the image below.
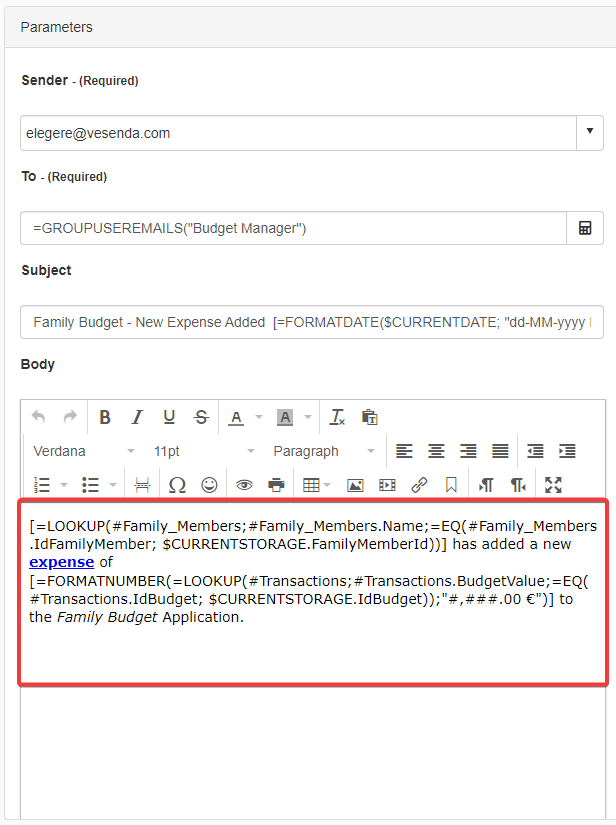
In this way, every time the Budget Manager receives the email notification, the body will specify the user and the amount besides providing the link to the row.
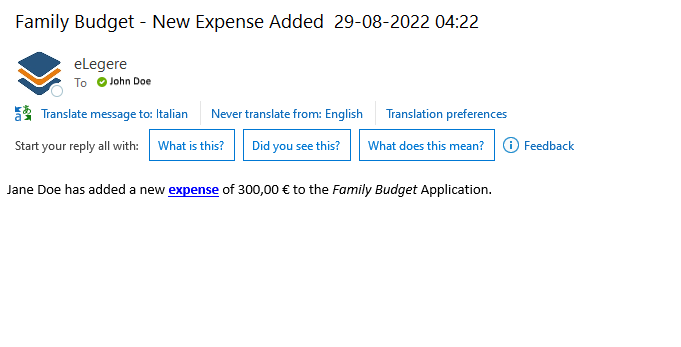
Congratulations! You have introduced new functionalities to work with other people in your applications!
Success
You have completed the Get Started! You have now proficiency with the fundamentals of eLegere. But you can learn more by checking Formulas, Advanced Features, and eLegere Script.